HOME | DD
 cmstpp — How I color, Tutorial
Published: 2009-07-01 02:13:20 +0000 UTC; Views: 6328; Favourites: 114; Downloads: 65
Redirect to original
Description
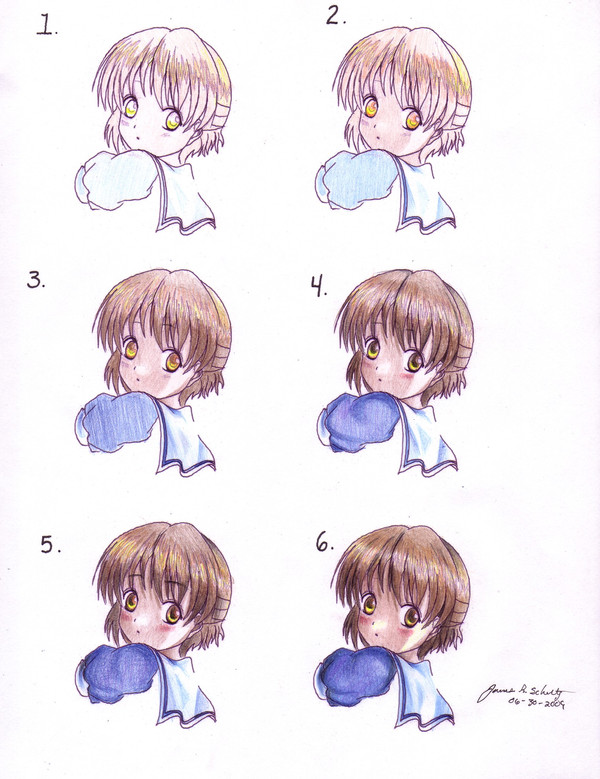
And here is the first of the coloring tutorials.. As I'm sure many more will be requested!^^ We will be working on Ushio from Clannad. Because she's so darn cute.
Here I will explain how to do this in 6 easy steps. So prepare for some reading. READ> Usually the face would be colored in first, But since this is a tutorial, everything will be shown right away.
1. Obviously you need some form of lineart.. wether it's pen or pencil. We start out with the absolute basic of colors. A rule of thumb... Lightest colors come first!! I have the highlights of the hair drawn in pencil so it's easier to see. We will color the highlights with a yellow first. And then put a even but light layer of terra cotta covering the entire surface of the hair. Eyes get a yellow spot just under the pupil. The face is colored with a peach color. And the clothing is hit with light blues just to differentiate the shaded and lit areas of the clothing.
2. On this step we start to add in a few more features. The face and neck get a light brown to show the shaded area of the face. Make sure to leave a lighter spot beside her nose. This simulates depth.The eyes get an orange added around the highlight and the bottom portion of the pupil. The hair is also hit with orange around the highlights to simulate a better flowing effect later on with the brown colors. The clothing gets a bit darker layer of blue. Shaded areas start to become more visible.
3. Now comes the brown. The hair gets a darker brown. Starting from the bottom and working your way to the bottom of the highlights. The top of her head is hit a with the same brown but a bit lighter. The face also gets hit with the darker brown.
Eyes get hit with a brown around the pupil area. The clothing is colored with a darker blue this time. And highlights around the clothing start to show up.
4. Now comes the black color. Usually the areas between the hair are darker than the rest. Also the hair in the back to the left and right also get a bit of black color. The top right hand corner of her hair also gets some black to help simulate more depth and realism. More brown is added to the top portion of her head. Make sure not to go to dark. Try and blend the orange into the brown. Use a mini eraser and start lighlty erasing away some of the color in the highlights of the hair. You want white to show through where the sunlight is directly hitting her.
Eyes now get the pupil, which is the center portion of the eye. This is done with black. And the face gets an even darker layer of brown. And start getting a little darker torward the left side of her face and get lighter as you go to the right. Add in the shadows of her hair on her forhead. Also put in a little bit of red on her cheeks. The spot is still visible around her nose. Clothing starts to take shape now that some darker areas have appeared for the shading. I've also added a very light layer of purple at this stage on her sleeve.
5. The final stage of coloring. You added the darkest of colors on this stage. Her hair gets the final touches of brown where needed. You could also added a light layer of yellow or orange in the highlights.
Her face gets the final layer of brown and those red rosey cheeks show up better in this stage. The clothing gets even darker. Also added another light layer of purple there. Now adding some black in the darkest of areas of the clothing too.
6. This is where the final touch is added. The prisma colors colorless blending pencil. Blend the colors evenly to give a nice finish. Once you have it blended you can take a mini eraser and slowly and lightly take off some of the color on the lighter areas of the sleeves. This will simulate some light hitting her clothing. Also the right side of her hair should also get the same treatment.
Hopefully this was easy to follow and you can learn it just as well as I did. If you have any questions please let me know.
Just to remind you, I still have a long ways to go. But If this helps you, please, by all means have fun with it!^^
I look forward to see who will do this!
Related content


Comments: 60


She is adorable. She's just a dream!
👍: 0 ⏩: 1

I haven't watched it yet, so don't say a word

👍: 0 ⏩: 1

i love how u color ^^
but even with this ill still fail at it o3o;;
👍: 0 ⏩: 1
You can't say that yet. You have to give it a go to know. I'm not going to lie, it does take a while to understand the basics of coloring. I certainly didn't have it stamped on my butt!^^ But I didn't give up either..
👍: 0 ⏩: 1
well, right now im okay at it but certainly not as god as you ^^
i still do try to get better but it usually looks the same as befor
i only use 3 layers of different shades of the same color for each part, and for me thats okay for now

👍: 0 ⏩: 1
Well that's fine. It just takes time. Take all the time you want!^^
👍: 0 ⏩: 0
<= Prev |