HOME | DD
 GriswaldTerrastone — Perspective Tutorial: 1VP 10
Published: 2011-06-22 20:54:56 +0000 UTC; Views: 9112; Favourites: 74; Downloads: 255
Redirect to original
Description
1VP Cube, continued...So far, we have the front and bottom of the cube. Since this was a Single Vanishing Point cube, the front was incredibly easy to do: just draw a square. It was finding that angled square that was the problem, but now you know how to do it.
Thus, drawing the entire cube is really not that difficult.
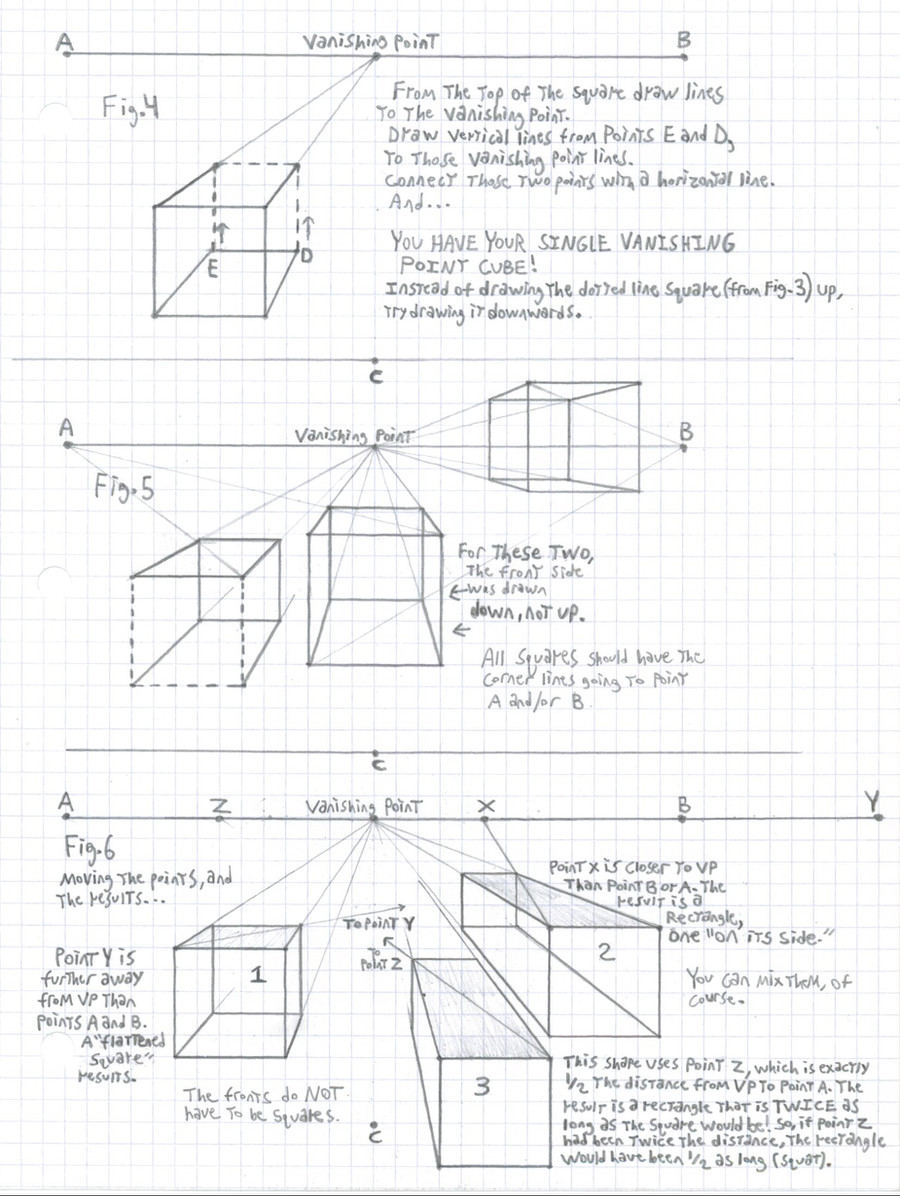
All you have to do now is connect the two top corners of the front square to the vanishing point, and then draw vertical lines from the back corners of the angled square (the bottom) as shown in Fig. 4.
Draw the little horizontal line to connect the tops of those vertical lines, so you have a back square, too.
And that's all there is to the rest of it.
Of course, that assumes you wanted a "clear" cube; if you had wanted a solid cube, all you would have had to do was draw a line up from Point D (in this case) until it touched the vanishing point line, and then draw a horizontal line to complete the top of the cube. In other words, leave out the lines you wouldn't be able to see if it had been solid.
A cube, a nice, neat cube. And it's yours to draw whenever you like. Yae!
 (Smile)")
Fig. 5 has examples of a few more cubes, including one on the horizon. To see any of these cubes above the horizon, just flip the image over. It works the same way.
Fig. 6 shows shows something very important for advancing your style: it is important to not only KNOW how to do something, but to UNDERSTAND it, too. If you know that 2+2=4, then that's quite good, but if you understand why it is 4, then you will also know that 3+4=7, too. Or that 3+1 also equals 4.
Or you can simply experiment with something- in this case, by asking:
"I drew Points A and B where I did because of how far Point C was from the Vanishing Point, right? That's how I kept getting those angled squares?"
"Yes."
"But what happens if I move, say, Point A to the left or right on the horizon and use it? Point B should still give me a square since it's in the same place, but what will Point A give me now?"
"Well, why not try it and see? You've already guessed that it won't give you a square now."
And so that's what happened here- let's move points around a bit.
For Shape 1, Point Y, which is further away from the Vanishing Point than Point B, was used, and the result was a "squat" rectangle (you can see that the line going to it is at less of an angle than a line to Point B would have been).
Shape 2 uses Point X, which is closer to the Vanishing Point than Point B. The result? A "tall" rectangle, just as you probably guessed, since this is the opposite of Shape 1.
So, moving the point that made the square results in rectangles: tall if closer to the VP, squat if further away.
Can you actually decide on what kind of a rectangle, so it is more specific than "taller of squatter?"
Absolutely, and now it's time for Shape 3.
For Shape 3, Point Z was used, and it is closer to the Vanishing Point than Point A or B so you know you'll get a tall rectangle.
BUT- in this case, Point Z was drawn EXACTLY 1/2 the distance from VP that Point A or B were...and the result is a rectangle that is exactly twice as tall as a square would be.
And there's the key to it here- if you had wanted a rectangle 1/2 as tall, Point Z would have been twice as far away as Point A or B. Three times as tall? 1/3 the distance from VP as A or B.
Now you have it, too.
In all of these cases, I drew a square for the front, but there is no reason one can't draw, say, a taller or more squat rectangle. For Shape 3, I could have drawn the front as a rectangle twice as tall as the square, so the front would have been as long as the top of the shape.
It's up to you.
(If why Point A and Point B yield squares or rectangles is still a bit confusing or difficult to visualize, this page should help:
[link] )
Thus, the Wonderful World of the Single Vanishing Point can be much more vast than before!
Previous page:
[link]
Next page:
[link]
Related content


Comments: 1

Wonderful tutorials on perspective... I suggest to collate the pages in one pdf and upload the same.
👍: 0 ⏩: 0