HOME | DD
 kayanah — How to make pies

Published: 2010-08-12 23:15:58 +0000 UTC; Views: 21620; Favourites: 270; Downloads: 169
Redirect to original
Description
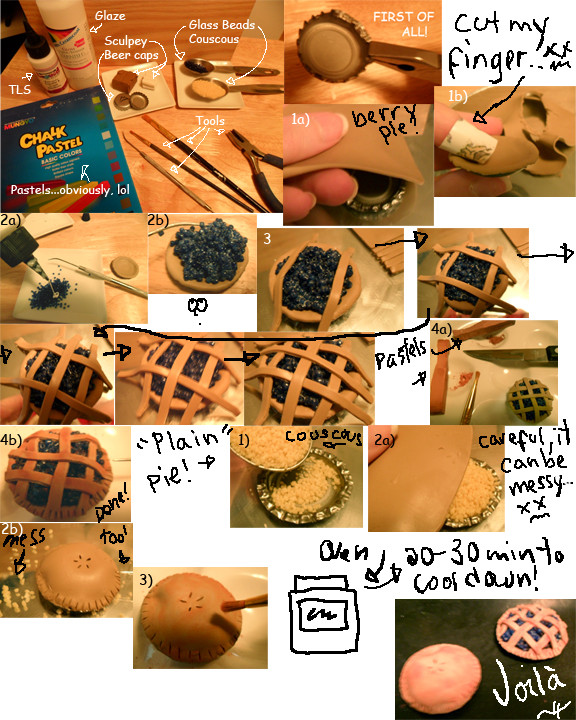
How to make pies!I was asked to make this tutorial, so I decided it was time. I will explain how to make two kinds of pies, a “plain” pie and a blueberry pie (it can be any fruit you want by the way)
You will need:
-Polymer clay (obviously, lol) Brown and white (or if you can find a nice beige color in the aisle that’s fine)
-TLS (Translucent Liquid Sculpey) or liquid Fimo (I never used that brand, simply because I never could find any where I live, but it should work the same)
-A few beer caps (depending on how many pies you want to make)
-Pliers (small if you can)
-Pastels (chalks)
-A paintbrush (for the pastel) and another one for the glaze.
-Glaze
-Something to stir (a small plate and a toothpick works fine)
Other materials, to make a berry pie:
-Glass beads (plastic beads melts a bit in the oven but it is not dramatic unless you touch them, then they tend to deform). Blue for blueberries, red for cherries, or whatever you feel like having in your pie.


To make a “plain” pie
-Couscous or scraps of clay (to fill the inside of the pie). Since we won’t see what’s in it, it doesn’t matter. Couscous works well and doesn’t grow mould.
FIRST OF ALL:
(For both pies)
Before we do anything, you will need to “modify” the beer caps. Some people who use those to make pie plates, leaves them the way they are, but I prefer my way, no offence, lol. With the pliers, bend the edge toward the exterior, be careful not to cut yourself. It isn’t too hard, just make sure not to go too far.
STEP #1
FOR THE BLUBERRY (or whatever berry or fruit) PIE:
a) Roll out a piece of clay (it has to be a nice beige color), not too think, and put it in your brand new pie plate. Make sure it sticks to the bottom, if you’re not sure you can add a drop of TLS, but it is not necessary.
b) Remove the excess of clay on the edges as shown on the picture.
STEP #2
a) In a small plate, put a small amount of beads or whatever you need to fill up the pie with, lol. Then add some TLS or Liquid Fimo. Mix them with a toothpick or whatever tool you want to use. Personally I prefer using dentist tools. You can find those in art supply stores or drug stores sometimes. Just make sure that all the beads has some TLS on it.
Why doing this? Simple, so the beads stick together during the baking process!


 Otherwise they will fall out the pie and then you’ll have beads everywhere…no fun. lol
b) Put the mélange into your pie plate.
STEP #3
A tricky part! Roll out some more clay the same color at the bottom of the pie, then cut even slices, but careful not to make them too large, or you won’t be able to see the inside of the pie. I will show you the not-so-complicated version on the assembling of the slices. You put two slices on the extremities, them you put two on the other side, again at the extremities. You change side once more, put one in the middle, them you turn it one last time and put the last one in the middle. I hope the pictures are clearer than my poor attempt at explaining the process with words, lol. Just follow the steps as show on the picture and you should not have any problem. Remove the excess.


STEP #4
a) Scrape (or rather, gently “shave”) some brown pastel into a plate or small cup or whatever. With the paintbrush, gently dab some of the powder you’ve made onto the edges of the pie, so it looks baked. You do the slices as well. You can use a darker color for the most exposed part, to look as though these parts baked more.
b) With a tool (toothpick or a large needle) make small indentations on the edge, to make it look more like a real pie.
STEP #5
It’s time to put your piece of art in the oven, follow the indications on the pack of the brand of polymer clay you uses.
STEP #6
Once it is out of the oven, wait for 20-30 minutes for it to cool down, then you can glaze it.


 The berry pie is done!
STEP #1
FOR THE “PLAIN” PIE:
Take your previously prepared beer cap and fill it with couscous or scraps of polymer clay. The color isn’t important, since we’re not going to see it. To look good, you need to fill the pie plate with as much as it can contain. See the picture to get my meaning, lol.
If you don’t want to “hear” the couscous after it is baked, then add some TLS or Liquid Fimo to it before you continue. It will make the small “seeds” stick together in the baking process.
STEP #2
a) Roll out a piece of beige clay and carefully put it on top of the pie plate (as you may have noticed, you do not need a bottom to the pie, unless you want to cut a piece, but that will be for another tutorial eventually). Remove the excess.
b) With a tool (toothpick or a large needle) make small indentations on the edge, to make it look more like a real pie. On top, pierce small holes in the shape you want, as you would a real pie, to let the steam out.


STEP #3
Scrape (or rather, gently “shave”) some brown pastel into a plate or small cup or whatever. With the paintbrush, gently dab some of the powder you’ve made onto the edges of the pie, so it looks baked. You can use a darker color for the most exposed part, to look as though these parts baked more.
STEP #4
It’s time to put your piece of art in the oven, follow the indications on the pack of the brand of polymer clay you uses.
STEP #5
Once it is out of the oven, wait for 20-30 minutes for it to cool down, then you can glaze it.


 You have a pie!
 I hope you found these two for the price of one tutorials useful. I truly hope you will send me your comments about it and if you that it, I hope you will show me.


Have fun!
Related content
Comments: 74

If you scroll down you have all the directions for the tutorial. 

And it was my pleasure! 
👍: 0 ⏩: 1

Oh. I see. 

Glad you're having fun. ^^
👍: 0 ⏩: 1

Hey there! Thanks for your tip! I would love to try this, but unfortunately there is no TLS or liquid FIMO here in Germany...
👍: 0 ⏩: 2

stimmt nicht 
👍: 0 ⏩: 1

hallo! 
👍: 0 ⏩: 1

hm nein, so im laden hab ich auch noch keins gefunden. ich hab aber die erfahrung gemacht dass solche spezialsachen wie fimo im internet trotz porto immernoch viel billiger sind als im laden (ganz zu schweigen von der auswahl). im baumarkt kostet ein paeckchen fimo z.b. 2,50, bei ebay 1,50...
👍: 0 ⏩: 0

There's another way then, less efficient, but still something anyone can do as long as you have glaze.
You do the steps of my tutorial up to 1b, then you add the glass beads without TLS or liquid fimo, then you carefully go on with Steps 3 and on, careful not to let the beads come out.
Once it is baked, you add loads of glaze. It should keep the beads in place once the glaze has dried!
👍: 0 ⏩: 2

i found out yet another way to make tls yourself. i tried it with water, but that takes a looong time and hurts your arms 
👍: 0 ⏩: 1

Cool! I'll give that a try someday! 
👍: 0 ⏩: 0

I suppose I'll be able to do that, thanks a lot!
👍: 0 ⏩: 1

My pleasure! 
👍: 0 ⏩: 0

Aw you made a tutorial! 


Great work!
👍: 0 ⏩: 0

I love the berry filled pie. It definitely looks real!
👍: 0 ⏩: 1

Can't wait to see. 
👍: 0 ⏩: 1

perhaps...T.T pray for a better camera...mine is broke down with the LCD...i'll ask some friend to borrow their cam...hehe
👍: 0 ⏩: 1

I so understand your problem... I have to borrow my sister's camera all the time because I no longer have one (mine just decided to eat the batteries I had, even brand new ones, and then stopped working altogether) :s
👍: 0 ⏩: 1

wew...we're just same
did you brought it to service center??
👍: 0 ⏩: 1

Nope, since I no longer have a guarantee... Olympus cameras all tends to do that, I hear. sucks
👍: 0 ⏩: 1

well....so do i....the service payment is equal with the prize of the camera itself...so it's sunk too
👍: 0 ⏩: 0
<= Prev |


