HOME | DD
 navate —
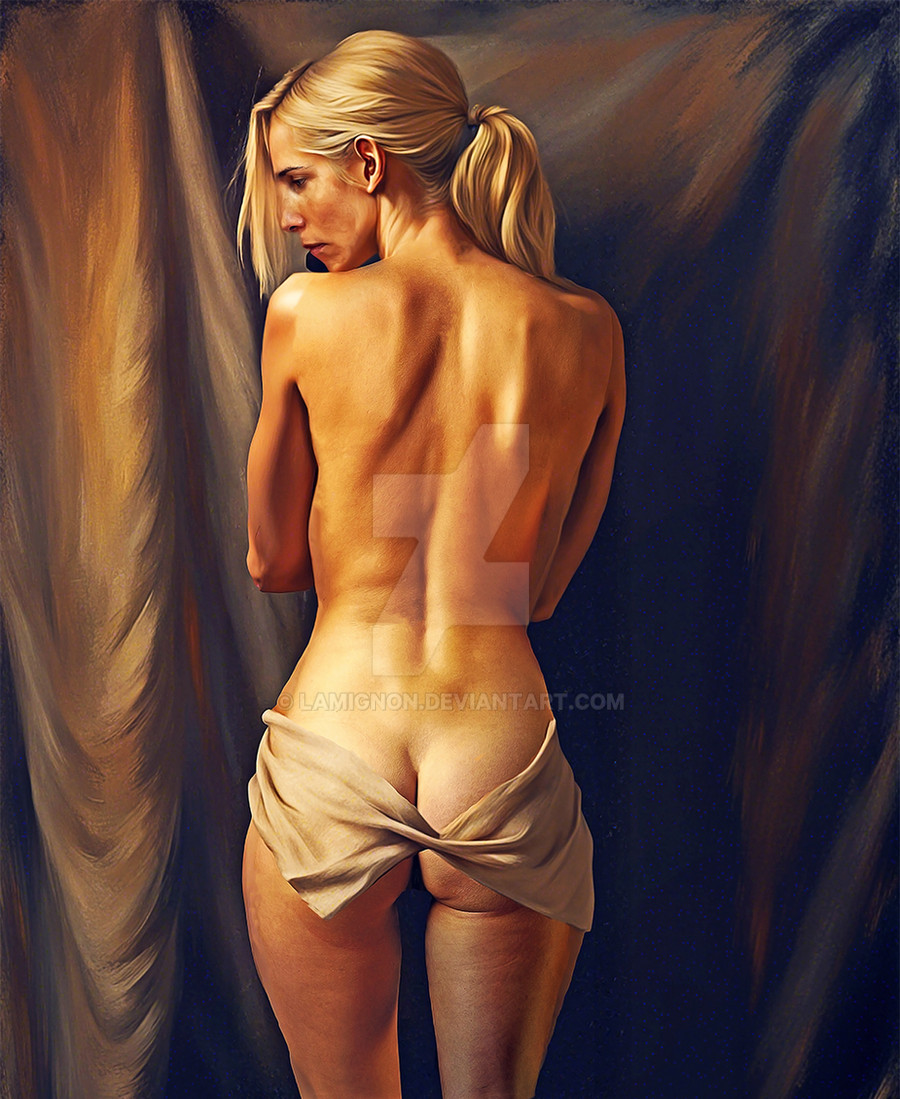
SKIN: a tutorial - Part 1
navate —
SKIN: a tutorial - Part 1

Published: 2009-11-21 15:24:08 +0000 UTC; Views: 579419; Favourites: 16740; Downloads: 18309
Redirect to original
Description
UPDATE 7/31/2011: I've uploaded a slightly revised version. Content is still the same. (Smile)")
_
This tutorial is very extensive and will be published in (at least) four parts.
 IN THIS SECTION:
 Skin basics: A simple but in-depth look that expands beyond the usual shadow-midtone-highlight formula, and how to use each tonal range most effectively.

 SECTION II: Skin tones. how to apply the basic formula to light, medium, dark, and fantasy skin tones.
COMING SOON:
 SECTION III: Background color and ambient light. How surrounding colors affect skin. SECTION IV: Building a skin tone, blending and texturing. The technical section showing how to paint skin start to finish.
__
This tutorial uses mostly digital work as examples, but the theory behind it should apply to ALL mediums. But of course it goes without saying that this is hardly the end-all-be-all of skin painting tutorials. Just my way of thinking about it.
I tried to make this accessible for artists of all skill levels. Intermediate artists will probably benefit the most. Beginners will probably find some of the principles discussed difficult to put into practice. But don’t be frustrated! The only “secret” to being a good painter is practice.
 And hopefully even advanced painters will be able to glean something useful.
 Also-- this should go without saying, but I will say it anyway: the ONLY WAY to learn how to paint/draw anything well, let alone realistically, is to STUDY COLOR THEORY AND FORM. All the stuff I blather on about in this tutorial is meaningless unless you take the initiative to learn the fundamentals of color and figure drawing.
Color theory resources can be found HERE .Please, any questions, concerns, criticisms, etc: comment below.
Thanks so much for the DD!
follow me:
Instagram :: Tumblr :: Facebook :: Twitter :: Prints & Originals Store
Related content


Comments: 734

thanks for making this!!

👍: 0 ⏩: 1

You're welcome! Next section goes live next weekend.
")
👍: 0 ⏩: 0

One of the better tutorials and paintings of skin I've seen. Seems very helpful! Looks like I'll be learning a few things from this.
👍: 0 ⏩: 1

Thank you so much for this tutorial.
I usually use unsaturated colors for my shadows so I was skeptical about that part at first... Until I tested it on one of my current WIPs and saw how it made the other colors pop so wonderfully.
👍: 0 ⏩: 1
It really does make a difference.
👍: 0 ⏩: 0

That was absolutely helpful. THANK YOU.
👍: 0 ⏩: 1


The best one I've read so far. Thank you! This was VERY insightful!
👍: 0 ⏩: 1
Thanks very much, glad you like it!
👍: 0 ⏩: 0

Thank you so very much for writing this tutorial. It is amazingly concise!
👍: 0 ⏩: 1
Oh good, haha; I always worry I prattle on too much. ")
👍: 0 ⏩: 1
I sort of used your tutorial here, [link] Any fault in not comprehending your tutorial is mine for not processing it completely and diving headlong into it. I had love to have any critique you might have if you have the time to spare? Thank you!
👍: 0 ⏩: 1
Big improvement! You're still using too few colors. Overall her skin is very yellow and the shadows are too black/gray. Try using some (dull) pinks in the mid-tones as well; this will balance the yellow some. For the shadows, add some color! I won't be discussing how to choose shadow tones until section III, but the short version is that you want lots of colors, some of those colors coming from your background. Try mixing in the blue of your background (not too heavily though) and the red of her bottom lip. Make sure your shadows are SATURATED as well as darker in value.
Your highlights are a bit too bright on her face atm. This is easily fixed--just take the mid-tones and lightly blend over a bit to take it down a notch.
Hope that helped.
(It's a great image by the way, hope you finish it!)
👍: 0 ⏩: 1
Thank you so very much for your thoughtful and lengthy critique!
I shall endeavour to correct my mistakes and shall eagerly await your next tutorials :"D I hope you will also be doing a tutorial on judging colour tones for different ethnicities That would be most helpful too! :"D
Thank you once again!
👍: 0 ⏩: 1
Ooh, yeah, the whole next section is devoted to different skin tones (the full range--I cover three each of light, medium, and dark).
Glad to help!
👍: 0 ⏩: 0

This is fantastic. Thank you so much. Skin is such a hard thing to get right. I really appreciate this. I can't wait to see the rest of the tutorials.
👍: 0 ⏩: 1

Awesome tutorial! So many good tips. OwO
👍: 0 ⏩: 1
Question: Do you use color references? Or do you do it all by yourself? I tend to use a photo and take color samples from it.
👍: 0 ⏩: 1
I will use color references, but I don’t recommend color picking from photos. Not only is to good to be able to choose colors on your own (I work traditionally too, so being reliant on color samples is a handicap I cannot have) but a lot of photos don’t have good “color integrity” due to poor lighting or post-production. And the colors a camera records is not always what works best in a painting.
But most of all, it’s important to understand that in a painting, the colors you see are probably not the colors that were used. It’s like the warmth colors I discuss in the tutorial: a bright orange brushed on top of a mid-tone will produce a great effect. If you tried to sample the RESULTING color, instead of blending the orange yourself, you will not get the same result. The swatch will look like a flat midtone. Color works best in layers.
Try copying color from photographs without color sampling. This will help train your eyes to understand what colors work where.
The next two sections will talk about HOW to choose colors that work well, and why they work. Stay tuned...
👍: 0 ⏩: 1
Wow, that was more in depth that I expected to get! Thank you.
I'll stay tuned then. ^^
👍: 0 ⏩: 0


Haven't gotten the chance to go through it yet, but this is grand! just in time for my lazying-out of no colouring!
Thanks a bunch!!
👍: 0 ⏩: 1
Still lazy-n-rusty... but that's the first shot!
[link]
Had to give you some major props since you helped a bunch!
👍: 0 ⏩: 1
Hahaha, I love her face.
Skin wise, good start.
Keep going!

👍: 0 ⏩: 1
Will do! Thx a lot for the constructive C n'C I really appreciate it!
👍: 0 ⏩: 0

This is an amazing tutorial. Thank you so much for sharing your techniques.
I've been searching for someone/something that explains how to get the translucent appearance of skin and this is wonderful and does just that.
👍: 0 ⏩: 1
You're welcome! I will talk more about application/painting technique in Section 4.
👍: 0 ⏩: 0

Thank you so much for the amazing tutorial! I've been hoping for one of these from you.(I'm always looking forward to read some tips from you in Imaginefx by the way, great job you're doing.)
👍: 0 ⏩: 1
Aw, thanks! I do love writing for IFX but I thought it was high time I did something more in-depth, without the burden of word-counts and layout requirements.
👍: 0 ⏩: 0

Great tutorial! I await your following courses.

👍: 0 ⏩: 1

Yes! I was waiting for you to do one of these! Thanks!
👍: 0 ⏩: 1

Wonderful reference. I've always admired the way you paint skin, and this is a good way to see, at least a bit, how do you work to achieve it.
👍: 0 ⏩: 2
You'll see more as the rest of the section get posted, I promise! This is just the intro.
👍: 0 ⏩: 0
And I forgot to say the most important thing:
Thank you!
👍: 0 ⏩: 0

Thank you for sharing this! I've looked at a number of other tutorials, but none of them explain shading and highlights in a way that makes sense. That's what I appreciate the most about your tutorial; you don't assume that we know what we're doing. We wouldn't be reading a tutorial if we did!
👍: 0 ⏩: 1
I am glad I've hit the right note!
That is something that bothers me about a lot of tutorials I've seen too. Even when they give great advice, they don't explain it in a clear fashion so unless you already sort of know what you're doing, you can't get much out of it. This is a complicated subject so I am trying to work from the ground up and not leave anyone, or anything, out.
👍: 0 ⏩: 1
<= Prev | | Next =>