HOME | DD
 Soynuts — Simple Mold Making and Casting Tutorial
Published: 2013-02-01 23:01:39 +0000 UTC; Views: 13877; Favourites: 225; Downloads: 72
Redirect to original
Description
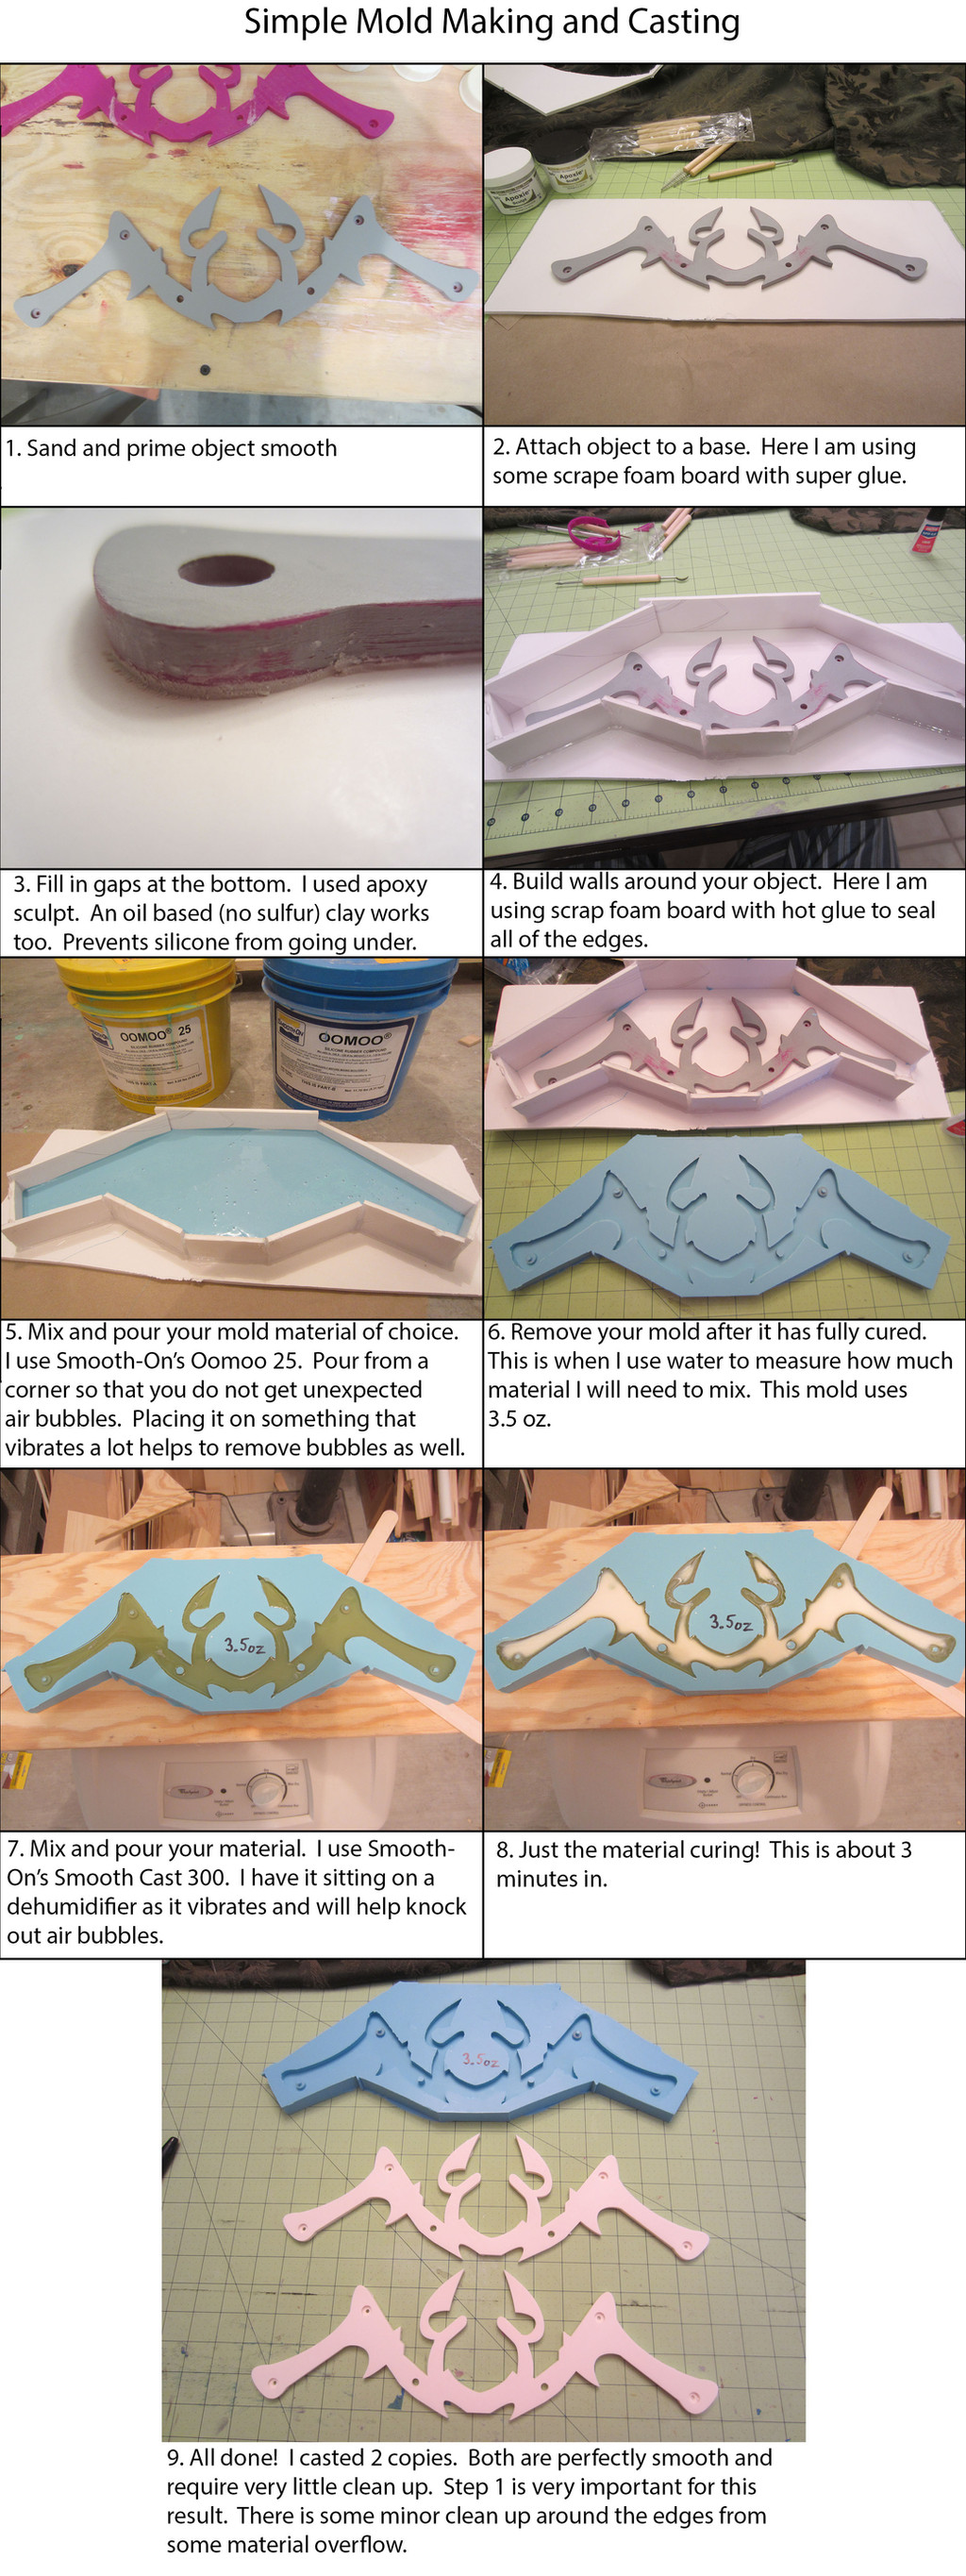
I decided to write up a quick tutorial on how I make molds and cast objects from them.I use Smooth-On products, but there shouldn't be any problem with using any other product. Just be sure to follow the instructions on the product of your choice.
If you have any questions, just ask!
Related content


Comments: 15

This is the most straightforward tutorial I have seen thus far. Thank you! I love learning about this stuff and I am getting ready to try some of it this summer ^___^ I actually do have some questions if you would not mind answering them. From looking through your gallery, I see that you have built a lot things out of insulation foam and styrene. Then you say you sand, fill in holes, and prime... and then you can pour a mold? What sorts of materials are you referring to when you are preparing an object for casting? I'm building Sailor Moon's Cutie Moon Rod.
www.facebook.com/NoJuCosplay/
👍: 0 ⏩: 1

Well, better late than never.
For object preparation it involves bondo for filling in large holes/gaps then sanding smooth. For smaller pin size holes, I use bondo glazing and spot putty. Sand that down smooth. I start with about 100 grit sanding to get most of the bondo and rough spots gone. Then I sand with 220 grit sand paper to make it smooth to the touch. I then spray paint it with primer. I then wet sand with 1000 grit sand paper to make it extra smooth. At this point, you can have confidence that what you are about to mold is as perfect as can be.
I'm more than happy to answer more questions. I respond far faster on my facebook page: www.facebook.com/SoynutsProps
👍: 0 ⏩: 0

")


That's funny, I use my dehumidifier that way too! Something in the compressor mounts is off, so it vibrates more than it should, and I stuck a penny under one of the wheels to make it shake even more. I have to tape mold boxes to it, or they end up spilled all over the floor.
")
👍: 0 ⏩: 1
haha ya, mine vibrates more than it should too. I've been considering building a degassing chamber to completely remove all bubbles from the silicone.
👍: 0 ⏩: 1
I use PMC 121/30 and pressure cast everything. I think it's cheaper to set up a pressure casting setup than a vacuum degassing setup. I'm running Harbor Freight hardware and getting crystal clear resin casting and bubble free urethane molds. Good luck trying to get an 18" inch mold in either a degassing chamber or pressure pot, though. :/
My setup: [link]
👍: 0 ⏩: 1
That was a good video. I can see how a pressure system would be cheaper, especially since I already have a 2hp 8gal air compressor. Though I should probably get some slower curing smoothcast since the 320 have has far too fast of a kick for me to get it into a compressor.
I'll def need to go to my local harbor freight and get me some parts though.
👍: 0 ⏩: 1
If you already own the air compressor, the pressure paint pot is the most expensive part. It's worth it for the kind of casting quality you can get.
👍: 0 ⏩: 1
Sounds and looks like it's worth it. It always annoys me having small tiny holes in my cast that I have to fill with bondo putty.
👍: 0 ⏩: 1
The other nice thing is that I almost never get air bubbles due to undercuts. You still have to have air holes and design your molds in a way that minimizes trapped air, but I can do small pieces that would normally have trapped air bubbles, even if you used baby powder and a vibrating table. The pressure casting just seems to work a lot better for forcing air out.
👍: 0 ⏩: 0


This is a lot easier than the way my one teacher explained it. XD
👍: 0 ⏩: 1
Glad it was easy to understand!
When I do a 2 part mold (which should be this month) I'll be making another graphic like this.
👍: 0 ⏩: 0