HOME | DD
 tower015 — How To Guide - Trevor Style
Published: 2009-08-15 03:22:26 +0000 UTC; Views: 1591; Favourites: 10; Downloads: 111
Redirect to original
Description
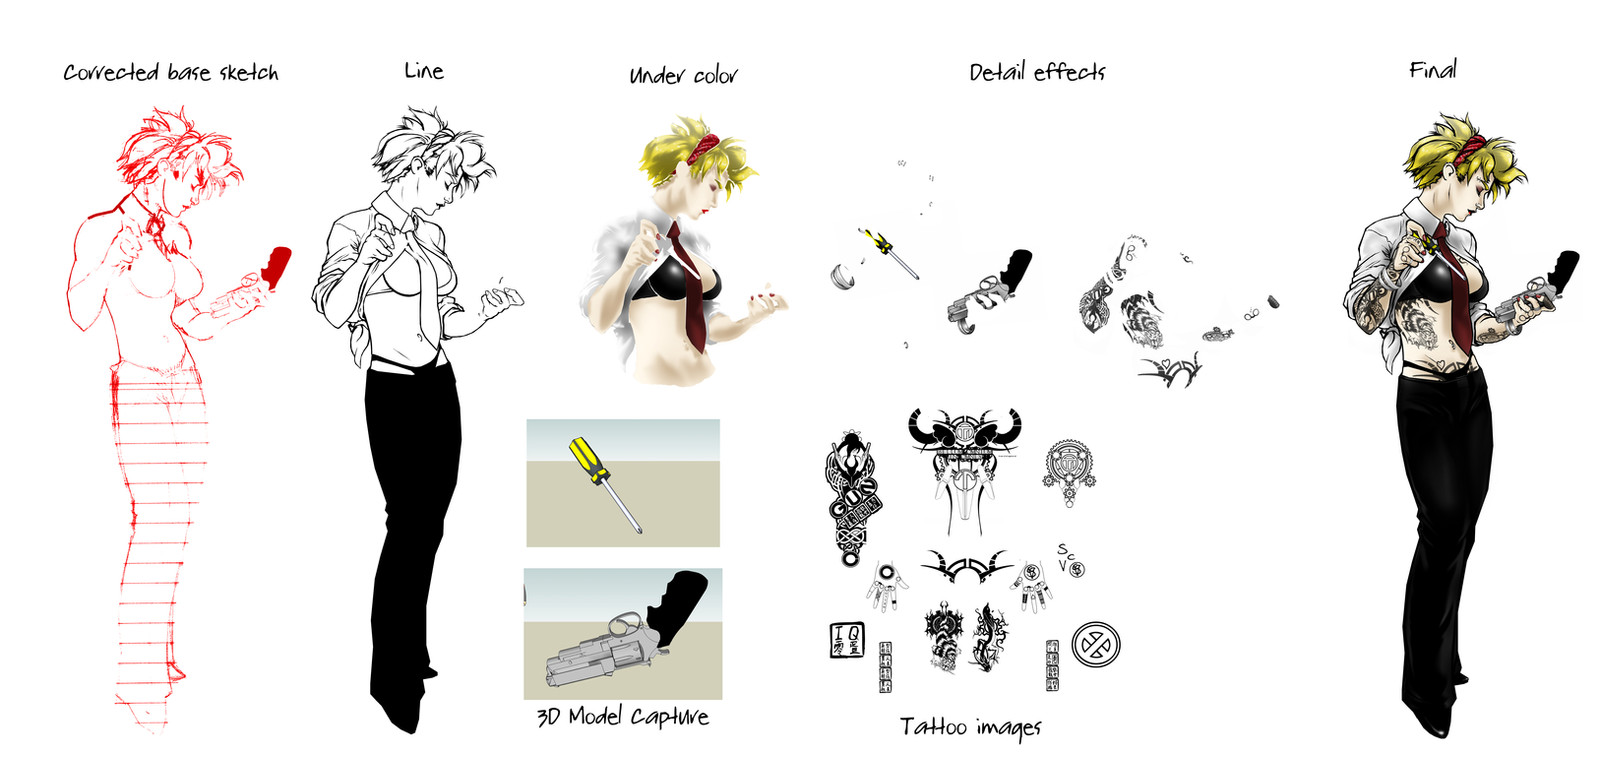
Simply because some level of interest was generate in how I created the main image, I broke apart the PSD file to show the layers and I felt I should take some time to explain how I did it.As you look at the image included with this post, left to right is the intial scan I did of my sketch, cleaned up and using the line tool I corrected a couple of lines and bent them until I felt the image was exactly what I wanted. Normally when I scan I use about a 200 DPI resolution for the scan, and when I go to work on the finalized version, I will up it to 300- 400 DPI, so that when I resize the image down, it'll be much crisper and the level of detail stays relatively preserved. Additionally, working in a big format is much easier to work details into the image.
Next to that is the completed black line layer. This layer hovers on top of the next image piece, the color layer. This half torso color blob is actually multiple layers before being completed. Every section that is colored has its own base layer, with a highlight and shadow layer. Once every section is completed and shaded independantly (while working underneath the line layer), I compress the color layers into one.
Next are the detail effects. Things like the rings, the screwdriver and the gun were rendered in Google Sketchup, and then using Print screen, directly imported into photoshop and tweaked just slightly, then trimmed to fit around the line layer. These items need thier own shadow and highlight layer which gets compressed and that completes the layer.
Now for the tattoos, or logos that I might use, it requires using a black and white image, and use of the "Transform Tool" to align the images with the correct contour of the intended form. Doing this makes the image map fit to the depth of the object, but also allows for a direct reference to the shadows and highlights, allowing you to make yet another pair of highlight and shadow layers.
Once you touch everything up, and make it as you want, you can compress all the elements into one and voila, your image is done. As I said, I resize the image as I am finished, and what I normally do is use my zoom tool to find a percentage that looks best and then use the Image Size function and resize it to the percentage I liked.
Related content


Comments: 3

lol, we actually use some of the same techniques when coloring (although sometimes its hard for me to keep them all straight). I use a base layer and then add shadows and highlights, using a different layer for each shade or highlight. It seems like a very effective way of coloring. Plus if I mess up or for get something I can always go back to that layer and make sure that I'm using the same color again. lol
👍: 0 ⏩: 0

You REALLY like the first Terminator movie, don't you?
👍: 0 ⏩: 0
