HOME | DD
 agirlnamedshemus — cullen crest tutorial
Published: 2008-10-12 04:17:41 +0000 UTC; Views: 60633; Favourites: 313; Downloads: 9909
Redirect to original
Description
may/24/09 edit - ARTISTS NOTICE: i have had several requests for better detailed instructions and pictures with reguard to creating the frame around the crest itself. partially in response to that, and partially because i've almost got my act together, i will be shortly posting my tutorial of the cullen boys crest bracelet i created, which will have a better explination of the steps taken to create the frame (although the frame is slightly different, the steps were all still the same) and attaching it to the fimo part of the crest! i wil have that up as soon as it is done, and i'll pop the link in here so it will be easy to find. thank you for taking the time to look at these tuts again by the way! i sincerely hope they are a help! (Smile)")
(ORIGINAL TEXT)
not sure if this actually counts as a tutorial or not...? *shrugs* ah well.. here goes
short version: my cullen crest project.
i made this one back when they first started talking about the crest, and i have to get back to it because i want to do a better job with the next one
")
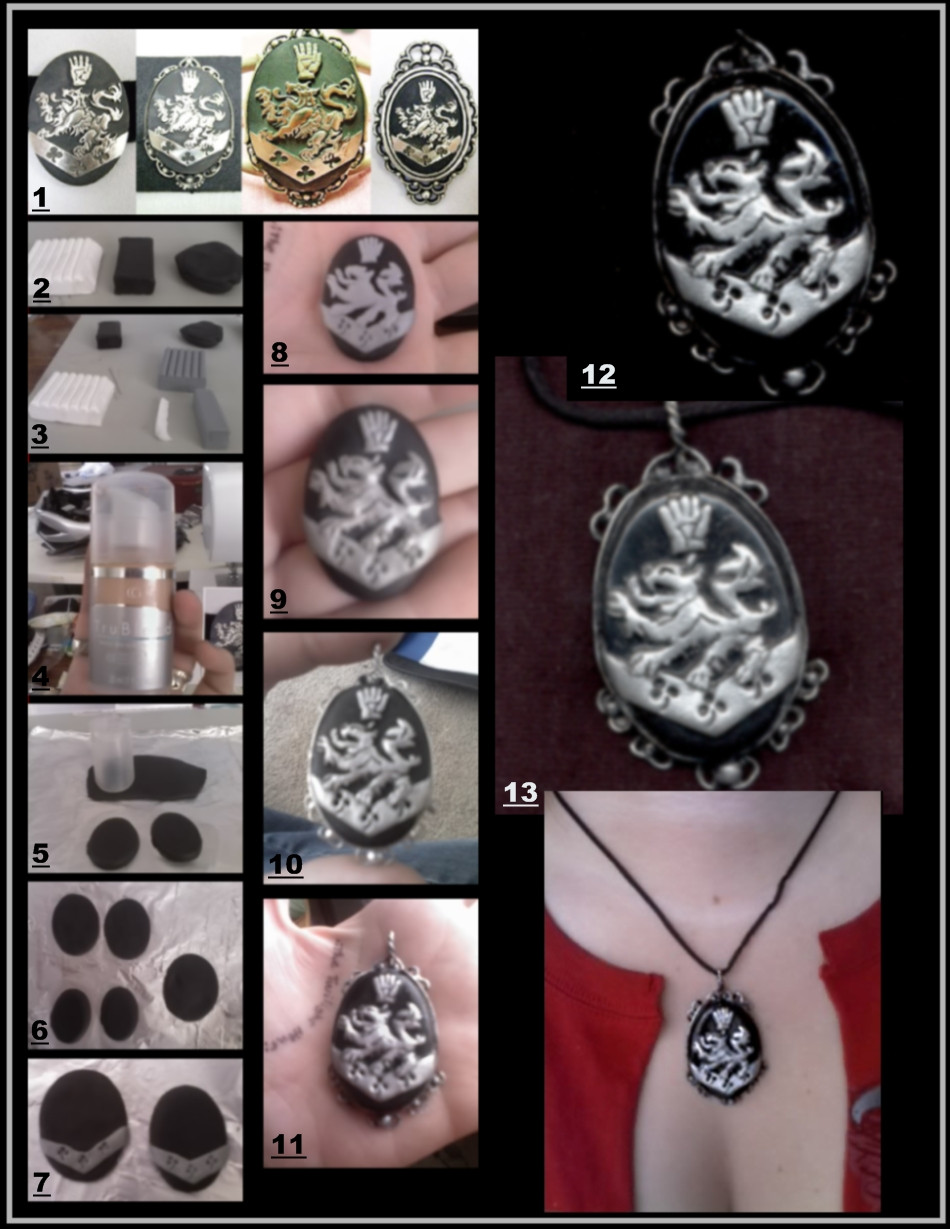
i made the set of numbered pics on the left as a guide for me to hep me remember the order i did things in, and then got a suggestion from my enormously gifted roomie to put it up here to see if it could help others.
ingredients:
-black, white, and silver fimo.
-exacto knife
-something oval to cut the shapes (roomies make-up lid worked REAlly well)
-sewing pins (for details and clovers)
-silver wire (just coated, real silver not necessary)
-silver beads (plastic, a dime a billion)
-black craft paint (water based, for antiquing)
-silver chrome nail polish (adds a bit of shine)
-clear nail polish (keeps everything pretty and shiny)
-and, of course, super glue!
i'm pretty pleased with the end result, it just needs a little tweeking. (*wrinkles nose* that lion is a bit deflickted)
ok, believe it or not, that was the short version. here's the long one
if you use this process to make your own cullen crest and have any questions, please feel free to drop me a line and i'll be glad to help anyway i can!
ok, ingredients above.
1) model pictures that i kept in front of me the whole time!
2-3) these were to remind me how much i used of what, and mixes. like in 3, that small sliver of white i mixed with the smaller chunk of silver to lighten it a bit, and the color came out exactly what i was looking for! lucky.
4-5) my roommates "covergirl tru blend" lid was perfect for making the oval shape. the size was perfect, and, as it was/is airtight, the ovals pop right back out after you cut them, like cookies and a cookie cutter.
6) by cutting out thicker ovals and then smooshing them slightly, i got a few different sizes, as rosalie's version is obviously much larger then alice's, the boys, and/or esme and carlisle's rings.
NOTE: don't forget that if you cook your fimo pieces in a pan that it can never again be used for food, as fimo releases some blah blah gas that will not come out of the metal except when heated and will make your food yucky. cook it on aluminum foil on a cookie sheet, or even better, invest in one of those little cheesey pie tins. very much worth the dollar something they cost
7) add the banner next and bake again. it's won't hurt the first layer, honest. use the ball of the pin for the clover leaves, and the sharp end for the tails of the clover. and DON't have them going the wrong direction like mine! *lol*
8) next goes the lion and the hand. don't forget to use the sharp end of the pin, or the exacto knife to add any details before you bake it, because when you antique it, the black paint will settle in any and every little cut, carve, or detail you put.
yay! all your baking is done! now comes paint.
9) put a few drops of the black paint on a plat or sommat, and dip your finger in it. spread the paint all over the crest, careful to get it in all the details. smooth it carefully with your finger, and then when you are sure you've gotten everything saturated, carefully start wiping it off with a paper towel or a piece of cotton. you obviously want it in all the deep places, while the higher places stay paint free and light grey.
10) once everything is VERY dry, start working with the wire and the little beads. my favorite frame was the one that is around the crests that jasper, emmett, and edward wear. this is where the superglue comes in handy! just experiment,and make sure you like it before you glue it! antique the beads and wire just like you did the crest itself.
11) last step. CAREFULLY dab your finger on the chrome silver nail polish and then CAREFULLY dab it on the very highest places on the banner, lion, and hand. you can also dab a teensy bit on the wire and beads if you want them to shine a little more to. once again, let everything dry Thoroughly! then CAREFULLY coat everything in two very light coats of clear nail polish. front, back, cracks, crevices, everything. that will seal all the colors and antiquing in, plus, fimo is very porous and can get very dirty very easily if not sealed.
12-13) a sharper scan and softer scan, if that helps you at all.
then Duh Nuh!! Wear it!
and try not to have your wearing it tell everybody that they can grab at you, which, for some reason, cool jewelry seems to do
enjoy!
Related content


Comments: 55


I have earrings that I got for Christmas that have the crest on them!
👍: 0 ⏩: 0


Must try this out (It looks like a great present to twilight fans xD)
👍: 0 ⏩: 0


AMAZING! But I don't have the mad enough skills to make this...

👍: 0 ⏩: 1

whatever spork! it is not so hard as people think! thats why i put it into a tut.. it is way fun. seriously
👍: 0 ⏩: 1
Yet I lack patience...

👍: 0 ⏩: 1

o.o I don't know that you can make jewelry without breaking from FIMO or clay-like or some sort, lol.
thanks, I got new info.
o.o do you have a tutorial about metal jewelry instead???
Because if I go to college about jewelry...I think it'll waste a lot of time in the theory, lol.
👍: 0 ⏩: 1
keeping fimo strong in the jewelry that you make takes some expierimenting in support options, at least it has for me.. it also totally depends on what you are doing/making with it, of course
i actually started putting together a few more tuts on things like working with wire and other sorts of jewelry making, i just havn;t got them finished enough yet. i've also started expirementing with metal working, and will be starting a class in sterling silver jewelry making soon as well, which am hoping will help to just load all the suggestions and hints i can possibly find, and put them into info sheets and get them out to as many as can use them! if people can actually learn something from my mistakes, which i am happy to make, why not?
👍: 0 ⏩: 1
*nod, nod* cool....
*grin* good for you.
I'm like that too, in my public speaking class. I always want to go first and get it over with, and people learn from my mistakes, lmao.
👍: 0 ⏩: 1
*grin* what is WRONG with us that we have to be the ones tromping off into the middle of the not yet known to get it over with, make the messes, and then leave behind our marks so everybody else can learn from our massive failures?! *lol* we're so weird.
👍: 0 ⏩: 1
LMAO, I know. it's as if we're the lab rats, the try outs for everyone to watch the reality leaves scars on us.
👍: 0 ⏩: 1
for serious!
👍: 0 ⏩: 1
LMAO, I like your icon.
👍: 0 ⏩: 1
*curtsys* thank you! i love it! *lol*
👍: 0 ⏩: 0

Dude, thats awsome! ")
👍: 0 ⏩: 1
seriously seriously! you do! it really was and is so much fun!
👍: 0 ⏩: 0

*turns bright red*
try it for yourself!!
👍: 0 ⏩: 0

Thank you so much for putting this tutorial up!
It's going to help so much for my cosplay *_*
<3
👍: 0 ⏩: 1
fantastic!! it makes me so glad to know that putting these tuts together helps even one person.. seriously! lets just everyone get together and create things shall we?
don't forget to get pictures and put them up when you try it for yourself!!
👍: 0 ⏩: 1
Of course! I shall put a picture up of it soon and link it to you!
👍: 0 ⏩: 1
i'm excited to see and to find out how easy or not my attempt at instructions were to follow
*lol* just link your pictures to the tut so we can brainwash everyone into making twilight crest jewelry MUAHAHAHAA!! oh, whoopsies.. 
👍: 0 ⏩: 1
*Laughs* OF COURSE.
WE WILL GET THEM ALLLLL 8D
👍: 0 ⏩: 1
MUAHAHAHAHAAAA!!

👍: 0 ⏩: 0

o.o SUMTHING FOR ALL TWILGITH FANDOMS XD haha
ok to be honest i totally forgot abt them having a crest @_@ when was it mentioned? i think i need to reread >< i always miss out things ")
👍: 0 ⏩: 1
you are not a bad fan you big silly!! you're just not a "scary" nerd like some of us!
the crest is not actually mentioned in the books. the idea was created for the movie, and for the actors to all have something that tied them together and made thier "family connection" stronger. Carlisle wears it as a ring, Esme as a dainty bracelet, Alice and Rosalie as necklaces, and Jasper, Emmett, and Edward on leather wristbands. in a mention that is Not a shameless plug, i Swear! i have actually also created the boys wristband version, which i had a blast with, and am currently putting together an add-on tut to the original to help any and all who want to make that one as well
👍: 0 ⏩: 1
haha yea i read tat it was made for the movie sumtime later when i was looking at all the trailer,behind the scene, spoofs ( btw found some awesome spoofs kept laughing XD)
haha its kidna cool but @_@ i dun feel its quite cullen-ish, look like gryffindor @_@ HAHAH D:
lol oh well D: im still a lousy fan XD haha i shall fan blindly @_@ *yay twiliiight*
👍: 0 ⏩: 0

Hello 

👍: 0 ⏩: 1
so it's Your fault i hopped on today to find 38 favorites on my tutorial! *lol* Thank you so much for putting my humble tutorial in your article(which is fantastic by the way! there are some GReat ones there i hadn't even managed to find yet!), i am very honored!
again, thank you so much! and Happy Holidays to you to!
👍: 0 ⏩: 0

Holy shat! This is great!
Well done on yours too
👍: 0 ⏩: 1
*turns bright red* thanks so much
TOTALLY try it! let me know how it goes if you can! if you have ANY questions, you know where to find me
👍: 0 ⏩: 1
I absolutely will
👍: 0 ⏩: 0
*turns bright red*
thank you so much! i really appreciate it!
when you use it? SEND PICS!!
👍: 0 ⏩: 1

You're welcome
i'll only send pics if it turns out a success, otherwise it'll be plain embarrassing..

👍: 0 ⏩: 1
*lol* whatever! all pics! i really do want to see!
👍: 0 ⏩: 1
okay, okay, I'll give it a try
with the silver bit, does it just turn out like that when its baked? or is there something you need to do to achieve the metallic effect?
👍: 0 ⏩: 1
(SO sorry it took me so long to get back to you!!
it comes out very silvery when baked, because the fimo itself has a metallic effect, but once baked, it is very matte as well. i dropped a few drops of chrome nail polish into my left palm, and used my right ring finger (according to my make-up enthusiast sister, it is the most gentle of your fingers), and just GENTLY gently dabbed it lightly on all the raised "metal" parts. if you put to much on, it puts less of a difference between the darkest parts on the piece and the lightest parts, and you really need those "shadow effects" to help it make even more genuine.
does that help at all?
👍: 0 ⏩: 1

👍: 0 ⏩: 0

| Next =>