HOME | DD
 algenpfleger — Spark - Steps

Published: 2011-03-01 11:09:50 +0000 UTC; Views: 97915; Favourites: 2694; Downloads: 2781
Redirect to original
Description
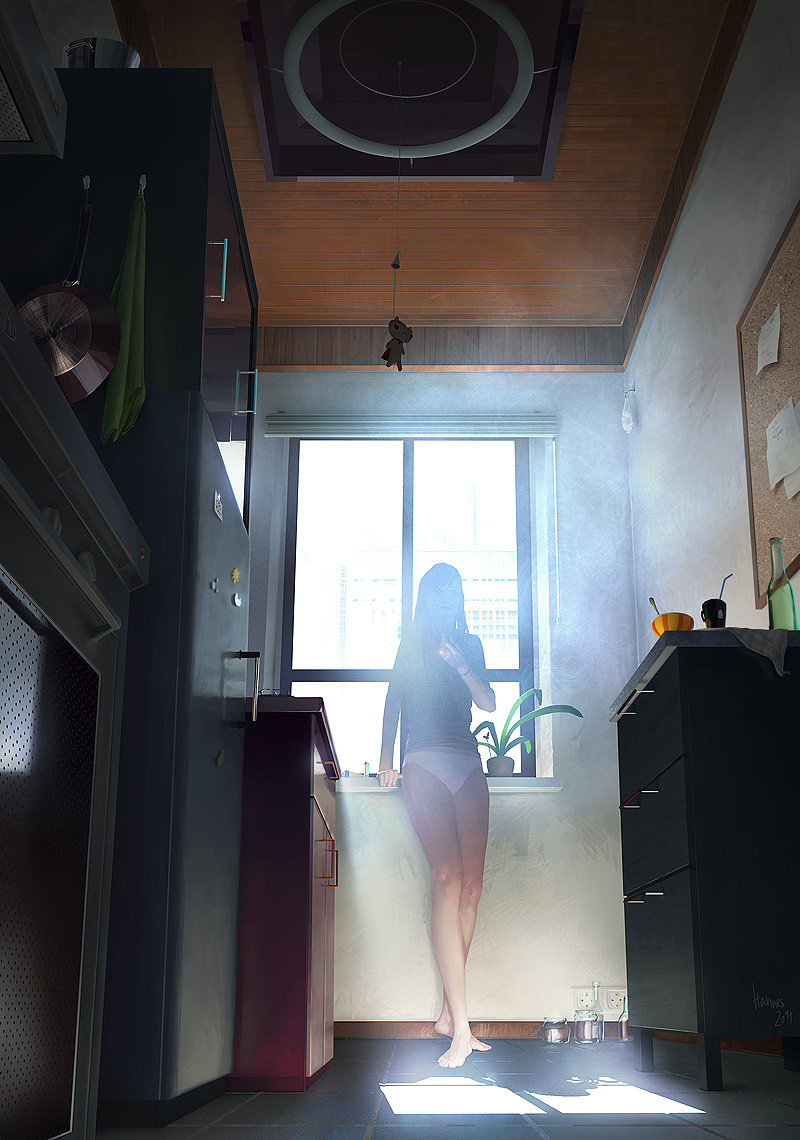
<- FinalPretty selfexplaining I think! Steps 1 and 3 are just visualization, not part of the actual process, meaning, I did the linedrawing from scratch, not over the thumb, and started the painting from the blank canvas again (except for the lines) after doing the color thumb to get an idea of how I wanted the values and lighting to be and all that. This painting went really smoothly because I had a clear idea of it in my head beforehand. I used a ton of layers to keep all the elements separate, over a 100 in total I think, which is only really a good idea if you have the stuff planned out D: In other cases I'd just go and mess around with a painting on a single layer and kind of see what emerges, but this time I tried a different approach. Polygon lasso and locking transparency keeps the edges straight and clean, and after the block-in it's all just rendering stuff out, going over the whole painting to make stuff fit together, and then putting effect stuff on top. Since I knew from the beginning that I wanted glowy lighting like this, I could just go and render everything out without the smoke being there and then just put it in in the end.
The details are like it says 100% zoom, I worked really small this time because of all the layers, the whole image is only like 4k tall.
So there! :] Hope this is interesting to someone.
Cheers!
Hannes
Related content


Comments: 278

gah.When I try making something that big my system fails *A*
👍: 0 ⏩: 0

UNGH... UNGHH... UNGHH.. I- I think I just came from the awesomness
👍: 0 ⏩: 0

Thanks for that. Its nice seeing the order in which you tackle stuff.
👍: 0 ⏩: 0


thank you so much for giving values and sizes as this is very helpful to me .Plus the Zooming values way cool dude.I will look toward doing some layers as well.thanks again.
👍: 0 ⏩: 0

it is interesting indeed! I was blown away by the picture itself, looking at the process is very interesting. Thank you for posting it!
👍: 0 ⏩: 0

amazing how you put light effects and everything in every little detail, like the outlets.... I really admire your patience.
👍: 0 ⏩: 0

It looks like a photograph. O.O...how dare you!
 (Wink)")
👍: 0 ⏩: 0

youre one of the most talented and gifted artists around here, you are an inspiration
👍: 0 ⏩: 0


man, i though it was a real pic when i first saw it. you're good.
👍: 0 ⏩: 0


Much love and respect <3
It makes me relieved to see that someone with high experience use more than just one layer. I aways try to avoid multiple layers but sometimes it's more safe to separate some elements that you don't want to mess. Feeling less guilty now, hahah!
My favests parts are the glasses and the glows.
What is that thingy on the wall? The one on the upper right side.
👍: 0 ⏩: 0

")
👍: 0 ⏩: 0

 (Smile)")


BEST PROCESS EVER! love you too much hannes, plus great work from imagination. Such a break through
👍: 0 ⏩: 0


Incredible! It's so awesome when people shows the steps they take on pieces. Gives me a sense of what to do. Thanks!
👍: 0 ⏩: 0

Astounding and educational! I see some texture on the zooms- was that just another layer or did you add some noise, maybe? It makes it look like watercolor.
👍: 0 ⏩: 1

I have the noise setting turned on on a few of my brushes, I really like the look it gives =0 And I sometimes use the dual brush setting with a wildly different brushtip to give some texture too, and after resizing I added a bit of noise with the noise filter too. Those are just superficialities though =0
👍: 0 ⏩: 1
Haha.. I've only got GIMP and Elements, so a bit of that was chinese, but I think I get the picture. Thanks!
👍: 0 ⏩: 0

I was all in full view, so when I slowly scrolled down from digital line drawing to colour thumb, MY MIND WAS BLOWN AWAY. I had to scroll up and down about a hundred times, wondering how someone could create such an amazing atmosphere. Did you pull that off the top of your head? I mean you've probably studied and practiced lighting tons, but the places you put some of the reflections and highlights...it seems like only a madman could possibly know to put them there, and they look perfect! I noticed some of the furniture was initially 3d render, so I was wondering if you did a lighting setup first in the same 3d program. Not that it's really important, the art is STUNNING either way.
👍: 0 ⏩: 1
Hi! : D Yeah it's all from imagination, and like you said, studying a lot helps a lot o_o Reflections and that are easier than they seem, basically it's just mirroring stuff around it, so f you know what's around you just have to put it in! ö_öv And there's no 3D involved.
👍: 0 ⏩: 0

Just putting separate elements on different layers to be able to work on each without messing up the edges around it, helps when there's a lot of overlap!
👍: 0 ⏩: 1

Ich bin einfach nur... amazed!
👍: 0 ⏩: 0


very very interesting O__O and astonishing!
How long did this take you?
👍: 0 ⏩: 0

idk the last step dosnt look that good in my opinion, the drawing is amazing btw
👍: 0 ⏩: 0

You should really post up more of your stuff on here. I find your WIPs and step-by-steps very helpful and interesting
Great envy for your colour choices and shading/reflection ;_;
👍: 0 ⏩: 0

When I first looked at the original work, I thought my eyes decieved me. It looked so realistic as if it was a photograph! This picture really shows off your skills ;]
👍: 0 ⏩: 0


thanks for sharing,Hannes. Kinda cool to see the stages and i love the initial digital sketch phase! ;O
👍: 0 ⏩: 0

whoa... that's awesome...
It looked like there were a lot of steps missing between 1 and 2 (it's hard to just go from such a rough thumb to perfect lineart, in five minutes), but I'm amazed by how much happened after that (so I forgot all about that).
hmm... how'd you get the light on the floor from the window so bright between the "done painting" and "effects" pictures? Did you just add fuzziness in there, or is there something else?
👍: 0 ⏩: 1
Hey! Sorry about that, I didn't really save steps of the lineart because I expected the painting part to be way bigger :0 Basically what happened was I drew the thumb, went to bed, woke up, drew a perspective grid, started drawing the big parts in, then drew some details and finally the figure, to get to the linedrawing. It's not really made out of the thumb so there's no realy steps in between anyways. About the light on the floor, that's just a couple of linear dodge layers with a big airbrush with noise turned on :]
👍: 0 ⏩: 0


Really cool man, thanks a lot for sharing your process. It looks fantastic.
👍: 0 ⏩: 0

A wonderful behind-the-scenes peek. Thanks so much to uploading this!
👍: 0 ⏩: 0

Um.. you hope this is interesting? Dude, this is way beyond interesting; it's... I can't even find a word to say how awesome it is. Fantastic job!
👍: 0 ⏩: 0

Wow, thanks for this. I try to learn what I can from others works and this really helps. Some day I hope to get enough practice into be able get to your level.
👍: 0 ⏩: 0


So did you find working cleaner to be faster for you? I've been trying to balance working clean and keeping spontaneity in a piece.
👍: 0 ⏩: 0


Really amazing, the detail and devotion to work on something that detailed without it loosing its painterly feel is wonderful.
I would also like to know whether there was any photo reference used, though, when you speak of planning, I have a feeling you don't. Especially concerning the light, the dense atmosphere of light being reflected on the ground and shining back at the scenery is overwhelming.
👍: 0 ⏩: 0

okay.. i just did not believe when i saw the final picture... but this wip makes me wish i never started to draw....
just wow...this one is awesome...
👍: 0 ⏩: 0

It's great to see the steps for this mate, outstanding job.
👍: 0 ⏩: 0
<= Prev | | Next =>