HOME | DD
 artsangel — Smooth Comic Shading Tutorial

Published: 2010-12-18 00:25:18 +0000 UTC; Views: 41165; Favourites: 1053; Downloads: 657
Redirect to original
Description
I did this tutorial ages ago for a friend. But now that I'm done with this particular style, I don't see any reason to keep my methods secret any more (Wink)")
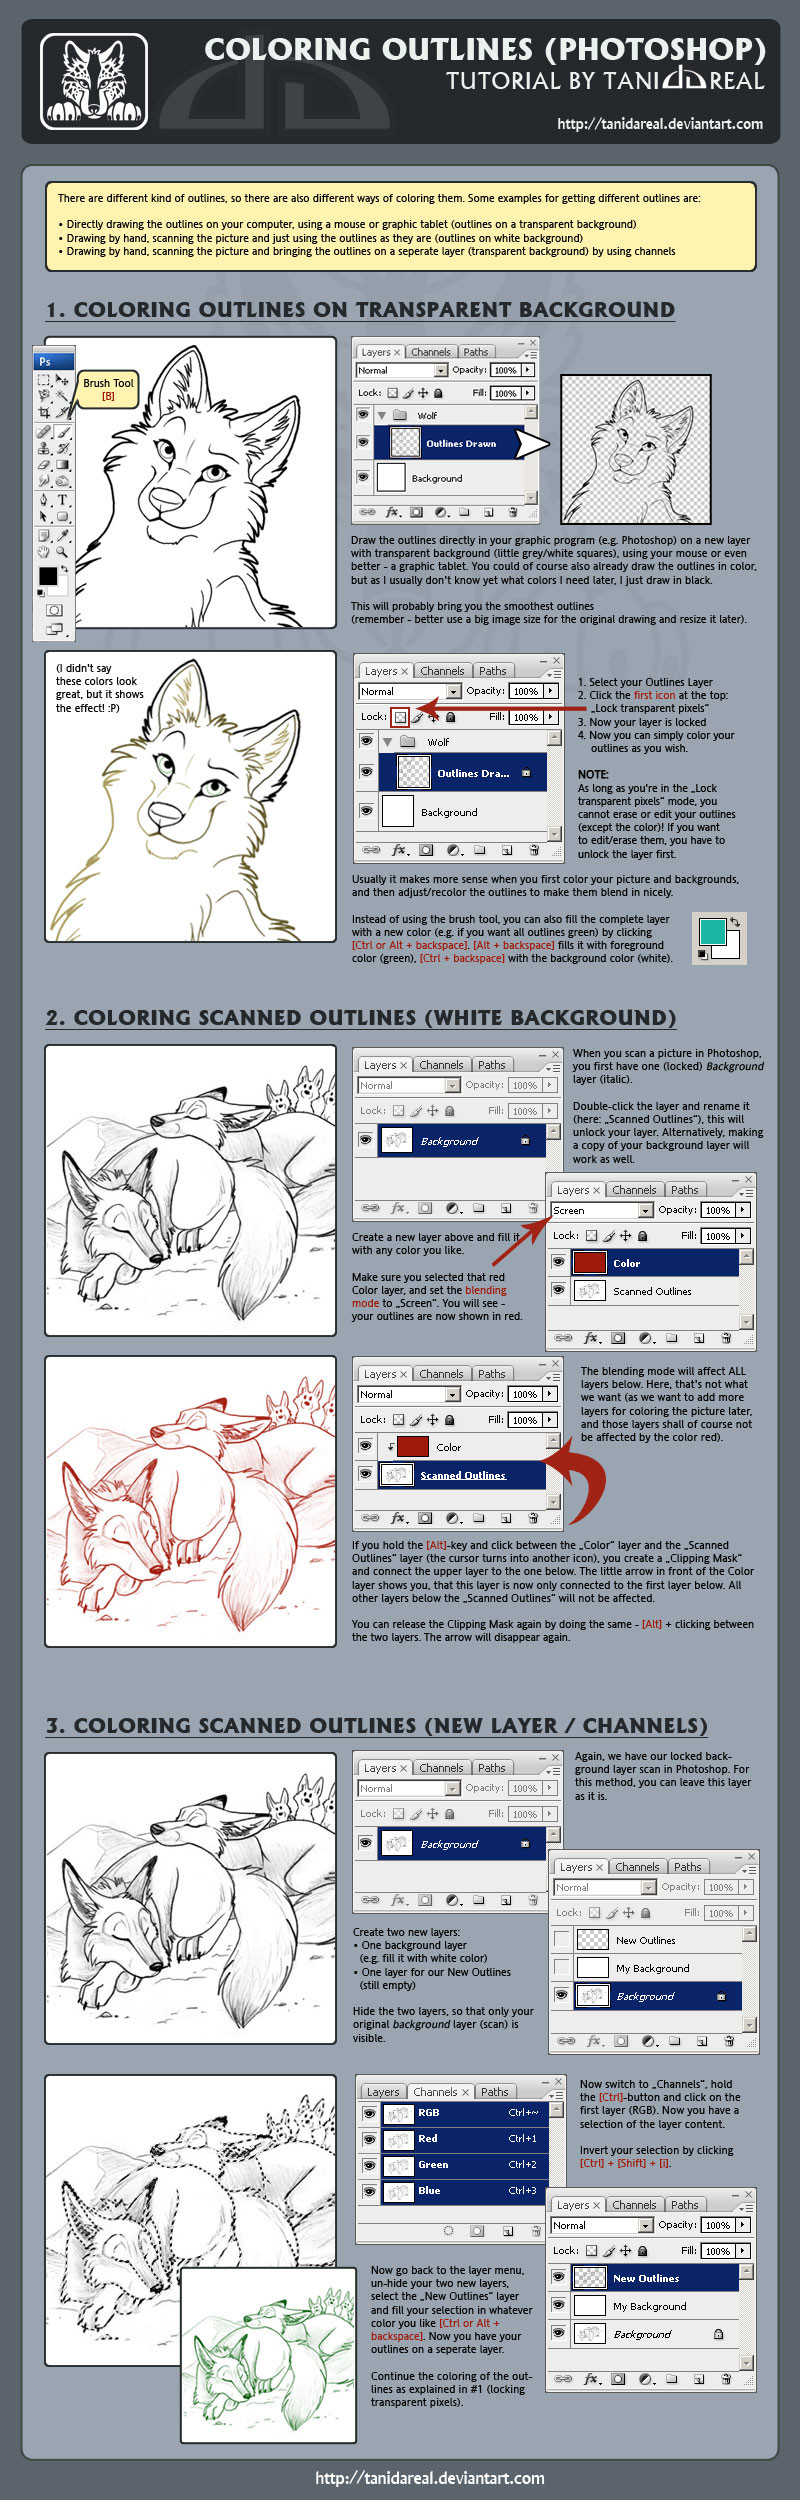
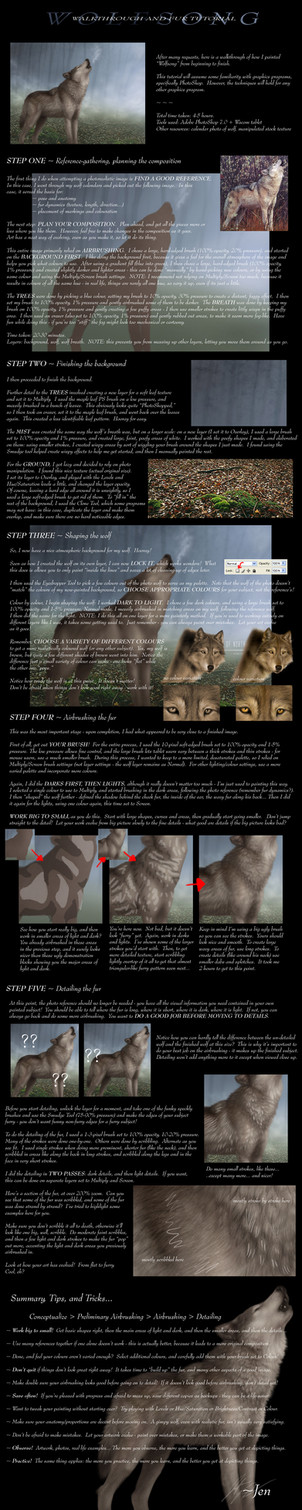
So yeah, this is pretty much how I do my comic shading for Phoenix Requiem. It's not a detailed tutorial; it presumes you're already good with Photoshop.
Edit: Obviously, this image is a couple of years old. I do things a little differently now, but this should give you a rough idea, at least until I replace it with something else
 (Smile)")
Related content


Comments: 51


Great stuff! I think I'm going to have to start playing with channels now...
👍: 0 ⏩: 0


It is a very helpful tutorial ")
👍: 0 ⏩: 0

Hey there, I just came along looking for comic tutorials in general but this here might help me with something else, perhaps. I do a lot of pencil stuff and still try to find ways how to color them. Your method with the channels might just be what I am looking for, will try it out. Thanks a lot for this.
Did you also do the linearts for the dog? I really like with how less lines you give all the information about shapes and forms, great stuff.
👍: 0 ⏩: 0

Very helpful tutorial! Even though you did it a couple years ago, it's still very helpful.
👍: 0 ⏩: 0

GASP! Helpful stuff! O3O Super spiffy tutorial!
👍: 0 ⏩: 0

Thank you so much for this tutorial.
Finally, I can go back to coloring with grayscale like good ol' pencil and paper. TT uTT
👍: 0 ⏩: 0

Someday... Someday I will have Photoshop and I will be doing cool stuff like this! But for now....well.... I don't even have Photoshop and I've never used it because I have a Mac. Ah, well!
👍: 0 ⏩: 0

i feel like such a novice.... XD i don't really use the techy version of it...i'm not that big on messing with the gradient maps, but i love the filters, especially on GIMP. they rule
👍: 0 ⏩: 0


This is great! I love the way it turned out. <3
👍: 0 ⏩: 0

nice! i'll definitely be using this technique in the future <3
👍: 0 ⏩: 0

Ooh, I do so love learning how other people shade, even if it's a bit old. :3 This'll come in handy, I'm sure.
👍: 0 ⏩: 0


Wow, very well done. Is it possible to get as smooth a result as this without a Wacom tablet (all I've got is a mouse ")
👍: 0 ⏩: 1

Eh... not really. It all relies on the pressure sensitivity too much, so even if you were awesomely accurate and smooth with your mouse strokes you still wouldn't have the variation in line thickness or shading density that you'd get with pressure.
👍: 0 ⏩: 1
Nuts, I was afraid that would be the answer. Well, thanks for your time, I must now go hop down to the nearest art supply shop and buy a Wacom!
👍: 0 ⏩: 0


Interesting! I would probably fade out some of the line art, as it can make everything look stained glass-y, like the later pages of Phoenix Requiem. I understand the need for there to be no gaps for the fill, though, and I think your method works super well for the story you were telling.
I'm just thinking the method could be tweaked in a number of different places to get many different result. Thus, it is quite an excellent method!
👍: 0 ⏩: 0

I love the way Phoenix Requiem looks, and also the shades and hues of the colors you use for it fits the story so well.
Great technique. Thanks for sharing!

👍: 0 ⏩: 0

I need to try this out somewhen. Thank you for uploading this ^_^
👍: 0 ⏩: 0

Oh dear... you're working in RGB *tut tuts at you* but that would explain why all those color-layering tricks work out so smoothly...
👍: 0 ⏩: 0

Interesting process. Though I prefer your third step to the final image. You seem to lose a lot of lovely depth as the process goes on.
👍: 0 ⏩: 1
It probably wasn't the best image for a sample, since the lighting scheme for that scene, being night, was pretty uniform and non-contrasty.
👍: 0 ⏩: 0

The final result looks alright, but is still missing deeper shadows; there should definitely be more shadow on the leg that's tucked under his stomach, for one. There's also the problem that the dog doesn't look weighted and on the ground, he looks more like he's floating.
I realize you're done with this technique anyway, but for people following it, they should realize these steps are not without their problems. In particular I think the gradient layer actually hinders the process rather than helps.
👍: 0 ⏩: 1
To be fair, this is how I did things two years ago. I modified my techniques a little since then, but I was just digging through some old PS files and found this image and figured it was worth uploading.
👍: 0 ⏩: 0


Thanks for the tutorial, I'll be sure to try it out some time
👍: 0 ⏩: 0


Hooray this is awesome!
I like how you demonstrated the tutorial on the dog instead of on a face like most tutorials are.
👍: 0 ⏩: 0


Oh wow great tutorial, I've always wanted to know how you did your colouring, thanks
👍: 0 ⏩: 0

Great tutorials! It inspires me to finally get over my fear of playing with Channels.
👍: 0 ⏩: 0

Very useful! Thanks very much for sharing.
May I ask, though, what size do you work at and about what diameter is your line art brush? I'm having a hard time finding a way to get nice line variation without ending up with a heavy outline.
👍: 0 ⏩: 1
It's hard to get decent variation with smaller lines in Photoshop; Painter and Sketchbook Pro are better at that. I work at about 2500 pixels across with a 6px brush.
👍: 0 ⏩: 1

Almost the exact same method is up on the Inverloch branch of your site. It was a huge help for me when I needed to learn how to color in Photoshop better.
👍: 0 ⏩: 0

Hm, this is really neat, I have no experience with Photoshop, I just sorta click something, see what it does, move on, but yeah, I really need to figure out the ins and outs here
But thank you, I'll revisit this when I know what stuff does I can't shade to save my life!
")
👍: 0 ⏩: 0

this tutorial's really useful either way
👍: 0 ⏩: 0


I can't tell if you're serious with the "secret" or not, but thanks. XD I did always wonder how you did Phoenix. You're amazingly fast at this.
👍: 0 ⏩: 0

ah.... very nice.... I already knew all the stuff you pointed here... but that doesn't prevent me from +fav it :]
Most of the time i get lazy... ending up just with a sketch *points at first panel* with some shading *points at 8th panel* >_>'
👍: 0 ⏩: 0

Awesome! Now I just need to see if I can apply this to Fireworks!
👍: 0 ⏩: 0