HOME | DD
 AvalonStarlight — 10 Step Digital Art Tutorial

Published: 2008-05-31 02:41:27 +0000 UTC; Views: 13692; Favourites: 121; Downloads: 226
Redirect to original
Description
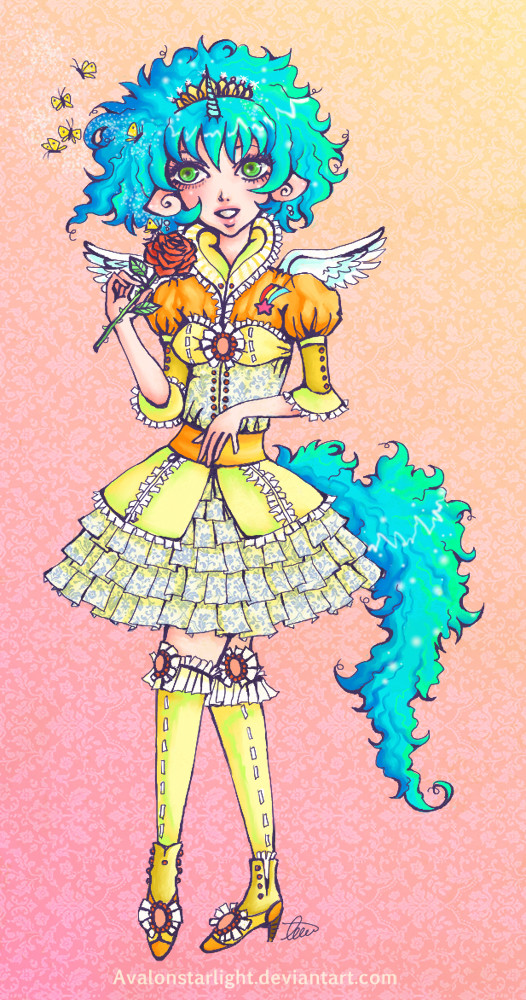
Introduction: Here is a step by step tutorial on how I create my line art and digital paintings. I don't use any pen or line tools in my artwork. Everything is freehand except the textures or patterns. I created this image using Corel Painter IX. I will not specify the types of tools or brushes I used, but instead I will keep things simple enough so that you can use this process in any digital painting program. If you would like to know any specifics, please ask! (Smile)")
Step 1: Sketch out an idea you have. I sketched mine out with paper and pencil and then scanned it into the computer.
Step 2: Lower the opacity of your original sketch and go over your sketch again, using a digital line tool. Be sure and add all the details you need to prepare for your lineart.
Step 3: Go over your second sketch keeping your lineart clean and be sure to vary your line thickness. You can thicken the lines where a shadow might be, or at corners where lines meet. Varying line thickness is important to add depth to your image.
Step 4: Next I will begin coloring. I made a separate layer for her skin, her hair, and her cloths. I like to lay all my colors down at the same time so I can have an overview of my color scheme. Don't try and be clean during this step. Because you are coloring on separate layers you don't have to be neat.
Step 5: I start to lay down my shadows and highlights. In her tail you can see the first step to laying down the colors, and in her hair you can see how I used a blender tool to smooth out the colors.
Step 6: I contine laying down shadows and blending the colors. I also start to add details such as the stripes on her shirt (on a new layer) and the sparkle highlights on her lips and cheeks (also on a new layer). Now you may be thinking... Wow... that's a lot of layers! Yup! You are correct! I try to label my layers so I don't get them confused, lol. Labeling your layers is a good habit it get into. (especially when you have as many as I do.)
Step 7: First notice how the stripes on her shirt are lighter here. I decided to lighten them so they don't stand out so much. This is a great example as to why it's so important to make all your details on separate layers- so that you can go back and make adjustments later without wrecking anything else in your picture. I also added some color around her eyes and finished shading everything.
Step 8: I made a new layer and gave her some blush on her cheeks, knees and ears. At first the blush is too dark so I lightened the layer to make it more natural looking. I also added a pink outline around her. I just like the effect outlines have. I added the outline freehand. I also put a pretty squiggly highlight in her hair.
Step 9: Yay! Time for textures! (I'm a texture junkie) I get the majority of my textures and patterns from these sites: [link] [link]
and these da members: ~masterjinn ~Enchantedgal-Stock
Textures are actually pretty easy to use. I don't know if my way is the easyest... so if there is a better way please let me know. The way I do it is first I paste the texture into my picture. I set the layer its on multiply or overlay, depending on what looks best. I move it around to get it into a good spot and then I erase everything except for the part that I want on her skirt. I repeat the same process for her shirt.
Step 10: For the background I used a paper texture. I put another colorful texture on top of that one for extra color.
Here is the finished illustration:[link]
If you have any questions please feel free to ask me!!
Related content


Comments: 20


omg, this REALLY puts things into a better perspective for me!!!! I had NO idea how to do ANY form of this, and now I've got some idea of how to do it!!!
thankyou SSSOOOO much for making this!!! Now I gotta put it into practice!
 (Wink)")

👍: 0 ⏩: 1

I'm so glad it was helpful! When I first started out with digital painting i found a tutorial like this one that helped me out a LOT! I hope this one can do the same for you!
👍: 0 ⏩: 1
Oh, it has. ")
👍: 0 ⏩: 0

Oh good! I'm very glad you found it helpful!
👍: 0 ⏩: 0

Thank you for making this!
Its helped me so much!
👍: 0 ⏩: 1
Ohhh wow, I'm really glad you found it helpful. I wasn't sure how helpful it would be, so I'm glad it worked! If you ever have any questions be sure to ask away! <3
👍: 0 ⏩: 1
Thanks! <3
I probably will lol
👍: 0 ⏩: 0

OMG It looks beautiful <3 <3
Your techniques are really good!!!

👍: 0 ⏩: 1


I recently got painter x, can u please specify(?) me the tools u used plz? @w@
xx
👍: 0 ⏩: 1
Sorry for the late reply! For lineart I use a grainy cover pencil set to the smallest size. I use a flat eraser, and for coloring I use a detail airbrush. For blending I use a "just ad water" blender. I hope that helps! It's always good to experiment, though.
👍: 0 ⏩: 1
Yep, thanks~<3
x
👍: 0 ⏩: 0

omg, hi~ I haven't comment your drawings for a long time now. Dx sorry.
Cool, tutorial. I love the way you shade!

👍: 0 ⏩: 0

wow thats really neat how your steps work. I would have stopped at like 7. but I LOVE your detail!
👍: 0 ⏩: 1
Lol yeah i'm a little compulsive about textures. Sometimes I like the non-textured version more but I just cant resist using them!
👍: 0 ⏩: 0

I really Like the out come. It's also very informative! Nice Job
👍: 0 ⏩: 1
Thanks! I'm glad I could help out a little! <3
👍: 0 ⏩: 0