HOME | DD
 chioky — Swordmaking Guide: Part 4
Published: 2007-08-01 13:52:55 +0000 UTC; Views: 46370; Favourites: 231; Downloads: 382
Redirect to original
Description
Swordmaking Guide: Part 4 (Fixing and Handle Wrapping)Part 1 (Tools and Equipment): [link]
Part 2 (Planning and Cutting): [link]
Part 3 (Sanding and Painting): [link]
I would use these updated swordmaking tutorials instead:
 The Swordmaking Tutorial: Part 1 (Tools and Equipment) [link] The Swordmaking Tutorial: Part 2 (Planning and Drawing) [link] The Swordmaking Tutorial: Part 3 (Cutting out the Sword) [link] The Swordmaking Tutorial: Part 4 (Cutting out the Tsuba) [link] The Swordmaking Tutorial: Part 5 (Sharpening the Sword) [link] The Swordmaking Tutorial: Part 6 (Sculpting the Details) [link] The Swordmaking Tutorial: Part 7 (Painting and Glossing) [link] The Swordmaking Tutorial: Part 8 (Constructing the Sword) [link]
 I have finnaly reached the end of the swordmaking guides ever since i started them months ago ^^. With the completion of this guides all 4 guides of swordmaking are completed and will allow a person to make a sword fully without any problems!. This is the completion of the sword shinso ^^. Now the first guide was about tools and machinery in the second guide was about planning and cutting the third guide was about sanding and painting. Now the fourth and final guide is how you fix your sword together and wrap the handle Chiok style ^^. I hope this guides helps everybody whoever wants to make a sword ^^.
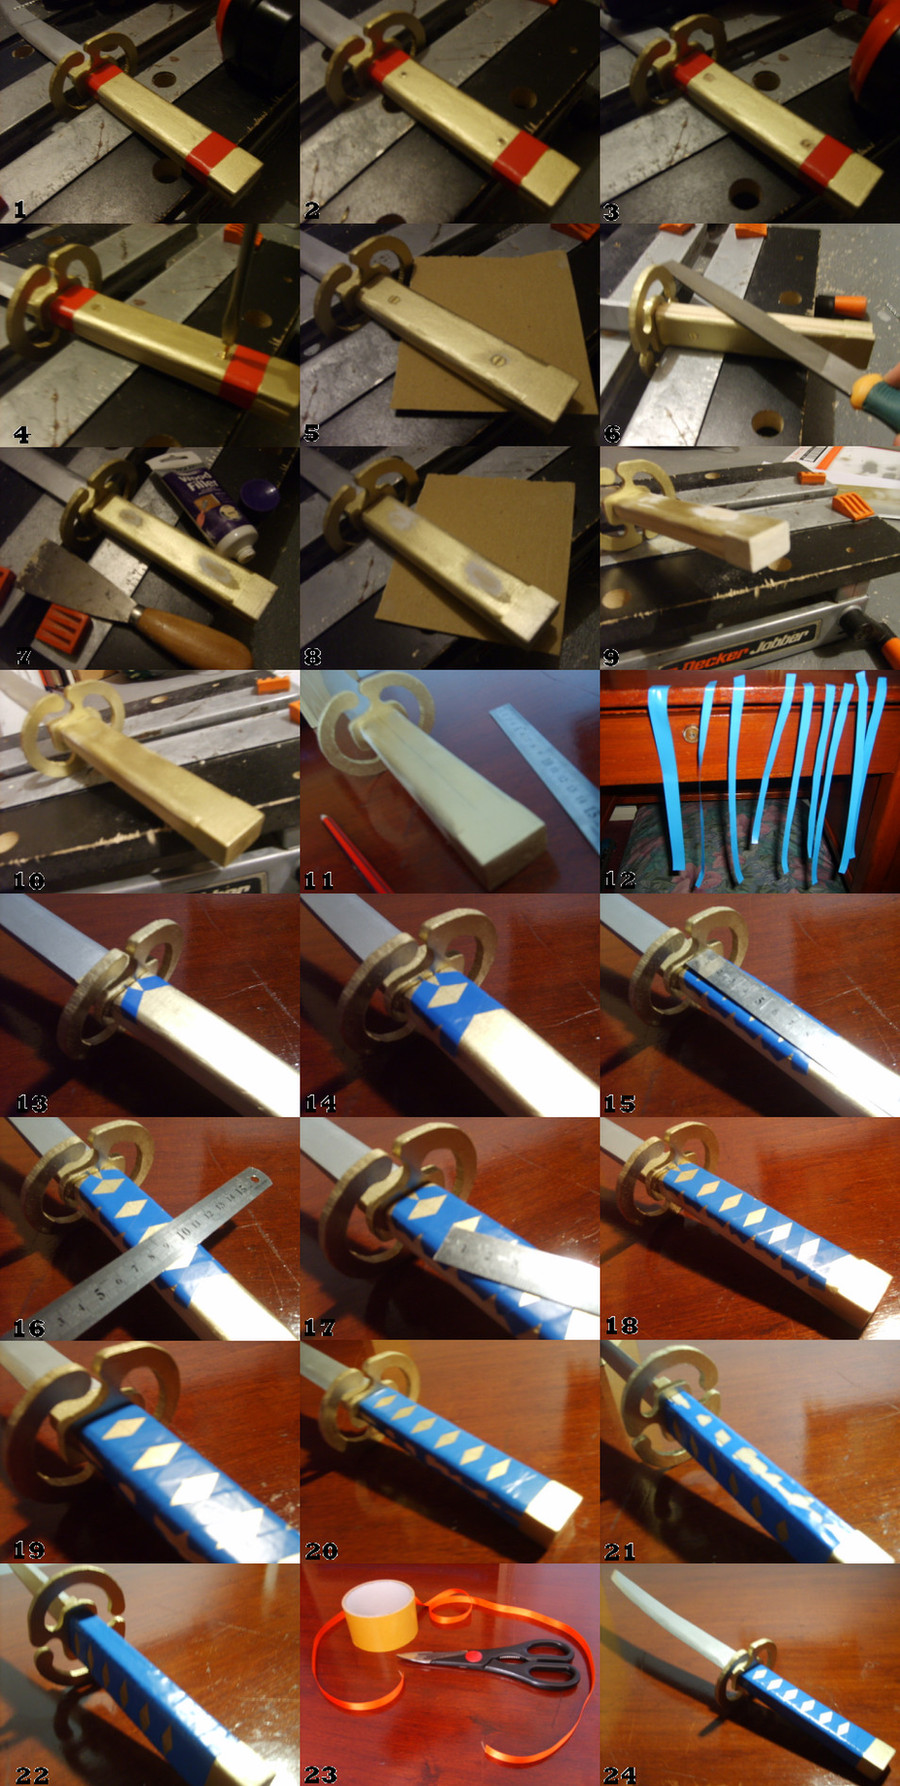
Item 1: With some electrical tape wrap it around both the handles and the main full tang of the sword. Wrap it tight so it wont move and with a pencil draw crosses along down the handle. This is where the drill points will be so space them out accordingly.
Item 2: Now with an power drill carefully drill holes into the crosses you have drawn. Please drill safely and make sure somthing is underneath the handle so it doesnt drill through the work surface.
Item 3: Now you need to make a counterpunch for the screw heads to fit in below the surface level of the handle. You can use an actual countersink drill bit which i lost OR use a larger drill bit. You want to drill with one press at a time to make an even crater.
Item 4: With a screwdriver and screws, screw in the screws into the holes. The screwheads must be BELOW the surface of the handles not level. Screw them tightly so the handle doesnt move.
Item 5: With sandpaper sand down any rough parts of the wood that are sticking up or protruding out from the drilling keep it nice and smooth.
Item 6: With a file sand down the sides of the handle so they are level. When you are drilling ans screwing sometimes the handles shift so make sure to sand down the sides to correct the mistake.
Item 7: Now with woodfiller you can use your finger and fill in the gaps in the wood and put it over the screwheads. Since the screwheads were below the surface you can cover them up.
Item 8: After the woodfiller dries with sandpaper sand down the handle ignore the paint for now. Just make sure the handle is level and the wood is not protruding from anywhere.
Item 9: At the hilt of the sword apply woodfiller to smooth over the gaps inbetween the handles. Keep applying woodfiller untill it fully covers it up and its nice and smooth and level.
Item 10: However you have made a mess of the paintwork becuase of fixing the handle together. Dont worry just grab a paintbrush and spray paint and by hand paint over the woodfiller to keep it the same colour as the rest.
Item 11: Now this is Chioky's method of handle wrapping however the traditional way is much better looking if you dont have either the skill or the material to do it use my method. With a pencil and ruler draw a line directly inhalf down the handle on both sides.
Item 12: Now grab the appopriate colour electrical tape and cut them in half down the middle. Try to make some pieces of tape different widths and make alot of them as shown so you dont have to repeat this part.
Item 13: Start with 2 small pieces of tape and aline them diagonal with the tips touching the pencil line drawn down the handle. The other side of the tape goes along the side of the handle.
Item 14: Now with a medium piece of tape align it PARRALEL to the tape above it so the distance inbetween is the same. Now do the same with another piece the other way into you form a diamond shape. When the 2 pieces of tape conjoin the points should be on the pencil line and be and X. Where you place the tape point becuase its a diamond is on the edge of the slope over the handle. You can see the slope clearly so align
Item 15: Now with a ruler measure the side points of the diamond to see if they are along the same points. You want to keep the side points roughly at the same place this allows better diamonds.
Item 16: Also with a ruler align across the middle of the diamond and check if its at a 180 degree angle if its not it means that one of the pieces of tape is not parrallel with the above. So keep trying till its level.
Item 17: Finnaly with a ruler measure if the distance between the piece of tape above is PARRALLEL. You want to keep it the same distance all the way across. If its not then you ruin the diamonds and all of them down the handle.
Item 18: Now continue creating the diamonds all the way down the handle until you reach the hilt until you cannot add anymore. Now do the exact same on the other side of the handle. If you compare both sides of the handle with diamonds one side of the handle the diamonds might be lower then the other side. This is becuase of the different widths of the pieces of tape you cut out. Even though the difference is small when you add it all up its very visble so keep the pieces of tape the same widths.
Item 19: Now with a piece of tape wrap around inbetween the space between the diamonds not the actual diamonds and wrap around both handles and leave the end on the side of the handles.
Item 20: Continue the process of Item 19 all the way down the handle on both sides and wrap carefully at the top of the handle and the bottom.
Item 21: Now the only part of the handle that isnt wrapped yet should be the sides. Make sure no piece of tape is sticking up on the sides and that there not touching with the ones opposite them.
Item 22: Now with a long piece of tape thats uncut not down the middle place it along the side of the handle from the top down to the bottom carefully. Do the same on the other side and it will cover up all the end pieces of tape.
Item 23: If you dont have the right colour electrical tape you can use ribbon with double sided tape along the width and just snip off the exact same piece everytime. If you havr right right width of a ribbon you should make perfect diamonds down the handle.
Item 24: If you have done everysingle process in all 4 guides up to this point CONGRATULTIONS!! you have successfully made your own sword!!. Do any finaly touch ups of paints that you missed and now you can take pictures and place it here on DeviantART, give to a friend, commisions or cosplay with it.
Related content


Comments: 74

If you had an artist hand and the delicate way to paint it on, u still wouldn't suggest it?
👍: 0 ⏩: 1

maybe if you painted on 20 coats so it then has a thickness
otherwise NO
👍: 0 ⏩: 1

Thank you so much for this!!! Although the katana I had to make was very different, I didn't have all the tools and I couldn't find all the right plank sizes or types of wood (had to improvise with a clementine box at some point 
")

👍: 0 ⏩: 1
well that is a very good sword, for a first time swordmaker lol, it seems you have made yourself a fine syaron sword from tsubasa chronicles lol, as long as these tutorials gave you the incentive to make the sword thats cool enough
👍: 0 ⏩: 0

Your tutorials are great!! I can't wait to make a cosplay sword!! THANK YOU!!!

👍: 0 ⏩: 1
and made a good one you shall
👍: 0 ⏩: 0

I just finished the grip on Shinsou, but I need a specific guide on diamondwrap. D'you have one? Oh, and do you think blue painter's tape is the right color to use for wrapping?
👍: 0 ⏩: 1
Take a look at the encylopedia of swordmaking lol
👍: 0 ⏩: 1
Yeah, I checked that already. Any guides specifically for wrapping?
👍: 0 ⏩: 1
Ehhh yes you check the 4 different levels of tsukamaki XD
👍: 0 ⏩: 1
I saw Laitz's ribbon tutorial, but all I have is painter's tape (which is 'Shinsou blue' by default), and I'm not sure how much of it I can use.
👍: 0 ⏩: 1
Well I already saw the comment you made to him but, its best to ask him, becuase I have never used his style before XD
👍: 0 ⏩: 1
I'm trying to decide between your tutorial, which is complicated and pencily, and Laitz's tutorial, which, apparently, requires some insane length of ribbon/tape.
👍: 0 ⏩: 1
I say try latiz, though you will need like 2 metres of tape
👍: 0 ⏩: 1
Except Laitz uses ribbon; you can't tie knots with tape.
👍: 0 ⏩: 1
Its possible you can use a varient like piratecaptains tsukamaki level 2 tutorial
👍: 0 ⏩: 0

I want to make this sword actually, and i was wondering how long is it? Can you give me an idea? I know his sword is short, and it extends, but i'm not sure how short I should make it.
👍: 0 ⏩: 1
it should be 20 inches long, so the handle should be about roughly 5 to 7 inches ^^
👍: 0 ⏩: 0

I got a question... How long did it take for you to make a sword like this? =3
👍: 0 ⏩: 1
making a sword like shinso? you could make it in one day XD
👍: 0 ⏩: 1
Ah, that's cool. Then it will be no match! XD
I am going to work on it next week! ^^
👍: 0 ⏩: 0
wow I have never seen a sword with a handle wrapping like that XD
👍: 0 ⏩: 1

well.. just a suggestion to work from ^^
👍: 0 ⏩: 0

It shows how carefully you´re making the handles.
That´s great.
👍: 0 ⏩: 1
ignore this swordmaking guide its outdated and such XD
👍: 0 ⏩: 1
but the Fotos are really helpfull!!
👍: 0 ⏩: 0

Nice guide, will try making one soon however I have an issue with my real katana.
The wrapping on the scabbard have come undone. You don't know of a tutorial on redoing it do you?
👍: 0 ⏩: 1
[link]
here you go try that above link
👍: 0 ⏩: 1
Thanks, that told me the knots name whick lead me to [link] and now after 30mins I fixed it (had to undo the whole thing first.
Thanks again.
👍: 0 ⏩: 0

NIce guide, I have a quick question though, what is the tang of a sword? I've seen that word used a lot but never could find an accurate, sensible description of what it is.
👍: 0 ⏩: 1
Let me illustrate with a drawing of a sword:
----------
------------------------------------
----------
The 2 small lines on each side of the longer line is the handles
The middle long long is the "tang" becuase the blade and handle are one piece of metal
👍: 0 ⏩: 1
Aaaaah, so the "Tang" is the full length of the sword, basicaly the blade and the section attached to the blade sandwitched between whatever has been used to craft the handle?
👍: 0 ⏩: 1

I wish I could make a sword like this, too bad my Parents won't buy me the equipments
But you're very good and I love your swords!
")
👍: 0 ⏩: 1
Sometimes when you are fully dedicated to achieving a hobby you would find a way to pay for it yourself XD Not everybody has that dedication so not everybody can do swordmaking ^^
👍: 0 ⏩: 1
Well, I'm not allowed to buy the stuff/to make a sword
My parents say it's 'only for boys' -.-
👍: 0 ⏩: 1
Swordmaking is only for boys? yeah if your primarly a swordmaker but as a propmaker but your parents could not be more wrong XD
👍: 0 ⏩: 1
I'll just kick their asses
No just kidding, I'll just have to save up myself and keep the stuff a secret under my bed

👍: 0 ⏩: 0

wouldnt a ribbon-like cloth (or just a simple ribbon) look better than a tape?
👍: 0 ⏩: 1
The process to stick it down is 10 times harder and also frays
👍: 0 ⏩: 0

I would love to make a sword but I think it would be wise to never let me near something sharp, flamable, or fire itself... hehehe I can see it now....."Why is everything on fire?!" Me: ummmm....*hides lighter* dunno o.O ..... lol >.> <.<
👍: 0 ⏩: 1
No excuses somthing like that just doesnt happen becuase there is 0 fire inolved with swordmaking XD
👍: 0 ⏩: 1
yes I know but knowing my luck I will still catch something on fire...like from the heater in our garage, where all the tools would be and where I would work, would like...ignite on the wood or something....>.> ill MAKE something catch on fire just so people ask how i managed to do that lol
👍: 0 ⏩: 0

Hey uhh.. this is prolly a stupid question but what are the screws in the handle for? thanks ^^
👍: 0 ⏩: 1
for holding the handles together with the sword XD
👍: 0 ⏩: 1
The handles were separate? I thought it was one whole, thanks.
👍: 0 ⏩: 1
If it was one whole it would be alot more difficult to make the sword ^^
👍: 0 ⏩: 0
| Next =>