HOME | DD
 chioky — The Scabbard Tutorial: Part 3
Published: 2008-07-20 09:59:57 +0000 UTC; Views: 21790; Favourites: 129; Downloads: 398
Redirect to original
Description
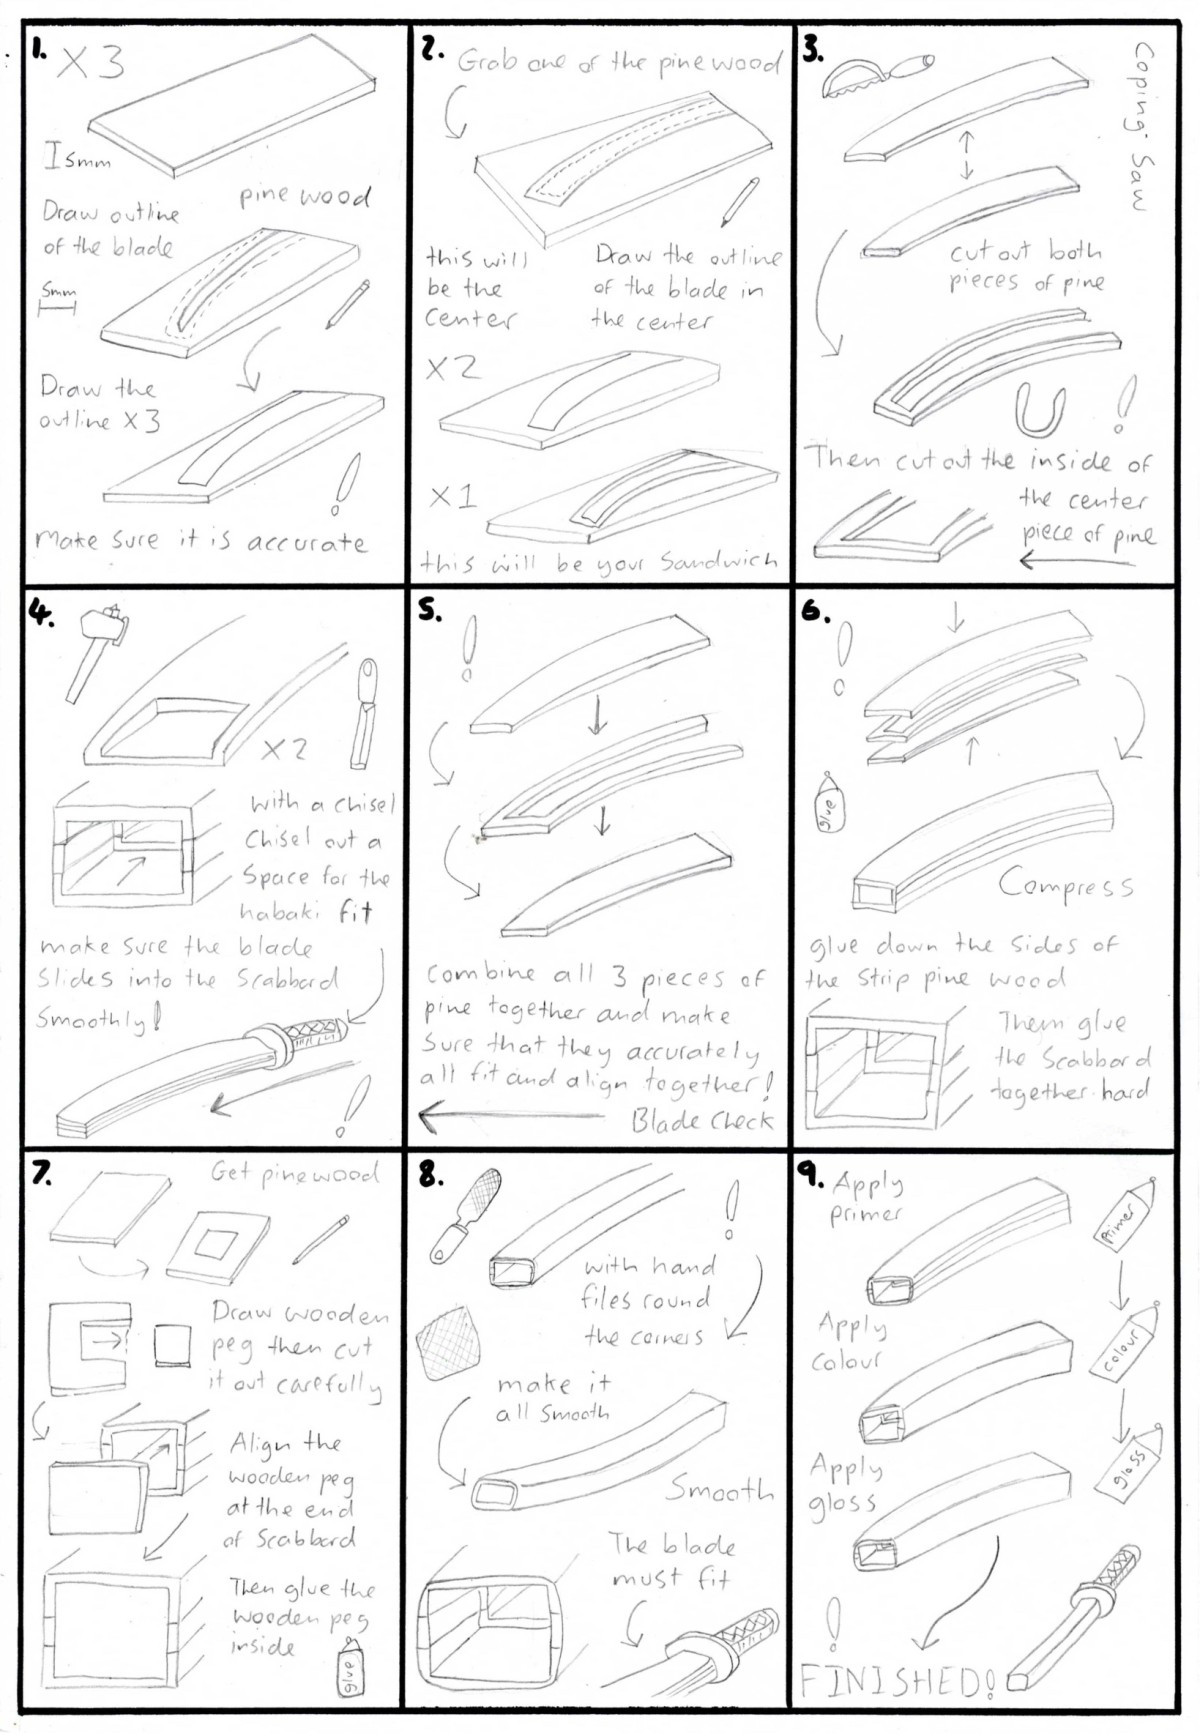
 Sandwiching
Many of you have asked for a "how to make a scabbard" tutorial, so I have decided to draw it up with my doodle like tutorials. There are in total 3 different ways to make a scabbard successfully.
Sandwiching is by far the easiest approach to making your own scabbard. However it is by far the weakest type of scabbard, just try to avoid accidents. You are basically going to have 3 layers of pinewood where the center one is cut out into a "U" shape so that the blade can slide into it. The other 2 layers of pinewood encompass the blade.
Step 1: Grab 3 pieces of pinewood 5mm in thickness and draw about 5mm away from the edge of the blade outline on both pieces of the pinewood. Make sure when the pinewood are layered together that the total thickness should be about 15mm. Make sure to draw the outline perfectly on all 3 parts.
Step 2: Now grab one of the pinewood scabbard parts and draw the outline of the blade onto the wood about 1mm or 2mm away from the blade. You would be drawing the scabbard part again only smaller and inside the original one. This will be the center scabbard piece where the blade will live in.
Step 3: With a coping saw, cut out both the pieces of the pinewood scabbard parts first not including the center piece. Then for the center scabbard piece cut out carefully the inside out of the wood. The center scabbard piece should resemble a “U”. You have to make sure as to not snap this delicate part.
Step 4: Now the habaki must fit snuggly onto the entrance of the scabbard. So chisel out some room for the habaki to slide and lock into place. Then you must test and see if the blade from the katana can slide through easily and the habaki. If it doesn't then you must remove more of the pinewood until it does.
Step 5: Then get all 3 parts of the pinewood scabbard together with the center scabbard part in the center and combine them on top of each other. Make sure that they all 3 parts align correctly, if not sand until it does with sandpaper. Also make sure there is enough space to allow the blade to slide in and out
Step 6: Now with woodglue apply it on your finger and massage it onto the sides of the pinewood scabbard pieces. Once enough glue has been placed, carefully position the scabbard parts together then sandwich them together. Compress really hard and wait for the glue to dry before moving on.
Step 7: If you notice the other end of the scabbard has a gaping hole. So you must cut out a wooden peg from pinewood to enclose the end of the scabbard and stick into position with wood glue. You have to make not to push the wooden peg in too much or you will not be able to get it back out.
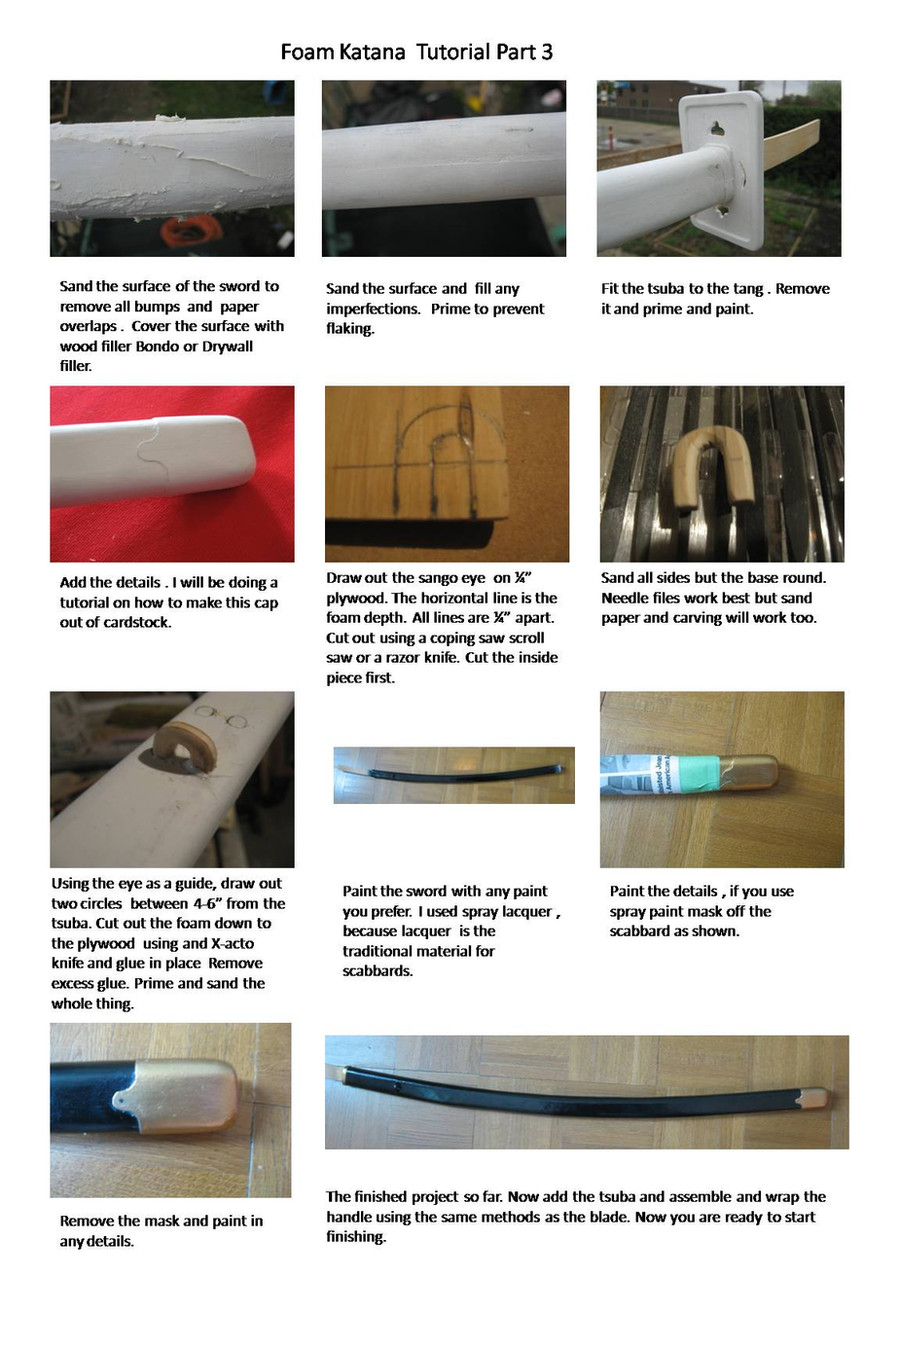
Step 8: Now with hand files round all the sides of the scabbard until it is oval shaped. Then use grades of sandpaper from the most course to the most fine to smooth the sheath. The scabbard should be as smooth and round as possible. The sides of the scabbard can be covered with wood filler.
Step 9: Finnaly, Apply white primer spray paint. Apply several coats until grain is not visible, the inside is not needed. Next apply the appropriate coat of coloured spray paint. Then finally apply a hard protective clear gloss on the sheath. Once everything is finnaly dried you can test if the blade slides into the scabbard parfectly.
Related content


Comments: 34

If I made a new scabbard for my euorpean sword; this is probably how I would make it.
Very simple, yet understandable tutorial.
A way to get a sandwich scabbard more stable is to sew leather or hide very tightly around it. That will keep it pressed together forever, and minimize the strain on the glue. I don't know how japaneese it is though.
 (Smile)")
")
👍: 0 ⏩: 1

indeed that is how the europeons made their scabbards, but lining it with material, the japanese mostly used the raw wood though, maybe some laqcuer
👍: 0 ⏩: 0

Great tutorial, I'll be adapting this slightly for my Jashinist katana in the next couple of days xD One question though, you mention having to plug up a gaping hole at the bottom of the scabbard - I don't see where that hole appears, shouldn't the bottom end be fine as is? The u-shaped middle bit only makes a hole at one end, for the sword to go into, right?
I get the feeling I'm missing something glaringly obvious here :S If I am, excuse my tardness xD
👍: 0 ⏩: 1
well theres 2 ways to go about doing it, the first way is making the u shaped middle, but thats actually quite difficult, you could just use two wooden square dowels instead for the sides, and then plug the whole at the bottom
👍: 0 ⏩: 1
Ohhhh, I see. I'll remember that, gonna try the U-shaped method first though ")
👍: 0 ⏩: 0

Oh, I really like this tutorial! I'll definitely try it for my next cosplay.
But I have a small, dumb question... do the sword and the scabbard "stick together" if you hold the sword in the hilt? Or will the scabbard slide off?
👍: 0 ⏩: 1
as long as the two surfaces are close together, which is the opening of the scabbard and the habaki, then there will be a certain level of friction and suction that should allow it to to stay in
👍: 0 ⏩: 1
I see. Thank you, I'll just try and see what happens, then ^^
👍: 0 ⏩: 0

This is above all my favorite way to make wooden sheaths.
Although, I tend to use an inexpensive plywood for the body, then veneer the exterior with something more exotic. The last one I did, years upon years ago, I veneered with holly and set with brass fittings and a tigers eye cabachon. It was purty.
👍: 0 ⏩: 1
You sure do get to use alot of stuff when it comes to swordmaking I see XD
👍: 0 ⏩: 1
I like to experiment with new and different materials and techniques. It's too easy for me to fall into a rut if I do the same thing over and over and over...
I try to find new ways to make things work. I've dabbled in a bunch of different crafts- each one has its own set of rules and results, but trying to mix and match can produce some interesting results. Sometimes, it turns out good. Other times... I deny any involvement.
")
👍: 0 ⏩: 0

lqtm who woulda thiunk'd it could be that easy to make a scabard
👍: 0 ⏩: 1
Well I for one knew it was that easy
👍: 0 ⏩: 0

^^ great tutorial tey again i need to think of something new to say, i keep saying that, it must get boring
👍: 0 ⏩: 1
If everybody commented just to say great tutorial then for me thats a great achievement lol XD
👍: 0 ⏩: 1
^^ true, and i hope one day that actually happens
👍: 0 ⏩: 0

I'll use theses for a costume I'm doing, any recommendations on how to make straight swords, like a long sword
👍: 0 ⏩: 1
well instead of drawing the katana curved, you draw it straight , then follow the steps through completion XD
👍: 0 ⏩: 0

wow & you even got a third installment for this scabbard tutorial! nice nice!!!
hmmm... among the 3, i prefer & recommend the 2nd one: box making...
👍: 0 ⏩: 1
indeed the box making seems more reliable, but I can only do sandwiching with the amount of materials I have XD
👍: 0 ⏩: 1
i agree... but if you don't have plywood, why not make use of two planks with different thickness for the 'sandwiching' & just trim the edges, or something like that...
👍: 0 ⏩: 1
one of the hardest things to come by is thickness of wood, lengh is no problem XD
👍: 0 ⏩: 1

*Rubs and massages your head to help you think*
👍: 0 ⏩: 1
its the final one, now you know how to make scabbards lol
👍: 0 ⏩: 1

I still might not make them out of wood though XD Fabrics instead
👍: 0 ⏩: 0
and now you know how to make scabbards lol
👍: 0 ⏩: 1

i already tried making scabbards,already made a few... ill improve it using your guide... ")
👍: 0 ⏩: 1
remember to upload your swords and link them to me XD
👍: 0 ⏩: 2
making about 3 swords right now...
ill try to get a pic as soon as i can after i finish it...
ill try to borrow a decent cam next time
👍: 0 ⏩: 0