HOME | DD
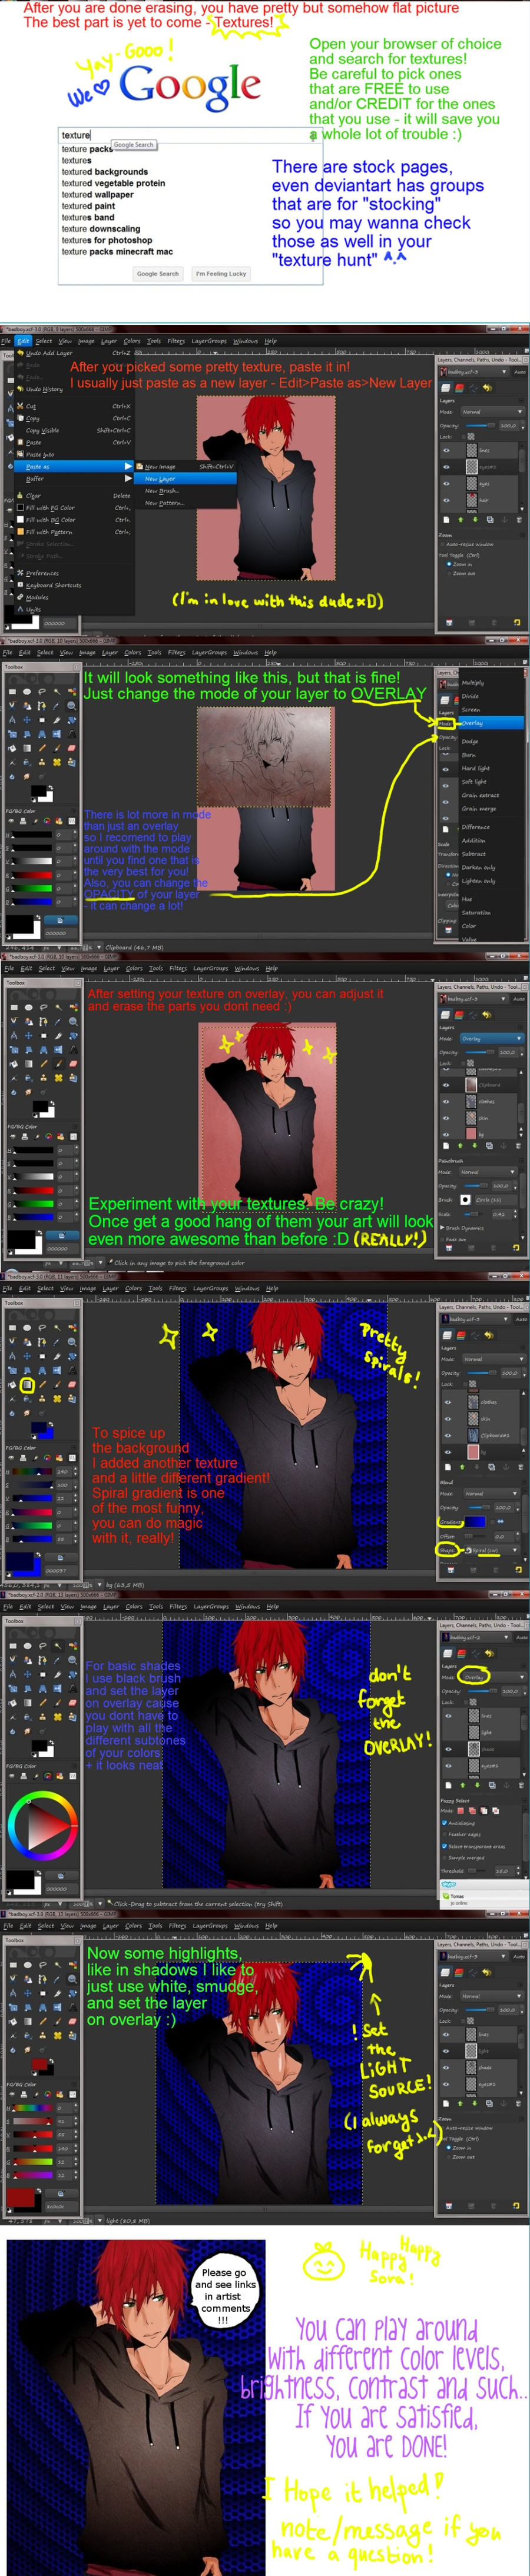
 Dragon-Screamer — GIMP tutorial part2
Published: 2011-08-21 22:29:17 +0000 UTC; Views: 1549; Favourites: 24; Downloads: 53
Redirect to original
Description
Part one is hereUseful links:
How to do lineart/inking - [link]
Know your tools - [link] §ion=&global=1&q=gimp+coloring#/d2sm31r
Lineart from
original by can be found here -> [link]
I am not some kind of pro at gimp, on the contrary, but I really hope you guys will find this at least one bit helpfull, and if you have any questions pleas ask me
 (Smile)")
and if you want some inspiration, do check this guy he is excelent GIMP artist

thanks go to who was so kind and helped me figure out posting of this huge huge file

enjoy and link me your GIMP creations, I will be more than happy to see what you guys can do
Related content


Comments: 19


Very nice tut! Thanks for the work you put in on it.
👍: 0 ⏩: 1

no problem, I am happy it helped
👍: 0 ⏩: 1
thanks a lot, I am happy you think so!
I didnt think you would be interested in knowing I used it, as people who draw as good as you usually dont have so much time, but I am happy you are happy I used your lineart
👍: 0 ⏩: 1

I'm interested in it OwO !
yeah sooo much time i don't really have but i love the "fans" of my pictures ^^ and want to give them a feedback :3 because it makes me soo happy ^^
<33
👍: 0 ⏩: 1
haha, I am happy you did, it made me very pleased to know that you like what I did with your art
👍: 0 ⏩: 1
I'm happy that i found the tutorial from you ")
👍: 0 ⏩: 1

Thanks so much~! I really needed this, for some reason the other tutorials didn't seem to help or their colouring style didn't feel right to me. I was really doubting myself and my colouring. Thanks again.
👍: 0 ⏩: 1
no problem! I am very happy that people find it useful, if you ever have any questions or any thing you would need help with, just ask - I hope I will be able to help
and dont worry, I was (and still am) kind of insecure about my coloring skills

👍: 0 ⏩: 0


Yay!
👍: 0 ⏩: 1
well, you just have to erase the parts of texture layer you dont want!
the easy way of doing it would be : select your shirt layer (or anything else you want to texture)and click on any of the transparent parts with fuzzy select (the magic wand)
change layer to the texture and you erase away! the parts of texture that are not covering oyur shirt will be gone and -tada- your texture is only in places you needed it to be (hopefully)
hope that helped
👍: 0 ⏩: 1
hm...can you explain a little more please? I don't understand HOW to erase with the fuzzy tool...and what do you mean by "change layer to the texture"? Sorry, I just have a hard time getting it until it is explained thoroughly and I get it by trying,lol.
👍: 0 ⏩: 1
ok, first, fuzzy select (the magic wand) tool is to selec an area (not to erase, I am sorry I should have been clearer in my explaining)
and now texture layer - you know how in the tutorial I pasted in the texture as a new layer? well, by change layer to texture I meant that you go from your layer on which you have color (of the shirt, for ex.) to the layer where you have your texture
now, I will try to explain it once again - when you want to have the texture just on one part of your picture you need to erase (with eraser tool) the parts that you dont want
when you want to do it faster (instead of just spending lot of time on detailed erasing, cause we all know how much pain in the behind erasing is)
you can do that!
you click on the layer with your color of the thing you want textured (like the shirt)
you pick out the "magic wand" tool and click anywhere on the layer, where you dont have your color - what it should do is to select all the areas exept the ones you have colored
when you have this selected you change from the layer where you have colors to the layer where you have your texture (the selected areas will stay the same)
you pick the eraser tool and erase away - the selection will only let you erase things around the "color" so you dont have to spend lot of time trying to erase around lines
I hope it is clearer now - if not I can make few screen caps with explanation and send them to you
👍: 0 ⏩: 0