HOME | DD
 dust-bunny — Sizer Armor In Progress
Published: 2011-02-28 19:22:01 +0000 UTC; Views: 3619; Favourites: 38; Downloads: 38
Redirect to original
Description
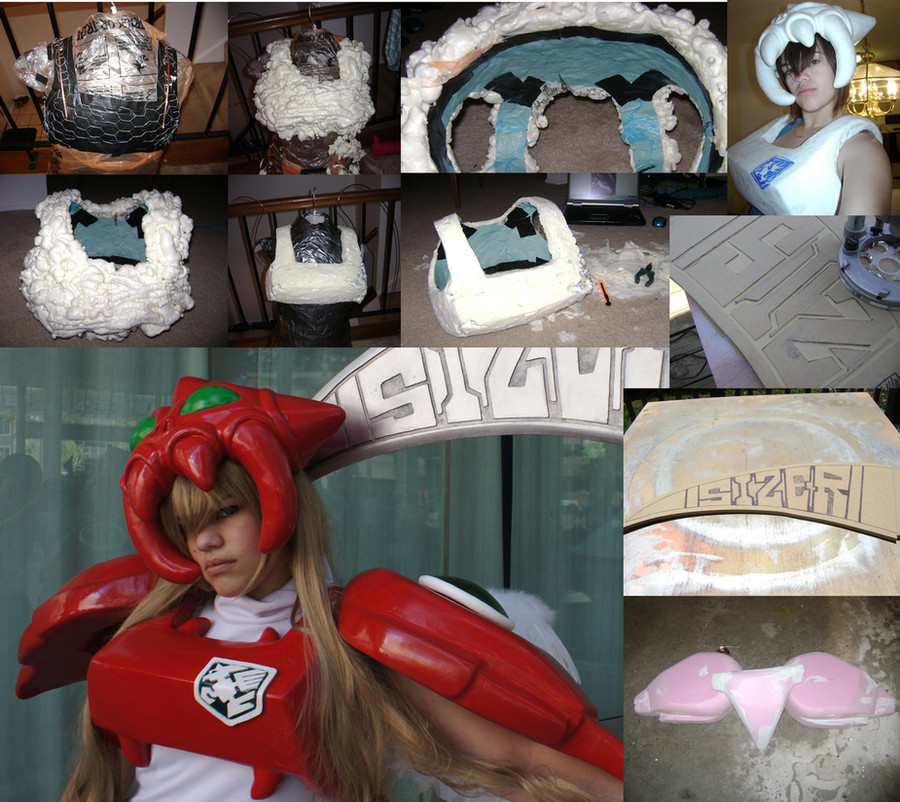
Just a collage of in-progress pictures of my Sizer armor. I didn't have enough detail to do a tutorial, and they would be pretty redundant to other tutorials I have posted.If you are interested the helmet tutorial is here : [link]
The chest piece was made using chicken wire and spray foam. I used a duct tape body form to spray the foam on to make sure it would fit me when complete. The spray foam was then carved to shape and finished with model magic, paper clay, and spray enamel.
The sholders and codpiece were done by carving pink insulation foam and shaping it with sand paper.
The scythe was hand routed on MDF wood board. It was attatched to a dowel rod, and painted silver.
Related content


Comments: 7

I'm back to bother you again- sorry. I had inquired on your helmet tutorial how you would go about doing a Sakuyamon (Digimon: season 3) helmet... and well... I just NOW realized that Sizer and Sakuyamon's armor are relatively the same- helmet, shoulder pads, and chestplate.
I have a few questions- does your chestplate just slide on or have any buckles in the back so it separates?
How are the shoulder pieces attached?
Those are some of the most trying pieces of my Sakuyamon costume- I was trying to wrap my mind how to connect the shoulders to the chest piece so they wouldn't move or fall along with the buckles or other means of connection being hidden nicely. I was also so happy to see you used the spray foam idea for the chestplate and was wondering if you believe it would also work well for Sakuyamon's round shoulder pads?
👍: 0 ⏩: 1

The breast plate basically slips on over my head like a t-shirt would. It is slightly difficult to get in and out of because it is rigid, but if I have help I can manage just fine. I considered cutting the piece in half down the sides (like where a t-shirt has seams) but it didn't end up being necessary. You could try both ways.
The shoulder pieces are attached using a loop of sturdy wire and some velcro. The wire loops around the arm hole of the chest piece to keep the shoulder pads standing straight out, and velcro is there just to keep it snug and prevent any shifting.
I normally find that attaching the armor is the hardest part, so you have to experiment because not all methods work all of the time.
I think that the spray foam could work for the shoulder pads, but since they are circles I would recommend using a styrofoam ball. You can google "smooth foam balls" (i promise it isn't dirty) and buy a pair of those that you think is the right size. Make sure they are hollow, you could also look for large christmas ornaments. No point in trying to carve the expanding foam into a sphere when spheres are already available!
Hope that helps!
👍: 0 ⏩: 0

Not particularly. The armor is made of lightweight materials to keep the weight down, I would say with everything finished and worn (wings included) it was no heavier then a backpack with a few books in it. It was however a bit bulky so moving around was a bit difficult.
👍: 0 ⏩: 1

just model magic + paper clay on top of the chest piece?? that's all? did you have to prime it before painting?
👍: 0 ⏩: 1
I did prime it before painting, just a normal spray primer from the Auto Body store. Light sanding and then a coat of spray enamel.
👍: 0 ⏩: 0