HOME | DD
 eggIett — [step by step] -- eye could have sworn
Published: 2014-02-17 04:30:07 +0000 UTC; Views: 8671; Favourites: 275; Downloads: 55
Redirect to original
Description
OTL puns.This is just something... to give back to the community, I guess. ;_;
For this, I used Paint Tool Sai with a tablet. It's a Monoprice tablet, and I bought it off of Amazon for like $60. I like it, but I can't really compare it to anything else.
Basic Brush Settings: sta.sh/029g2qkz3ede
Blending Examples: sta.sh/01orby6kdakr
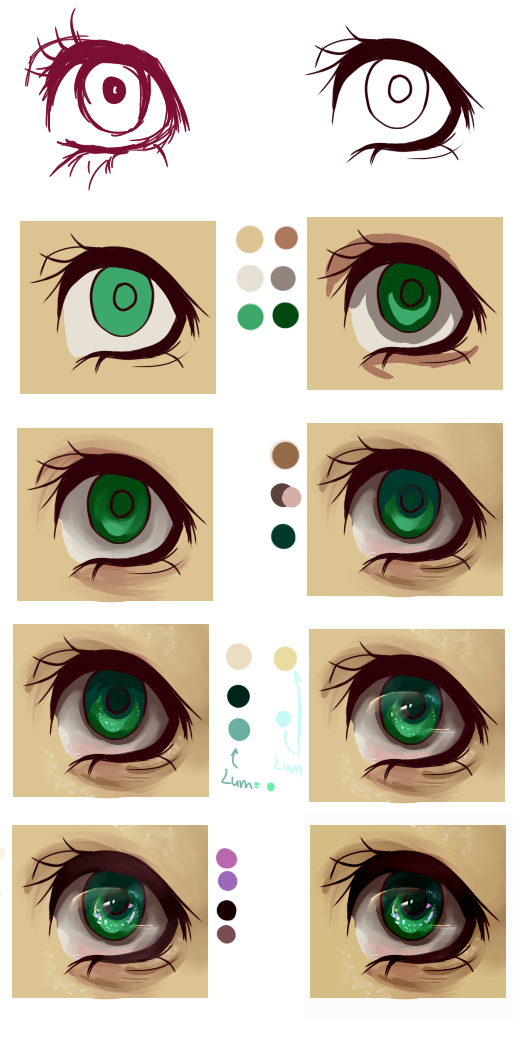
1. Sketching
I sketch with my normal marker settings in a color other than black.
2. Inking
I lower the opacity of the sketch and color over in a darker color other than black. My stabilizer is at S-7 (and I use the marker). You should get a lagging effect. I've had trouble in the past with my tablet and stabilizer not working together. If you have this issue, I recommend exiting the program, unplugging the tablet, and trying again.
For the lashes, I release pressure at I reach the end. This effect can be simulated by using the curve/pressure tools.
3. Flats
Using the marker, I color in the flats (Blending: 0). I have a layer for each color. For the white of the eye, I prefer to use an off-white. It looks more natural to me, personally. Any color, as long as it's not too bright, can be used for the iris.
4. Shading (blocking)
Using the marker (Blending: 0), I use a darker color to block in the shadows. I do not make any new layers! For instance, I blocked in the darker color of the iris on the same layer as the base color of the iris. As long as your blending is at 0, you shouldn't have a problem. Messy? That's perfectly fine!
5. Shading (blending)
Using the marker tool yet again (Blending: 30, 50, 80), I up the blending capability to a higher number. No new layers, yet again. With my darker color still selected, I move from the darker color to the lighter color. I increase blending until I achieve a paintish effect (I do not spend very long on this part, as complicated as it sounds! No more than 1 minute.)
6. Shading (blocking & blending)
Using the marker too (Blending: 0), I block in the darker shades. Again, no new layers were created. Don't be afraid of using dark colors with your light ones!
For the iris & skin, I blend with the marker the same way as the previous step. However, for the whites, I use the oil water tool. When using blending tools such as water or oil water, I never continue to blend. I make small, choppy strokes to ensure I do not overblend.
Note: Optional, but I also put a bit of pink on the bottom of the whites of the eyes. It's blended with the oil water tool.
7. Highlighting (stars)
Highlights are my favorite part of coloring eyes. I used to just put a small white dot in an upper corner, but if you take advantage of other ways to highlight, you can make such beautiful things!
I call this step the 'stars' step because that's basically all you're doing. For the first time, create a new layer. Set it to luminosity mode. Now choose a color that's lighter than the base of the iris, preferable with hues of another color. Then, just like stars, dot that color on the lower part of the iris (marker, blending: 0)! If the dots are too strong, then lower the opacity of the luminosity layer and/or blend the dots just a little using the oil water tool.
Optional: I used another darker color. On the original layer of the iris, I used this darkest color to color in the shape of the pupil and the top of the iris. I did not blend.
For the skin, there are barely noticeable highlights. Unlike the iris, you should stay on the same layer. I use the marker (Blending: 0) to dot on the skin where light hits, but instead of using the 'simple circle', I use 'fuzystatic'. I blend these dots with the brush tool, but again, in short, choppy strokes.
8. Highlighting (gloss)
Now the magic happens! Making another layer, I set it to luminosity and moved it above the lineart. First, I use a light, pale yellow with the marker (Blending: 0) and make a two slightly curved lines. I only blend the bottom of these lines. You can blend the bottom with with either the brush or oil water. Experiment to find your preference.
Then, on the same layer, I pick a light blue and add highlights in a few other places, blending in the same manner.
Optional: Using an off-white and your marker (Blending: 0), add small, white shines to the iris.
9. OPTIONAL (more touches)
I usually don't do this unless the eyes can be easily seen. I lock the opacity on the lineart layer and add in a darker color to the edges of the lashes with the marker (Blending: 0). Using the same tool and layer, I then add a lighter color of the base to the lashes.
In this step, I also made another luminosity layer and added purple and pink dots for more 'stars'. I combine nearly every color+luminosity. Experiment! :3
10. OPTIONAL Final adjustments
I love contrast. A lot. In this step, I went to Filter > Brightness & Contrast. I lowered the brightness and increased the contrast.
Making a new layer set to overlay, I use my marker (Blending: 0) to color in the to portion of the eye.
...And that's it!
I... I'm not too sure if the description helped explain. I hadn't intended to explain my steps/settings until LovelyAgeha suggested it. xD
If you have any questions or suggestions, let me know! q_q
Related content


Comments: 16


Eee, no problem! C:
And thanks!!
👍: 0 ⏩: 0


This makes it look like I spend a lot more time than I actually do. xD Doing eyes usually only takes like 3-5 minutes for me though. (':
👍: 0 ⏩: 1

Really? I might have to try this.
👍: 0 ⏩: 0

Pretty stuff, that will help a lot the beginners !
👍: 0 ⏩: 1
Thanks! I hope it will. C:
👍: 0 ⏩: 0

