HOME | DD
 ElsonWong — The Process 003
by-nc
ElsonWong — The Process 003
by-nc
Published: 2011-06-22 20:13:29 +0000 UTC; Views: 636; Favourites: 23; Downloads: 8
Redirect to original
Description
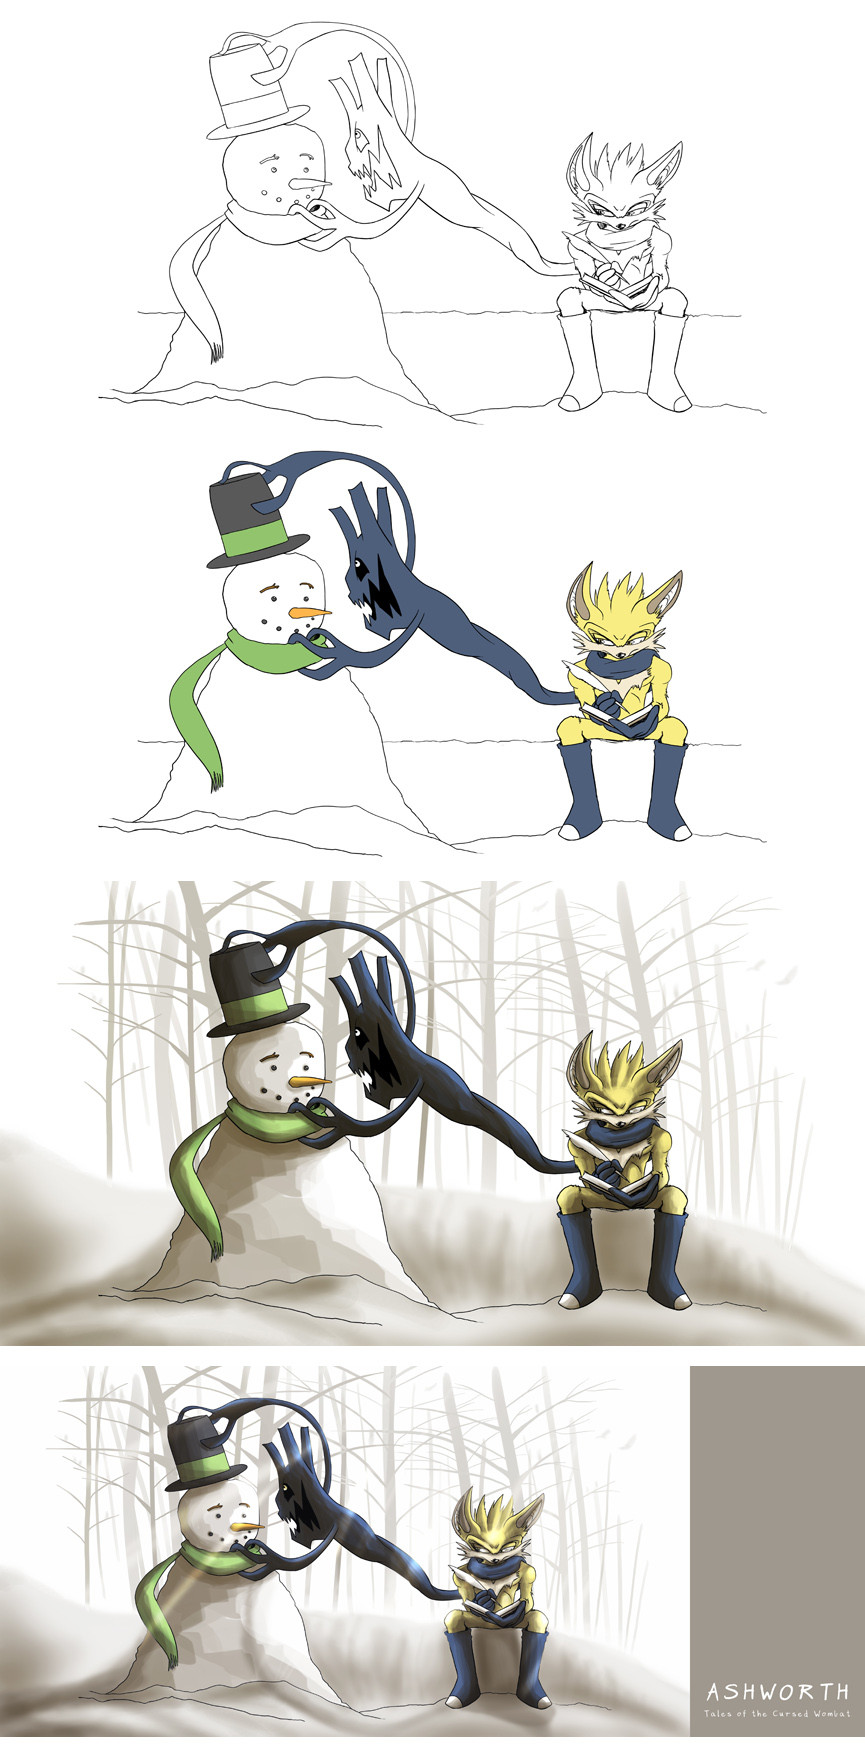
Here's my take on the colouring process to the deviation: 'snowman'If you got any questions about the method please don't be afraid to ask and I'll do my best to answer it when I have time.
 (Wink)")
'The Process' series of deviations will be scrapped later. Please view future visual tutorials in my Scraps folder. *thumbs up*
Related content


Comments: 14


I went digital all the way.
👍: 0 ⏩: 0

i'd be interested to know how you went from 2 to 3 if thats alright
👍: 0 ⏩: 1
Sure.
Step 02 is an important step to follow up to Step 03 because the base colours are what will determine the overall colour set for the piece.
To begin with Step 03 you'll need to use 'Adjustment Layers' - set to Hue/Saturation mode. Use a soft brush of your preference and colour at with a very low opacity. Studying how light bounces off objects can improve the your choice and application of shadow and light. Keep at it shading with a colour tha matches the environment - I chose a greyish brown to blend with the yellows to Ashworth and the blues to Zephar.
Hope that helps!
👍: 0 ⏩: 1
ah i see im afraid i've never used the adjustment layer before not quite sure how it works
👍: 0 ⏩: 1
This fantastic video tutorial will sort you out (by David Lillie).
[link]
👍: 0 ⏩: 1
ah i see, thanks very much the vid was funny and insightful ^^
👍: 0 ⏩: 0

Awesome! I love it! I read you comics on your old account, and this is my favorite character in those comics! Great Job!! (thumbs up)
👍: 0 ⏩: 0

I'd like to know about the third panel, after you coloured it, did you use opacites with black to get the depth in? like on the left of the snowman?
👍: 0 ⏩: 1
I posted a reply to Ninjaketsune that may help you out - just above your comment. However to add to what I said regarding the depth I used an opacity of 30% and a flow of 20% for my brush. Either a round soft brush or textured brush will do the trick. Keep brushing on top of the adjustment layer on spots you feel need more shadow/dark colour - this will create the depth you're looking for - if you made a mistake and overdid it, just press 'X' to switch to WHITE on the colour palette and brush away to erase the darkness (it is essentially acting as your eraser but with the same opacity and flow levels, making the job much more smoother and easier). *thumbs up*
👍: 0 ⏩: 1
ahh you see, with some of my work to get opacites, i was actually afraid to use the white on any dark areas if I made a mistake. But now I know from a professional  (Smile)")
")
👍: 0 ⏩: 1
Your most welcome! Glad to have helped out!
And boy, no way am I a pro! I still got a long way to go to truly call myself a pro in the field of digital arts.
👍: 0 ⏩: 1
XD
your work is amazing! XD its hard NOT to call you a pro :L
👍: 0 ⏩: 0

thanks for showing the process. I'm gonna definitly use this
Love the way u added the background <3
👍: 0 ⏩: 1
Your most welcome MissYuna! I'm glad to be helpful. ^_~
👍: 0 ⏩: 0