HOME | DD
 falia — Vulpix WIP process
Published: 2010-01-25 12:22:02 +0000 UTC; Views: 5787; Favourites: 193; Downloads: 164
Redirect to original
Description
I thought this might be a neat little addition to the deviation submission, found here: [link]If you found this any way helpful, or lacking, I'd like to hear your feedback! Specific suggestions such as "less words more pics plz" or "Please add a screen cap of the layers" are particularly useful.
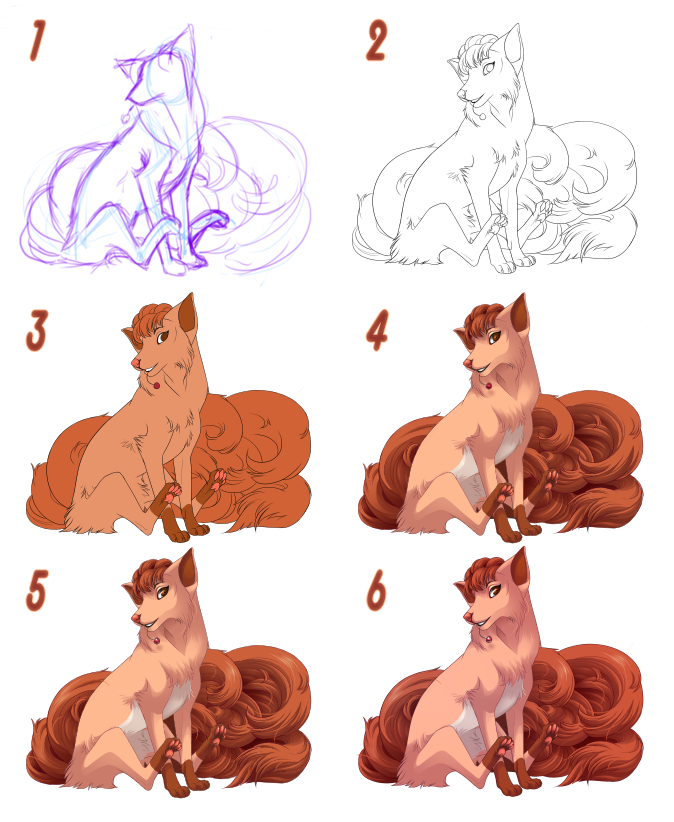
1. Sketching
I sketch the general shape of the drawing I have in mind fairly loosely in SAI. The blue lines serve as a skeleton of the basic proportions and pose, the purple lines create volume and texture.
2. Inking
I take my sweet time doing line art, again in SAI. Bits of fur, the outline of the body and tails and stylistic touches emerge. I put quite a bit of detail into the line art, though far less than some; it helps me when I start colouring and shading later on.
3. Flat colours
I lay down the flat base colours in Photoshop CS3. Each colour is on its own separate layer. The line art is still black at this point, but will be tinted once I finish shading.
4. Shading
Using a round brush of various hardness levels I block out the main dark areas. I then use the polygonal lasso tool with different Feather settings (between 1 and 5) to gradient shade lighter bits. The shading doesn't happen on the base colour layer, but on a separate one above that clings to it using Clipping Mask. Usually I have only two shading layers on top of base colour one: one for the super dark shading and one for the normal stuff. I never use blend modes aside from Normal, although I really should experiment with that.
5. Adding even more details
I added highlights to the tails, paw pads, cherry, nose and eye. A recent addition to my drawings is stray hair, which is quite easy to spot in the tails of this drawing. It adds a dynamic quality to the illustration that gets lost after the sketching stage and makes it 'pop' more. Many artists have no need for these silly wisps of hair because their drawing ability is so far advanced that they can capture the 'motion' with the lines and colours alone. I can't, and thus resort to this (cheap) trick.
6. Polishing
This post-processing business can go on for ages, and actually doesn't only have to occur after the drawing is done at all, as often happens in professional Illustrating. In this case, it's a really simple ordeal. I merge all my layers, excluding the background, and using Clipping Mask create a layer on top set to Soft Light. I fill this layer with a kind of cerulean blue and throw a gradient of raspberry pink over half of it, starting in a random corner. I then adjust the opacity of the layer to something below 20%. Often I fiddle around a bit more and delete parts of the layer with a soft eraser brush, but not this time. Why I go through the trouble if it is barely noticeable? Because it unifies the drawing's colours and lays a subtle focus on parts of it that you can't achieve by colouring the way I do.
Related content


Comments: 17


Thanks for taking the time to make this! I've been looking for some ways to spoof up my shading, and I've found this really helpful! Thanks again!
 (Smile)")
👍: 0 ⏩: 1

If it helps you in any way, you're var welcome!
👍: 0 ⏩: 0

Wow - love this one! One of the best Vulpix interpretations I've seen. <3
👍: 0 ⏩: 1

U-U;
*bows*
I admire your teachings skills sensei, now this fox must test her newly learned skillz.
👍: 0 ⏩: 1
Haha, glad I could be of any help!
👍: 0 ⏩: 1

w-wow
the lineart is stunning is so is the process
but the end result is just so gorgeous
this is like the best of vulpix i've seen O.O
👍: 0 ⏩: 0

Oh wow, it looks wonderful~ <3333 I will so use it! ^w^
👍: 0 ⏩: 1


LOOK AT THAT TAIL YOU ARE GODLY this is beautiful ;u; The final color works really well too, I always end up changing the colors to match together better.
👍: 0 ⏩: 1
I call it the tail-of-pain nowadays, nearly broke my wrist trying to force those curves out. I used make them match like that too, but it gets so annoying with a slow PC and a large file like this. So, cheap overlay tricks are my friends now 8D. Cheers!
👍: 0 ⏩: 0