HOME | DD
 Francy-93 — Tutorial infrared photography
Published: 2012-05-17 15:12:51 +0000 UTC; Views: 5110; Favourites: 58; Downloads: 98
Redirect to original
Description
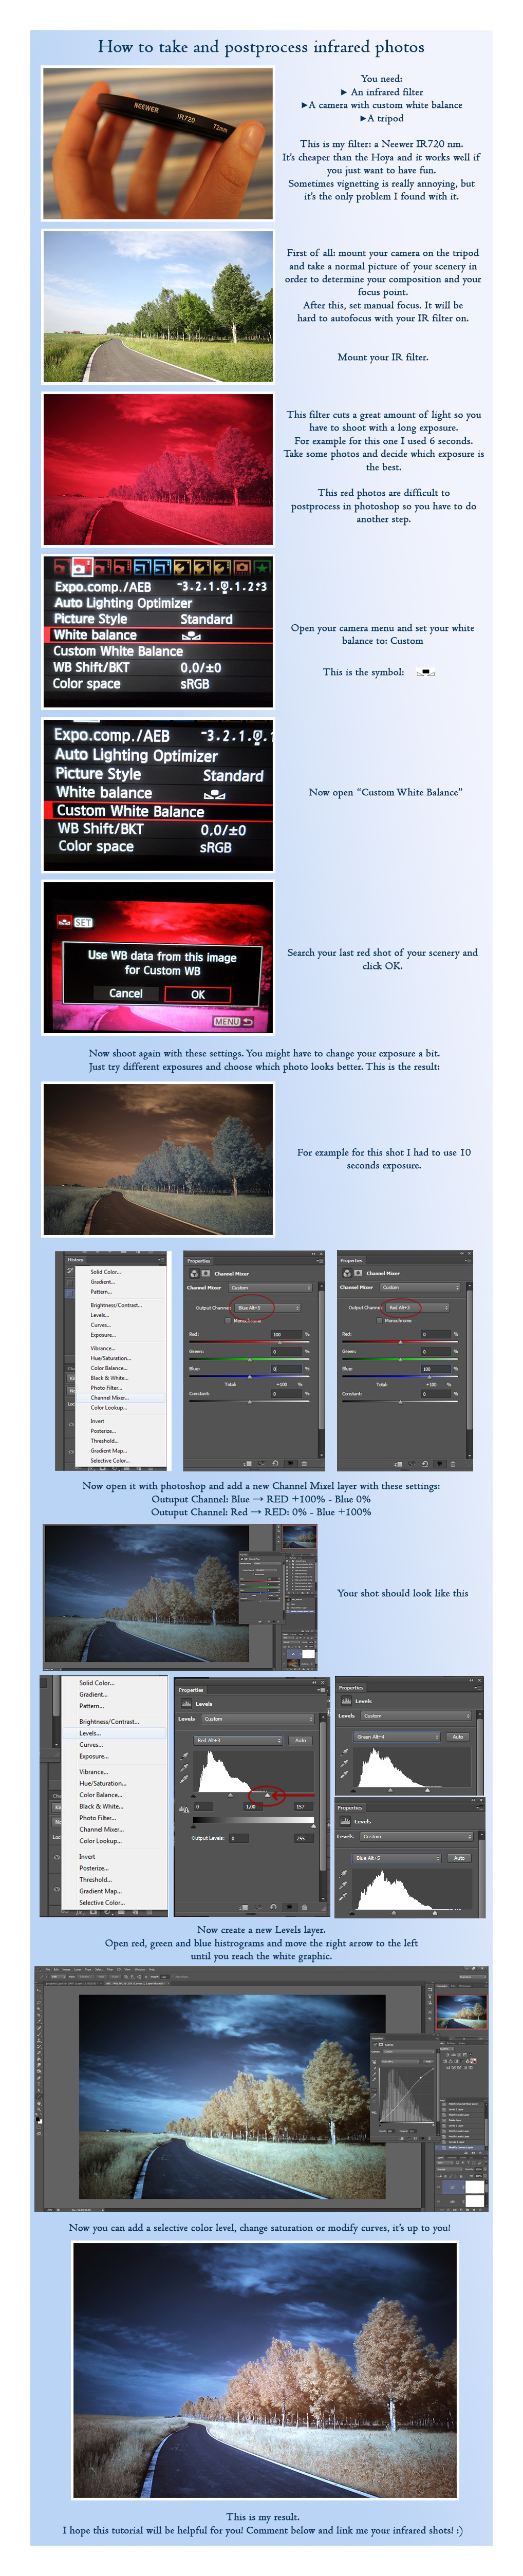
This is a tutorial about infrared images taken with an IR filter. I started to be really interested in IR photography but my first results were just some horrible red shots with poor quality. I had to try a lot but I've finally fixed this problem. It's everything explained in the image. If there are any problems just comment below, and link me your shots!PS: english friends! If there are some mistakes please tell me where and I will correct them
")
This is the final result:
Traduco anche in italiano.
Ho cominciato a interessarmi di fotografia all'infrarosso solo qualche settimana fa, ho comprato un filtro Neewer 720nm dal quale però ottenevo solo foto rosse con una qualità disastrosa. Il problema è che su internet non è spiegato benissimo come risolvere questa cosa, così ho pensato di fare un piccolo tutorial per noi ignoranti in materia.
Il filtro l'ho comprato su amazon inglese, costa veramente poco rispetto al famoso hoya e l'unico problema che ho riscontrato è un pò di vignettatura e qualche pixel perso, ma per il resto tutto ok.
I tempi di esposizione per questo tipo di foto diventano allucinanti perchè la maggior parte della luce visibile viene tagliata fuori dal filtro, quindi vi serve assolutamente un cavalletto.
Altra condizione necessaria: la vostra macchina fotografica deve avere il bilanciamento del bianco personalizzabile.
Una volta montato il corpo macchina sul treppiede, fate una foto normale giusto per decidere composizione e punto di messa fuoco. Adesso mettete la messa a fuoco su manuale e montate il filtro.
Scattate con il bilanciamento automatico, vi verrà fuori la classica foto rossa, fate qualche prova per capire quale esposizione è migliore. Ora aprite il menù della vostra macchina fotografica, impostate il bilanciamento del bianco su "personalizzato", aprite "WB personalizzato" e cercate l'ultima orrenda foto rossa che avete fatto e impostate il bilanciamento del bianco su quella.
Ora scattate di nuovo (forse dovrete allungare i tempi d'esposizione). Il risultato cambia parecchio!
Ora potete tenervela così (è già caruccia) oppure potete modificarla su photoshop per invertire i colori e avere l'erba giallognola come nella mia foto finale.
Apritela su photoshop, create un nuovo livello "channel mixer" con questi settaggi:
Output channel: blu -> blu 0% - rosso +100%
Output channel rosso -> blu +100% - rosso 0%
Ora create un nuovo livello "levels" e sui grafici rosso, blu e verde spostate la freccina di destra finchè non tocca l'inizio del grafico bianco (come in figura).
Ora avete praticamente finito, potete aggiungere un pò di saturazione o giocare con le curve e i colori.
Spero vi sia stato utile! Commentate se avete problemi o se volete mostrarmi le vostre foto!
 (Smile)")
Related content


Comments: 50

I just got my Neewer IR720 today and messed up all my infrared shots. ")
👍: 0 ⏩: 1

I hope you'll get some good shots with it! Good luck
👍: 0 ⏩: 1
Thanks. I just tried it this morning and still no luck. I'm wondering if the Canon T3i is too good at blocking out infrared or my IR720 Neewer filter is not strong enough for the camera.
👍: 0 ⏩: 1
But what's the problem? Are they still red or just dark?
👍: 0 ⏩: 1
They come out red and dark. Maybe I didn't set the white balance correctly. When I take the shot the leaves look nothing like the ones in your tutorial. They are black. When I import them into photoshop elements the highlights are overblown, when I try to switch the the red and the blue channels out the whole photo turns a blueish color. Hope this helps, any idea what I'm doing wrong. I have seen other infrared photos done with the T3i so I think it is something I'm doing wrong.
Just wanted to double check that I am using the right filter for this www.amazon.com/NEEWER%C2%AE-58…
Thanks for the help.
👍: 0 ⏩: 1
The filter is ok. If shots come out dark, maybe you should try to use a longer exposure, maybe 20, 30 seconds or even more. If they are still dark try with a larger aperture or a higher ISO.
These filters cuts a great amount of lights so I always shot during daytime and with the sun. This should fix the dark problem.
About the red problem.. Did you shot the first image with AWB? The first one should be red, because you need it to set the custom white balance. After the first shot you should open your white balance, then choose custom white balance. Now open your menu and choose "custom white balance" and choose your last red image.
This is what you should do with your T3i: www.youtube.com/watch?v=QwZGrS… (watch it from 1:40) but instead of that white shot you choose your red image.
Tell me if this works!!
👍: 0 ⏩: 1
Thanks I redid the shots using the awb. Here are the results:
Straight from the camera
Processed I still can't figure out why they don't look like any of the infrared I have seen. Even playing around in elements and gimp I can't get the foliage to look white or even pink. I'lll have to give it another try later. Thanks for the help.
👍: 0 ⏩: 1
I'm sorry, maybe it's just the filter. Unfortunately to obtain a really good infrared photo you should have a modified camera.
👍: 0 ⏩: 1

This Tutorial will work very well for many digital cameras! Just try it!
👍: 0 ⏩: 0

Great tutorial! Would work fine for me if my camera could use the red image as white balance.
👍: 0 ⏩: 0


Hi francy, thanks,
I have been doing IR experiments for a while, but no Post Processing.
I will work my way through your tutorial & see how I go. I have Photo Shop Elements 8, so it will be similar.
Cheers
Col
👍: 0 ⏩: 1
Good luck for your post processing! Send me the links of your photos, if you want!
👍: 0 ⏩: 1
Thanks Francy, much appreciated.
Don't hold your breath, I will get there soon I hope
Cheers
Col
 (Wink)")
👍: 0 ⏩: 0

I must echo some of the comments below - this is a really good introduction to using a filter for IR work. We all have our own tweaks and preferences, but for people starting out this is great.
Cheers
David
👍: 0 ⏩: 1


Very good basic intro to IR ! I wish I'd seen this when I first started out. You make it very clear and easy.
Personally I often prefer to use auto-levels (or auto curves) before the channel swap. You might also consider adding a Sharpening step, as IR images are often quite soft. My very basic sharpen tutorial is here: [link]
👍: 0 ⏩: 1
Thank you for your suggestions!
👍: 0 ⏩: 0

cool, thanks for the tutorial. now i finally know what a IR filter can do.
👍: 0 ⏩: 1

Good intro tutorial ^_^
The only thing I would add is that using a white balance cap rather then setting the custom white balance based off an entire image really helps with results without much additional cost ($10-$50).. at least it helps on older models.
👍: 0 ⏩: 1
I've heard of these cap.. but they work with IR?
")
👍: 0 ⏩: 1
I imagine they vary, and I gather UVR photographer still prefer cards instead, but for IR I have had pretty good luck with the BRNO baLens. I keep meaning to try out some of the cheaper ones to see if they give a different result.
👍: 0 ⏩: 1
Hi jythie
Do you use the white balance cap with the IR filter in place ?
Cheers
Col
👍: 0 ⏩: 1
Correct, I put the IR filter in place, dial in the exposure, then put the white balance cap on, take that picture, then finally have all the pieces for shooting ^_^
👍: 0 ⏩: 1
Thanks jythie
I'll give it a try on my Sigma cameras.
Col
👍: 0 ⏩: 0

This is one of the simplest and effective explinations I have seen for IR + Filter : Brilliant
👍: 0 ⏩: 1


I guess the camera will also have to have a sensor that's sensitive to IR frequencies. I've heard that not every model will work, even with the IR filter mounted.
That said, IR photography is really interesting and I'm going to try it as soon as I can get a suitable filter
👍: 0 ⏩: 2

Most newer sensors have an extremely aggressive IR cut filter, but IR light is nearly impossible to completely block. That being said, the more aggressive the IR hot mirror, the longer the exposure time will need to be. This poses its challenges, naturally. As stated in the tutorial, a tripod is necessary.
👍: 0 ⏩: 0
Actually I think that every modern camera now is sensitive to infrared light.. they put a sort of mirror filter in front of the sensor to block IR light that can ruin normal images. You can remove this mirror and modify your camera or use a filter..
I bought mine with amazon.co.uk, have a look there, it's really cheap
👍: 0 ⏩: 0


