HOME | DD
 jocarra — Another Fur Tutorial...

Published: 2009-05-31 09:54:34 +0000 UTC; Views: 24360; Favourites: 825; Downloads: 0
Redirect to original
Description
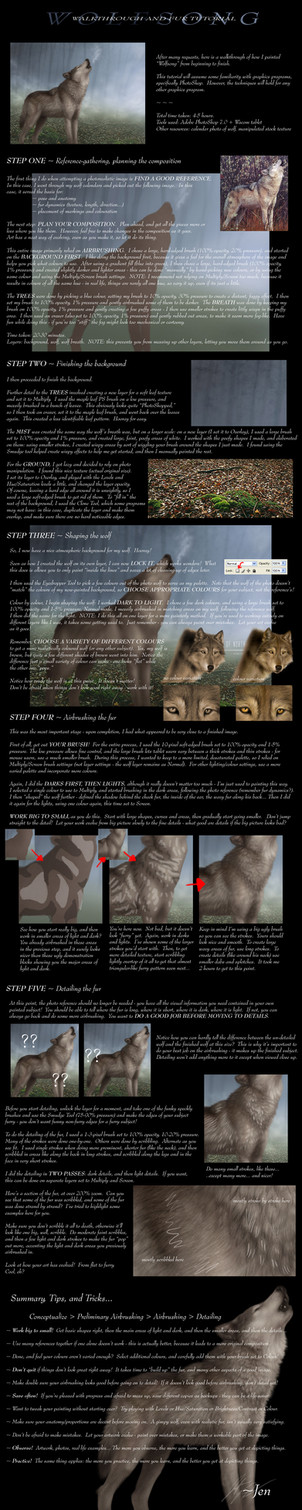
I use Photoshop, but the general strategy can be applied to many other media, digital and traditional.I realised the work-in-progress image for Wolf Mates VII made an ideal walkthrough image, as it includes all the major steps I take in painting. I've labeled them and included a description.
Feel free to post any questions if I wasn't clear enough
 (Smile)")
Related content


Comments: 181

Oh, and a little question if you don't mind. When painting markings, how do you go about doing it? Like do you block them in first or add them afterwards..?
Many thanks <3
👍: 0 ⏩: 0

I have a question!
Do you block out the characters in the colour they are going to be?
👍: 0 ⏩: 1

Yes, roughly, but it usually ends up looking a lot better in the end. As you can tell with the grey wolf, it looks kinda ugly/odd right now, but I'll make sure that in the end it looks right (or mostly right) X3
👍: 0 ⏩: 1
Oh ok thanks I'll give it a go (I am rubbish at realism!)
👍: 0 ⏩: 1
Using a more beginner strategy is better - once you get the hang of the basics, then you can try things like realism, or your own style
👍: 0 ⏩: 1

I've been doing my detailing/shading wrong all along o.o Most of the time I create the fur and do shading/lighting last. That's probably why I've never been good with realistic fur >.<
Thanks so much for the tutorial
")
👍: 0 ⏩: 1
You mostly want to work from "big to small" - start with large basic shapes and large areas of light/dark, and then slowly work down. Then when it mostly looks good (except for lack of texture) THEN start texturing. It works with graphite, too: [link]
👍: 0 ⏩: 1
Oh, I see. Thanks so much for the info!
👍: 0 ⏩: 0

That's what I usually do for drawing hair and fur - when I feel like doing realism xD. I've gotten better at it.
👍: 0 ⏩: 1
<^ ^> Somewhere in my gallery I have one of Keitana

👍: 0 ⏩: 0

i has a question!
so, on the layers, what does multiply and screen actually DO to the colours/sharpness- or whatever?
doing stuff like that on layers really confuses my small mind....
thankye, and awesome drawing!
👍: 0 ⏩: 1
Multiply darkens, and screen lightens, basically. So multiply is for adding darker bits and screen is for adding lighter bits, whether you making large light/dark areas, or adding individual hairs.
They are also used to create different colours. For instance, saying you're painting something tawny. You've got a tawny block of colour you want to start shading into a sphere. You can set your original tawny colour to multiply, and colour the dark parts to make a kind of dark brown, and then set the original tawny colour to screen and colour the light parts, to make a kind of light yellow.
The layer itself should be set to normal. I do all painting on that one layer.
However, if you're just learning, maybe try this: [link] - I show how to use multiply and screen to colour a character for beginners.
👍: 0 ⏩: 1
*reads*
thanks very much! ill check the link, but i have a better idea now!
Thanks,
👍: 0 ⏩: 0

This is even better than your last fur tutorial and it has been very helpful
Thanks Jo x
👍: 0 ⏩: 1

This is lovely, thank you very much for posting it
👍: 0 ⏩: 1
Thank you, and you're welcome
👍: 0 ⏩: 0

Woah, very useful. 
And a lot of detail on step 5; great work.

👍: 0 ⏩: 1
Thanks so much
👍: 0 ⏩: 1
")

Very good tutorial! Can't wait to see the artwork complete as well, looks so beautiful
👍: 0 ⏩: 1

Thank you SO much for this! When I saw the WIP of this image, I was already looking at the image how you managed to do such detailed fur. XD This is definately going to help.
👍: 0 ⏩: 1
You're very welcome
"how you managed to do such detailed fur" -> painstakingly

👍: 0 ⏩: 0

YAYZ! ANOTHER ONE!!!!!!!!! x3 U RAWK!!!
👍: 0 ⏩: 1

<= Prev |