HOME | DD
 jocarra — Another Fur Tutorial...

Published: 2009-05-31 09:54:34 +0000 UTC; Views: 24347; Favourites: 825; Downloads: 0
Redirect to original
Description
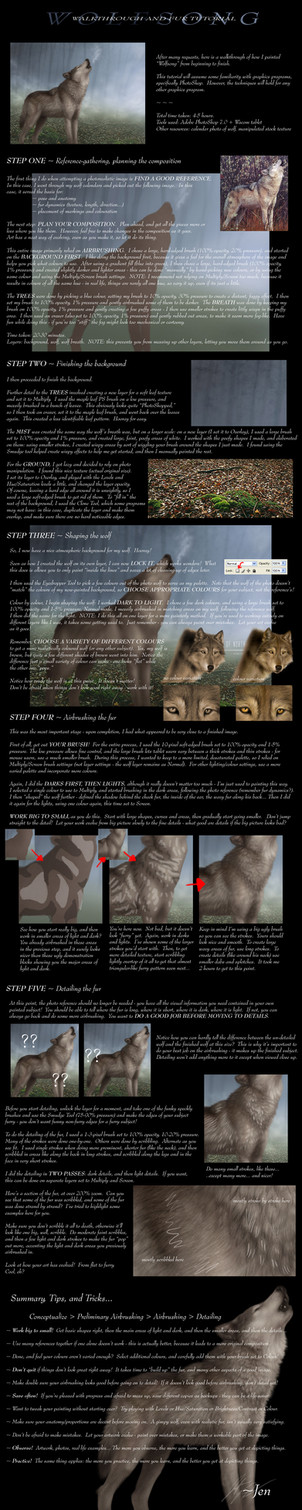
I use Photoshop, but the general strategy can be applied to many other media, digital and traditional.I realised the work-in-progress image for Wolf Mates VII made an ideal walkthrough image, as it includes all the major steps I take in painting. I've labeled them and included a description.
Feel free to post any questions if I wasn't clear enough
 (Smile)")
Related content


Comments: 181


I wish I could see you doing the detailing stage, regardless how I do it my works never come out looking like fur >.<
👍: 0 ⏩: 1

I could try out that uStreaming thing everyone is doing nowadays...
👍: 0 ⏩: 1
That would be cool ")
It can also record what your doing and let people watch at a later date, if you're not up to doing it live in front of people, you can just starter up and record.
ManyCam is what I use, it's a free alternative to the paied for webcammax (they both do the very same thing) and is good for recording your desktop, or have it follow your mouse around. And yes you can remove the manycam logo that appears at the bottom of the window

👍: 0 ⏩: 1
Yeah, I have no idea how it works. Like, if I need to download a program that records my desktop, and then uploads it through uStream. 
👍: 0 ⏩: 1
Go download Manycam at manycam.com
Ustreams not like other webcam aps that takes still and 'uploads them' to a site, it actually streams everything you do live (give or take a few secs delay on the viewers end)
Aside that theres nothing else you need to download, make a ustream account, create a show, and just click brodcast now, it'll pop up a flash window that will ask to connect to whatever webcam proggy you have, then click brodcast and boom, you are on the air. Though manycam you can set if you want it to display your desktop, a image, or even another webcam.
I can gladly show you all this though mine if you'd like.
👍: 0 ⏩: 1
That sounds like way too much work right now XD
👍: 0 ⏩: 0

It's amazing to see how you do this, especially since I have no idea how to do digital art.
👍: 0 ⏩: 1
That's okay, I have no idea how to do sculpture

 (Wink)")
👍: 0 ⏩: 0

Thanks so much for that. I'm sure it'll help me at some point when I get Photoshop
👍: 0 ⏩: 1

What an excellent idea for a reference pic! You can really see the process, thanks for the tips!
👍: 0 ⏩: 1


i think i dont have the patience for that °~°
👍: 0 ⏩: 1
Well, you can work up to it. As you get better at it, the results get better (and more tempting) so you're more willing to spend more time on it...
At least, that's what I'm finding.
👍: 0 ⏩: 1
yes maybe
(dont try! I answer EVERYTHING XD)
👍: 0 ⏩: 0

Thank you very much for this tutorial!
👍: 0 ⏩: 1


")
👍: 0 ⏩: 1

Very cool. It really works for you, no doubt about it.

👍: 0 ⏩: 1
Heh, with a lot of work, it does, anyway...
👍: 0 ⏩: 0

I've been looking for a nice, simple tutorial like this. Thank you, and, I hope it'll help me ^^
👍: 0 ⏩: 1
Phew, this one is actually a more complicated technique, although written more concisely than my others. You can take a look at my other tutorials, too. Fur tutorial 1 is particularly simple, and has similar concepts. [link]
👍: 0 ⏩: 0

This is fantastic. Thank you so much for posting this
👍: 0 ⏩: 1
Thank you very much
👍: 0 ⏩: 1
Awesome... you have solved all my problems lol :-D Thank you so much. I'm getting to work right away lol
👍: 0 ⏩: 1

What do you meen about setting them to multiply and screen? You meen setting the brushes themselves ot that or the layer? DX
👍: 0 ⏩: 1
I set the brush to multiply and screen. I leave the layer as normal, and do all painting on it.
If you change the layer itself to multiply or screen, the background will show through :b
👍: 0 ⏩: 1
XD Ah... I wasn't sure on how to do multiply and screen at the same time but I'm guessing you switch between them. Thanks for the tutorial though!
👍: 0 ⏩: 1
Yes, you must switch between them. I think if you tried to somehow use them at the same time with the same colour, they'd cancel out effects entirely. o_O
👍: 0 ⏩: 1

This is really useful.
Joc... I LOVE YOU !!! lol...
👍: 0 ⏩: 1

Great work Joc' (yet again)
---
Questions:
Wouldnt the "3 more shading" part prove difficult on 'flat' forms, such as on characters thighs and arms and other mostly flat places of anatomy?
👍: 0 ⏩: 1
Step 3 is unnecessary in "underdeveloped" areas. Like if it's just a big flat area, then of course it won't necessarily need more detailed shading. I'm just saying that you start off with (step 2) rough shading first, and then move to (step 3) more detailing shading as you need to. The idea is to work from big to small - getting the big picture ideas first before moving onto smaller detailed areas.
👍: 0 ⏩: 1
Sounds like the way it should always be done
Ok, so if i want to boost flat surface (of fur, skin or cloth texture) i just need more colours yes?
👍: 0 ⏩: 1
Yes, adding more variety of colours can help. I'd look at photo references and other examples of art to see how best to do this.
👍: 0 ⏩: 1
AS you say, thanks again Jo, youre really kind person to advice people this much.
Appriciated
👍: 0 ⏩: 1

Very interesting, nice tutorial. ^^ Indeed, fur does seem very hard to draw/color.
👍: 0 ⏩: 1
It doesn't have to be - my other tutorials are somewhat simpler, especially the first one.
👍: 0 ⏩: 0


A little less clear than the others, but understandable all the same.
Thanks for making this!
👍: 0 ⏩: 2
Hmm, less clear? I thought it was more clear, in that it was shorter and simpler. Well, if anything is unclear, you should tell me and I can try to explain it
👍: 0 ⏩: 0
<= Prev | | Next =>