HOME | DD
 judgemk — Simple Rigging/Armatures Quick and Dirty Tutorial
#3d #rigging #blender #tutorial #3dtutorials #armatures
Published: 2021-11-10 00:13:52 +0000 UTC; Views: 17555; Favourites: 56; Downloads: 70
Redirect to original
Description
TUTORIAL TEXT IN DESCRIPTION, IMAGE REFS FOR ASSET LINKS ABOVE
DOWNLOAD TO READ IN HIGH RES!
Started as a Reddit post, seemed worth sharing here. Google docs version: docs.google.com/document/d/1av…
Character Rigging & Armatures: A Slightly Less Painful Approach (Simple written-out rigging lifehack tutorial for beginner/intermediate character artists)
by judge_arts
I thought about calling this Skeletons And Bodies: Where To Find And How To Use Them. I decided against it.
Also, by non-painful, I mean it's non-painful for me. If you still find it excruciating, I am so sorry for misjudging, but seriously, I think it's not as bad. I assume others are rigging from scratch or something similar, but you really don't need to always. Studios don't redo the same rig by hand every single time, either. Work smarter, not harder.
Yes, you should probably learn or know how to hand-rig from scratch, but if you know absolutely nothing about it, this is a starting point to learn. And if you do already know, this might save a couple of headaches. (You can use your existing model bodies, rigs, and bones with this).
If you're worried about this being unprofessional, well, tbh, this technique is pretty much intended for individual artists. However, studios and pros have standardized character armatures for a reason. Unless you are literally enrolled in a class right now, nobody should be judging you for increasing your efficiency and working from reference. Besides, as you learn to do this, you'll undoubtedly build up a stock of your own weight bases to copy from. There's a possible sequel post involving shrinkwrapping for weight copy accuracy, but that's slightly more advanced than I want to discuss here. So let's go.
Please don't roast me too hard if this is really stupid. I just thought it might help people a little.
- - -
This all started when I made a post wondering whether other character artists enjoy rigging. The consensus so far is NO. I realized that for anyone who isn’t professionally trained (me…) or doesn’t have access to software to generate good rigs, it might be hard to find a way to simply do it in the first place. So - here’s a guide that might help, with plenty of model skeleton links as well.
Note: this is all for Blender. All downloadable assets linked here are free. Other programs like DAZ and Character Creator 3 are very high quality, but they have costs accordingly, so I’m not discussing those. (DAZ is freemium - assets like character bases are free, clothes often cost money. CC3 is $$$.)
Explanations and info…
You can skip to the downloads part with ctrl-F (Downloads) if you already know this stuff and just want some bones.
Before we start - this is for bodies, not faces. FYI. I can do some kind of similar tutorial post later on faces if you really want.
I’ve taken the time to compile some free downloadable models that would be good places to borrow a skeleton from. All of this is CC0/royalty free licenses (no need to be concerned about crediting).
The tl;dr before I jump in: The method is directly copying weights from a stock base character body with a similar T/A-pose to your own, then improving the result with weight painting, and parenting the new model to the original armature/skeleton. (This is an over-simplified version of the process but don’t worry about it for now.) I recommend you do the same technique with weight copy. It really can be that simple. However, be careful about things like close fingers and overlapping items; the weights can mix together. Make sure to learn to weight paint, erase, add, and blur. I swear it’s fun! Really.
First things first: when you’ve selected a skeleton (one from the list below, probably), import it and scale the reference model up or down to fit your character. Apply the transformation. Then, if the skeleton/weight base character does not match your character’s T-pose, use pose mode to adjust it (R rotate/G grab, S/scale but you probably know this). This is tedious but worthwhile. Bones and joints should be centered in limbs and appendages, like real bones are. Save your blend often in this process.
When you’re done, mirror the pose to the other side (ctrl-C shift-ctrl-V), apply the armature modifier on the model, and do the “apply as rest pose” option on the skeleton (this function has different names between different versions of Blender.) I know this is not a great explanation, you should Google it on how to do it properly, but that is a summary of the steps you should take to correct your armature pose.
Bone names will vary. My preferred lifehack for this is to use the BoneDict tool (packed in the XNAlara/XPS plugin, available for download in these places.
www.deviantart.com/johnzero7/j…
github.com/johnzero7/XNALaraMe…
BoneDict lets you generate a simple text file with an entire list of the character’s bone names. Then, you rename them by typing in the text document, and save it. Then, Blender will use BoneDict to instantly switch between different sets of bone names with the push of a button. It is so underrated!
This would be a good way to make sure your bone names fit things like Unreal or other standardized formats, too. Unreal has its own base mesh, but I’m just covering simple freebie stuff here that doesn’t require game engine knowlege.
Note: your body skeleton should be symmetrical. When you get to the separate cloth rigging, it doesn’t need to be, but aside from extra cases like amputees or monsters or some such, the body skeleton bones should be the same on both sides.
Now, you’ll join all the pieces of the weight-copy model together (the one you downloaded) with ctrlJ. Then, shift-click your own model (also all joined together if possible), ctrl-tab into weight paint mode, and do the Transfer Weights operation. Then, unclick everything, click the your model, shift-click the armature, and do ctrl-P to parent it, i.e. make your model follow the armature. (Just the regular Parent option, don’t click anything else!)
Then, test the armature with pose mode (ctrl-tab while clicking the armature) and use G or R to grab or rotate any joint and check that your model works. The weight copy model will probably also follow the armature still. Move it to another layer if this is annoying.
Congrats, your character is posable! This is only a start, but it’s a start that’s worth doing.
Now, for the skeletons…
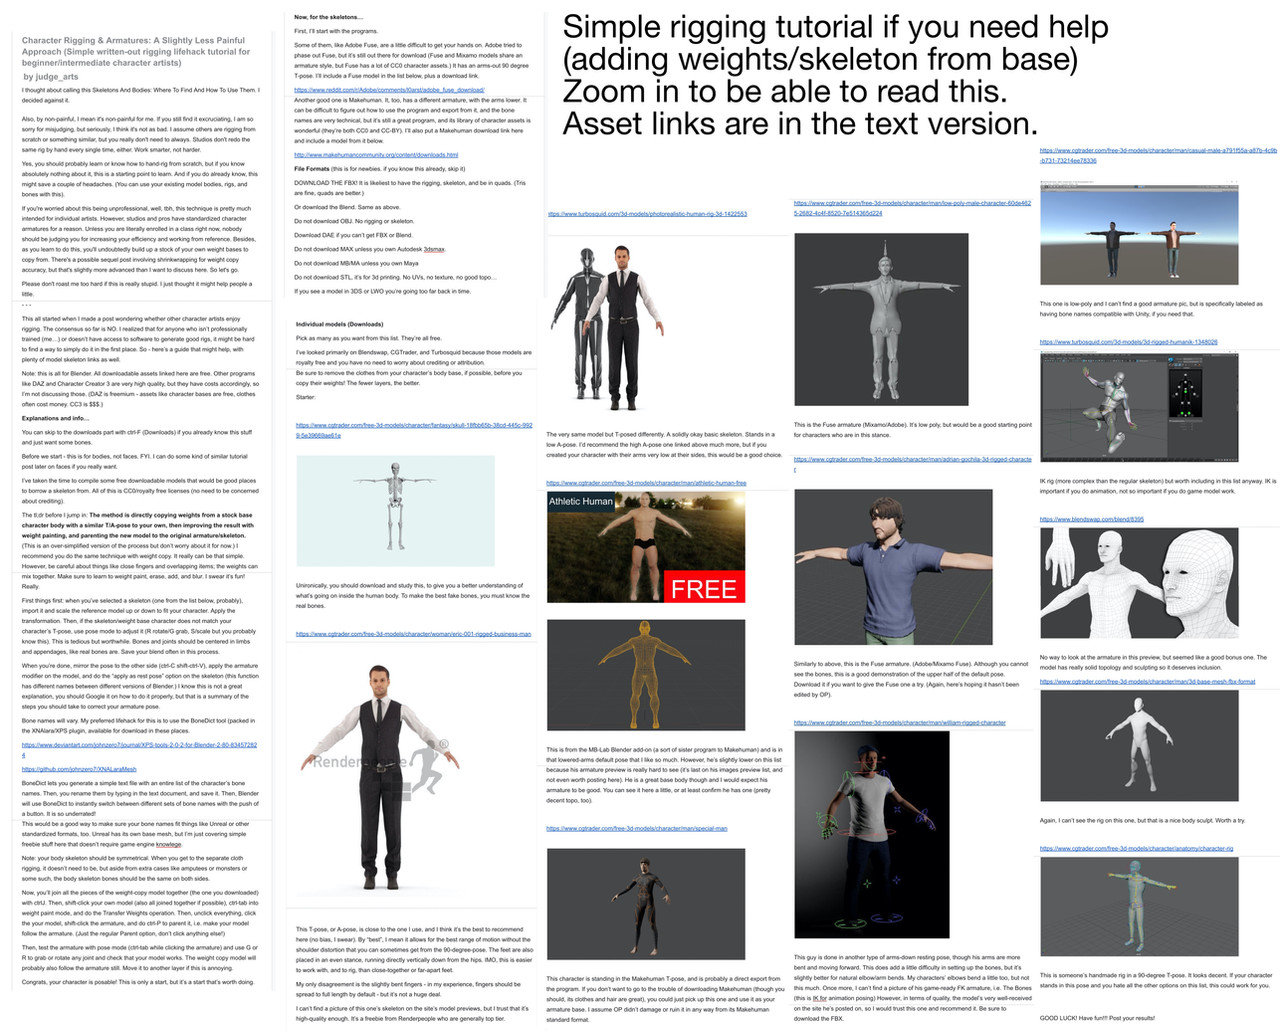
First, I’ll start with the programs.
Some of them, like Adobe Fuse, are a little difficult to get your hands on. Adobe tried to phase out Fuse, but it’s still out there for download (Fuse and Mixamo models share an armature style, but Fuse has a lot of CC0 character assets.) It has an arms-out 90 degree T-pose. I’ll include a Fuse model in the list below, plus a download link.
www.reddit.com/r/Adobe/comment…
Another good one is Makehuman. It, too, has a different armature, with the arms lower. It can be difficult to figure out how to use the program and export from it, and the bone names are very technical, but it’s still a great program, and its library of character assets is wonderful (they’re both CC0 and CC-BY). I’ll also put a Makehuman download link here and include a model from it below.
www.makehumancommunity.org/con…
File Formats (this is for newbies. if you know this already, skip it)
DOWNLOAD THE FBX! It is likeliest to have the rigging, skeleton, and be in quads. (Tris are fine, quads are better.)
Or download the Blend. Same as above.
Do not download OBJ. No rigging or skeleton.
Download DAE if you can’t get FBX or Blend.
Do not download MAX unless you own Autodesk 3dsmax.
Do not download MB/MA unless you own Maya
Do not download STL, it’s for 3d printing. No UVs, no texture, no good topo…
If you see a model in 3DS or LWO you’re going too far back in time.
Individual models (Downloads)
Pick as many as you want from this list. They’re all free.
I’ve looked primarily on Blendswap, CGTrader, and Turbosquid because those models are royalty free and you have no need to worry about crediting or attribution.
Be sure to remove the clothes from your character’s body base, if possible, before you copy their weights! The fewer layers, the better.
Starter:
www.cgtrader.com/free-3d-model…
Unironically, you should download and study this, to give you a better understanding of what’s going on inside the human body. To make the best fake bones, you must know the real bones.
www.cgtrader.com/free-3d-model…
This T-pose, or A-pose, is close to the one I use, and I think it’s the best to recommend here (no bias, I swear). By “best”, I mean it allows for the best range of motion without the shoulder distortion that you can sometimes get from the 90-degree-pose. The feet are also placed in an even stance, running directly vertically down from the hips. IMO, this is easier to work with, and to rig, than close-together or far-apart feet.
My only disagreement is the slightly bent fingers - in my experience, fingers should be spread to full length by default - but it’s not a huge deal.
I can’t find a picture of this one’s skeleton on the site’s model previews, but I trust that it’s high-quality enough. It’s a freebie from Renderpeople who are generally top tier.
www.turbosquid.com/3d-models/p…
The very same model but T-posed differently. A solidly okay basic skeleton. Stands in a low A-pose. I’d recommend the high A-pose one linked above much more, but if you created your character with their arms very low at their sides, this would be a good choice.
www.cgtrader.com/free-3d-model…
This is from the MB-Lab Blender add-on (a sort of sister program to Makehuman) and is in that lowered-arms default pose that I like so much. However, he’s slightly lower on this list because his armature preview is really hard to see (it’s last on his images preview list, and not even worth posting here). He is a great base body though and I would expect his armature to be good. You can see it here a little, or at least confirm he has one (pretty decent topo, too).
www.cgtrader.com/free-3d-model…
This character is standing in the Makehuman T-pose, and is probably a direct export from the program. If you don’t want to go to the trouble of downloading Makehuman (though you should, its clothes and hair are great), you could just pick up this one and use it as your armature base. I assume OP didn’t damage or ruin it in any way from its Makehuman standard format.
www.cgtrader.com/free-3d-model…
This is the Fuse armature (Mixamo/Adobe). It’s low poly, but would be a good starting point for characters who are in this stance.
www.cgtrader.com/free-3d-model…
Similarly to above, this is the Fuse armature. (Adobe/Mixamo Fuse). Although you cannot see the bones, this is a good demonstration of the upper half of the default pose. Download it if you want to give the Fuse one a try. (Again, here’s hoping it hasn’t been edited by OP).
www.cgtrader.com/free-3d-model…
This guy is done in another type of arms-down resting pose, though his arms are more bent and moving forward. This does add a little difficulty in setting up the bones, but it’s slightly better for natural elbow/arm bends. My characters’ elbows bend a little too, but not this much. Once more, I can’t find a picture of his game-ready FK armature, i.e. The Bones (this is IK for animation posing) However, in terms of quality, the model’s very well-received on the site he’s posted on, so I would trust this one and recommend it. Be sure to download the FBX.
www.cgtrader.com/free-3d-model…
This one is low-poly and I can’t find a good armature pic, but is specifically labeled as having bone names compatible with Unity, if you need that.
www.turbosquid.com/3d-models/3…
IK rig (more complex than the regular skeleton) but worth including in this list anyway. IK is important if you do animation, not so important if you do game model work.
No way to look at the armature in this preview, but seemed like a good bonus one. The model has really solid topology and sculpting so it deserves inclusion.
www.cgtrader.com/free-3d-model…
Again, I can’t see the rig on this one, but that is a nice body sculpt. Worth a try.
www.cgtrader.com/free-3d-model…
This is someone’s handmade rig in a 90-degree T-pose. It looks decent. If your character stands in this pose and you hate all the other options on this list, this could work for you.
GOOD LUCK! Have fun!!! Post your results!