HOME | DD
 Milavana — Chibi Tutorial: WIP + Tipps in description
#adorable #anime #animemanga #chibi #chibigirl #chibitutorial #cute #digitalart #howto #kawaii #learn #manga #practice #practicing #stepbystep #sweet #teaching #tutorial #video #wip #workinprogress #painttoolsai #stepbysteptutorial #howtochibi #chibihelp #clipstudiopaint #chibitutorials #help #wiptutorial
Published: 2016-11-03 13:05:58 +0000 UTC; Views: 8589; Favourites: 163; Downloads: 0
Redirect to original
Description
Hii guys!
As I decided to draw this chibi for Riuuzu, I knew I wanted to make it perfect, so I really saved almost
everything seperately. <.<
So, I decided to make my first, small tutorial!
I try to explain everything as good as possible here in the description, if there's anything to explain. >w<
I really hope this will be a little helpful for some of you.
If you like those kind of tutorials, I'll probably do some more in the future. ^-^
***
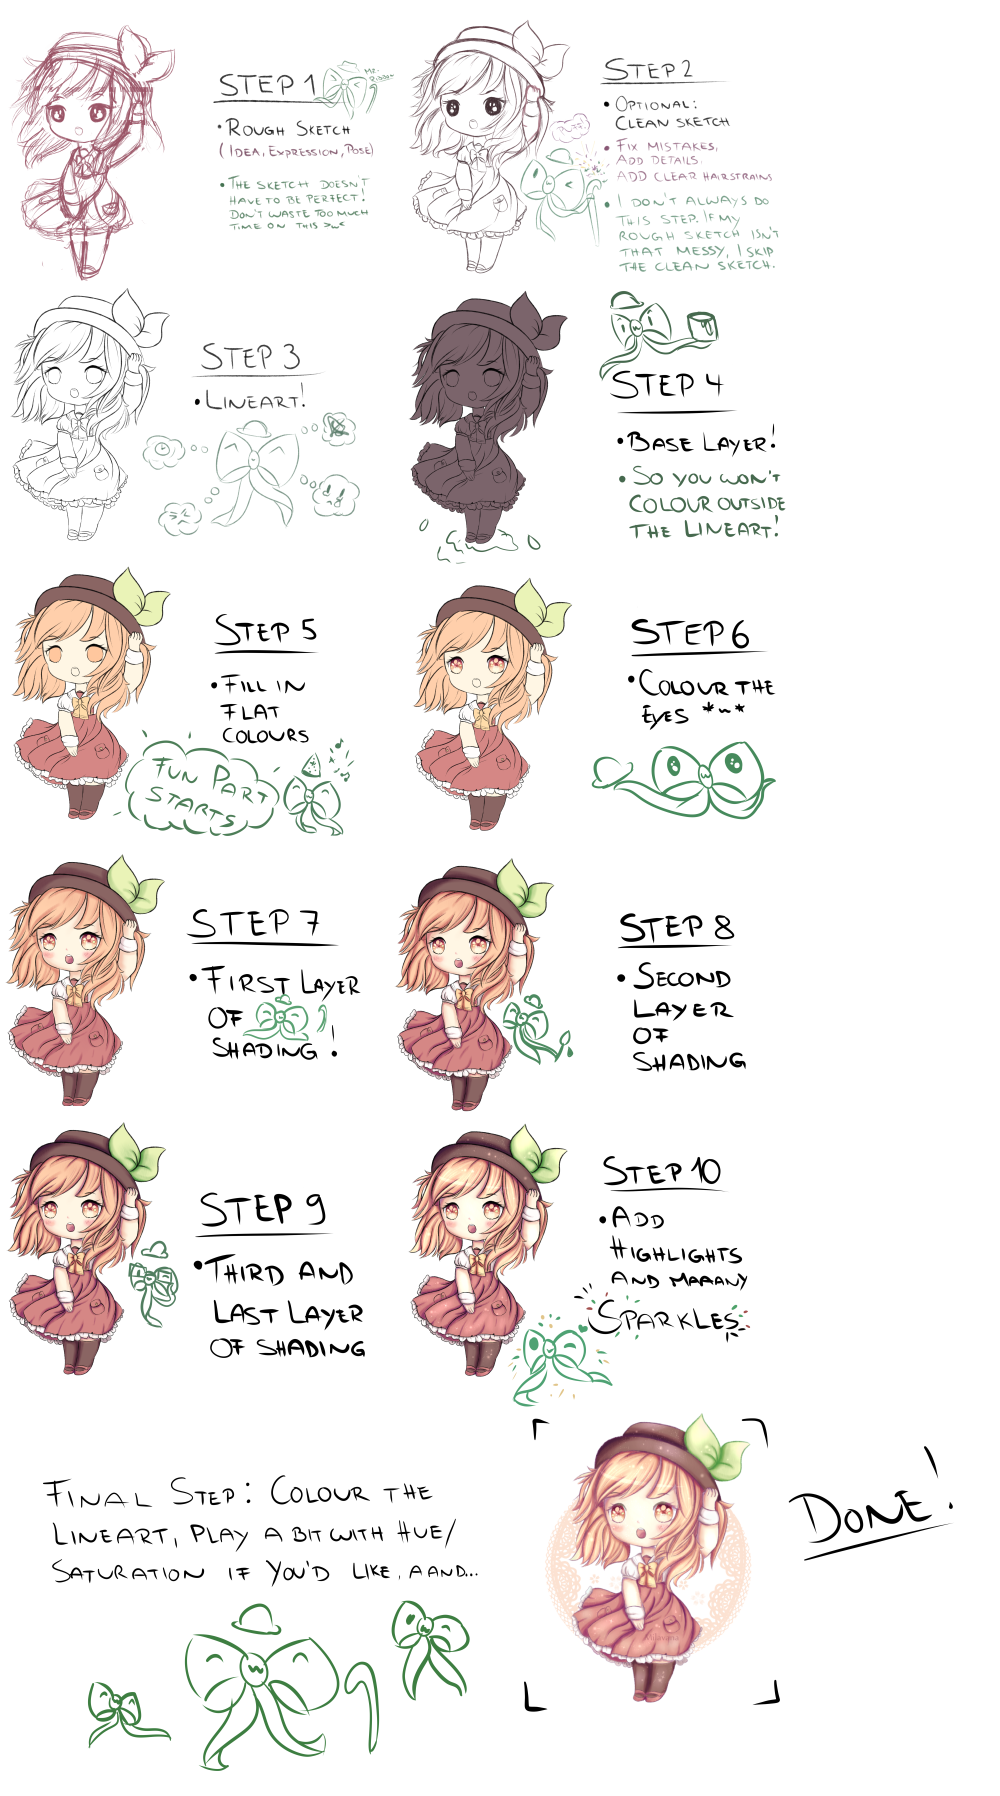
Step 1
In step 1, we start with a rough sketch.
Try to bring the idea in your head on the screen / paper!
At the beginning, I always tried to make the sketch look good itself as well - but that only costs you a lot
of time. It really is just a rough sketch, so if it looks weird or wrong, it doesn't matter.
Important: Draw big!
Use a big canvas to draw. The bigger the drawing, the easier it is to add details and stuff. Of course it shouldn't be too
big, but .. you know what I mean. :'D
You can always change the image resolution to make it smaller after you finished your drawing, but making the drawing bigger makes it pixelated - and that looks not professional.
Step 2 (optional)
Sometimes, there are days when everything just works out so well. On these days, the first sketch looks totally wonderful and
there isn't much that needs to be fixed. Trust me: These days are rare. xD
Still: If I have one of these days and I think the rough sketch is good enough, I just skip this step and start to do the lines.
But to be honest: A cleaner sketch is always a bit better - at least for me.
Now you have the time to ... make your chibi alive :'D
This means: More shapes, more hairstrains, more folds, more details.
Try to fix the anatomy and fix parts that you made too big in your rough sketch. Those parts which you drew like 5 times in
the sketch, everytime a little further down, so there are like 3 different hat positions in one sketch and you have to find the
right one. :'D
This step is a big help for the lineart. Trust me, the lineart is much easier and less annoying if you take the time to "optimate" your rough sketch.
Step 3
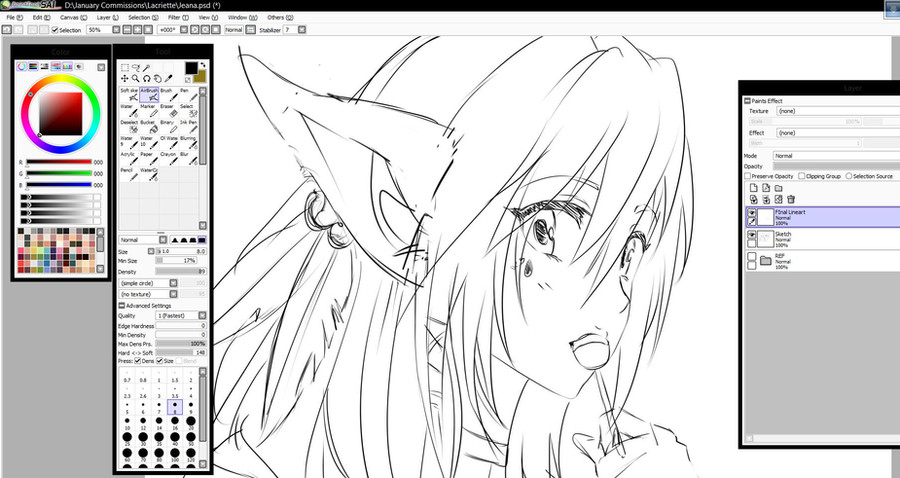
It's time for the lineart!
For me, this part is the worst in the whole drawing process. <.<
I struggled a lot with how to do the lineart at the beginning.
At first, I tried out the "Linework Layer" in PaintToolSai and did the lines by using the "Curve"- and "Line"-tools.
Let me give you an advice: Don't do that!
The lines look plain, flat - you just don't want to have those lines.
It takes more time, but using a brush make the lines look a lot better.
It's hard to find the right brush.
If you struggle to create your own one: Good artists on DeviantArt or on other websites are sometimes sharing
their own brush settings.
Try to experiment with different settings, have fun trying out new things and I'm sure you'll find your own settings that fit
perfectly for you.
And the most important part: STABILIZER!
If you work with a graphic tablet, the stabilizer is your best friend, because it helps you to correct your shaky lines. >w<
I always have my stabilizer on 15, except if I use a special brush with it's own stabilizer settings.
Step 4
In step 4, we start the colouring-phase. ^-^
We create a "so called" base layer.
Without Yamio (please check out her YouTube account for amazing video tutorials!), I'd probably still colour outside the lines.
But there is a simple trick, so you don't have to worry about that >w<
Create a new layer.
Use the magic wand to select everything outside the lines.
Click on "Selection" --> "Invert"
Fill in any color.
--> LOCK THE LAYER and clip it to the foulder of your colouring-layers.
(Make sure to place this base layer UNDER the foulder)
Now you can't color outside the lines. >w<
(Check out my speedpaint-videos, maybe it helps you with this step if you have any problems)
Step 5
Now it's time to give your chibi some colours!
Personally, I create a new layer for almost every colour. xD
For me, it's helpful. >w<
Choose the base colors for your chibi and fill in the flat colours.
Try to use soft colors, not too glaring ones. It looks better and your eyes won't burn after looking at your drawing. :'D
Step 6
Many of you will think now: "What? You colour the eyes first?"
And yes, I do. ^^
I know, most people start with the skin, but you can start with anything you want. xD
It's probably a bit silly, but I start with the eyes because it gives me a better feeling. :'D
Anyways, start with whatever you want, haha ^^
I'll probably do a tutorial how I colour eyes soon. >w<
Step 7
First layer of shading! <3
For the first layer of shading, I always use a very smooth brush and shade in a large area.
--> Blending / Blurring a little bit
Step 8
Second layer of shading!
I use a brush that is a little bit harder for that, to make it look deeper.
For my simple chibis, I only do two layers of shading.
--> Blending / Blurring a little bit
Step 9
Third and last layer of shading!
(Too much shading isn't good either! xD)
For detailed chibis, I do a third layer of shading. I use a hard brush to shade small areas..
I shade only the darkest spots with that brush and it's mostly not really much.
Don't shade too much here. Keep it simple.
--> Blending / Blurring a little bit
Step 10
Let your chibi shine! <3
Highlights are just as important as the shading. Light up the parts which would be touched by the sun. <3
I use a very smooth brush for this and set the layermode to "add glow" (in clip studio paint. In PainToolSai, I set it to
"luminosity")
I always add a lot of sparkles and dots, yaaay \o/
Final Step
Colour your lines! Because it looks way better if you give them some colours instead of letting them black.
I play a lot with Hue and Saturation or changing the brightness, if I don't like the darkness of the colours or something.
Try it out as well ^-^
I sometimes add a new layer on top of all the colour layers and colour very bright parts with another bright color
to bring in some more life - I'll explain that better someday.
Add a background if you want, leave your watermark on it aaaaand ...
DONE!
***
Thanks for reading, I hope you liked this little tutorial. <3
Character in the tutorial belongs to: Riuuzu (sorry for tagging you in this, but I just want to give you credit for your cutie, haha >w<)
If you have any questions, feel free to ask them below!
And also:
Check out my YouTube Channel for speedpaint videos!
YouTube Channel
Related content


Comments: 26


I'm glad you think so!! <3
👍: 0 ⏩: 1

Omggb thank youuufot making this! ;w; this is so helpful ♡_♡
👍: 0 ⏩: 1
Waah I'm glad it is! >w< <3
👍: 0 ⏩: 0


Great tutorial ^^
This is very helpful for a newbie like me thank you <3
👍: 0 ⏩: 1
Aww thank you!
Glad I could help >w<
👍: 0 ⏩: 0

Aww you're too nice >w< Thank you <3
👍: 0 ⏩: 1


t-t
as helpful as it is
ill never be as good as you
👍: 0 ⏩: 1
Aww thank you!
And yes you will >w< Just keep practicing!

👍: 0 ⏩: 1
Ok Milavana~Sensei!
//bows
x3
👍: 0 ⏩: 1

Aww thanks! And you're welcome >w< <3
👍: 0 ⏩: 0
