HOME | DD
 MzJekyl — Digital painting tutorial

Published: 2011-03-21 17:53:13 +0000 UTC; Views: 9854; Favourites: 144; Downloads: 66
Redirect to original
Description
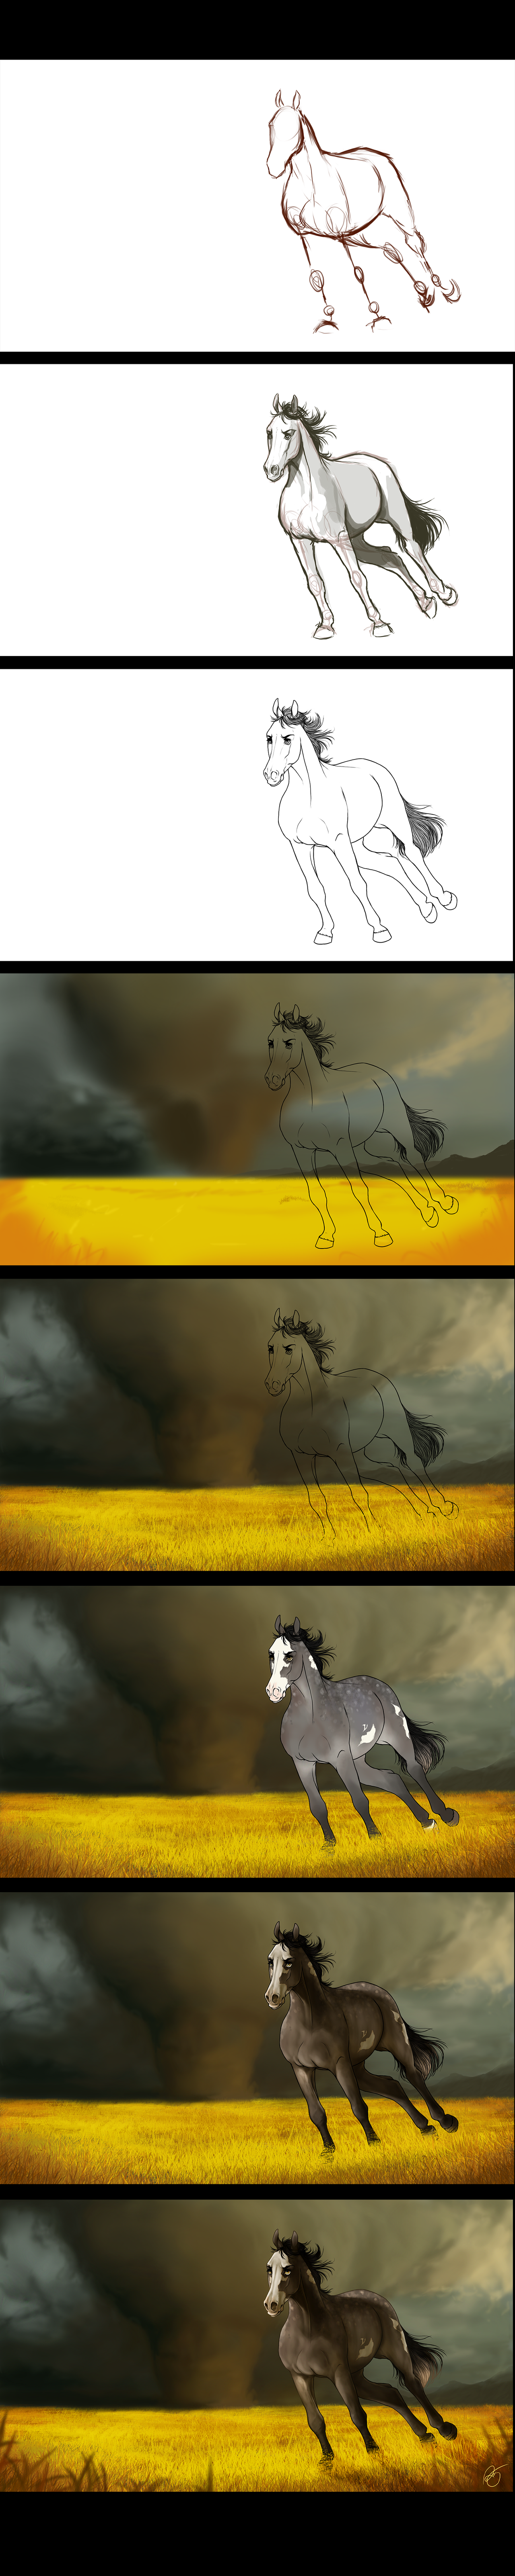
Digital painting tutorial for .To start with, I sketched out the simple shapes with a rough brush (or one that you would typically use for line art).
After that I used the same brush (on a separate layer) to create the base sketch. I try to put as much detail in it as possible so that its easy to tell where the lines end and where to colour.
I start the background roughly. Taking two different shades of blue (one light and one darker blue), I used the gradient to fill in the base colours of the sky. Then, taking a 'spatter' brush (this comes with photoshop and is a little scroll down the brushes box.) I take a lightish blue/gray and begin drawing the clouds. Use pen pressure for this! Pen pressure will become your best friend
")
With a black soft round brush, you can sketch out the trees (you can be pretty rough here, since later you'll use 'surface blur' on the background layer to make it lose focus a little.)
Next, I take a black, normal round brush and beneath the line art I put this down as a base colour. So you can see the lines still, go on the layer with the lines on, then image > adjust> hue/saturation and put the 'lightness' up to full then click ok. This should turn the black line art white.
Everything from here on is using the soft brush with pen pressure. Chose the colours you need and work from dark to light filling in the colour. the lighter the colour, the smaller your brush should become (lighter colours tend to be for detailing usually
).If you need to use the eyedropper tool on the photograph to get the correct colours then go ahead
.Once you've done that, make a new layer and (for the furry muzzle I'd suggest using the soft brush on 3px) start the hair by just gently drawing a thin layer of black hair. You won't need any other colours for this since there are no highlights in the image.
Next, to draw the hairs on the muzzle, use a 2px brush and draw them on a separate layer. Use both black and light grey for this, and use the blur tool on the ends just to make them softer.
As I said earlier, for the background, fill in the trees with a little more of a dull green colour before using surface blur. To use surface blur, select the layer with your background drawn on, go to Filter > blur > surface blur. 3-5% Radius and 255 Threshold should be enough, but you can mess around with this until your happy with it.
Just remember to keep your horse and background on a separate layer. It makes things far easier.
Hope this is helpful
Related content


Comments: 21

I thought this was a picture! Like a photograph, you have admirable skills.
👍: 0 ⏩: 0

I understand that it's exaggerated, but the exaggeration reminds me of the movie "alien vs predator". 
👍: 0 ⏩: 0


 (Smile)")


Oh you posted it!!
This is the best tut ever!! (:
Very, very, very helpful

👍: 0 ⏩: 1

^_^ Hehe I did 
I'm glad you found it helpful
👍: 0 ⏩: 1
I think everyone will find it really helpful (:
Thank you for making it!
👍: 0 ⏩: 0


omg you are just amazing. Great tut, and you are an amazing artist. I love your work
👍: 0 ⏩: 1

👍: 0 ⏩: 1
lol naw you explained pretty well
👍: 0 ⏩: 0