HOME | DD
 SailorSilverFalcon03 — My Tutorial
Published: 2004-06-30 00:24:07 +0000 UTC; Views: 6761; Favourites: 37; Downloads: 931
Redirect to original
Description
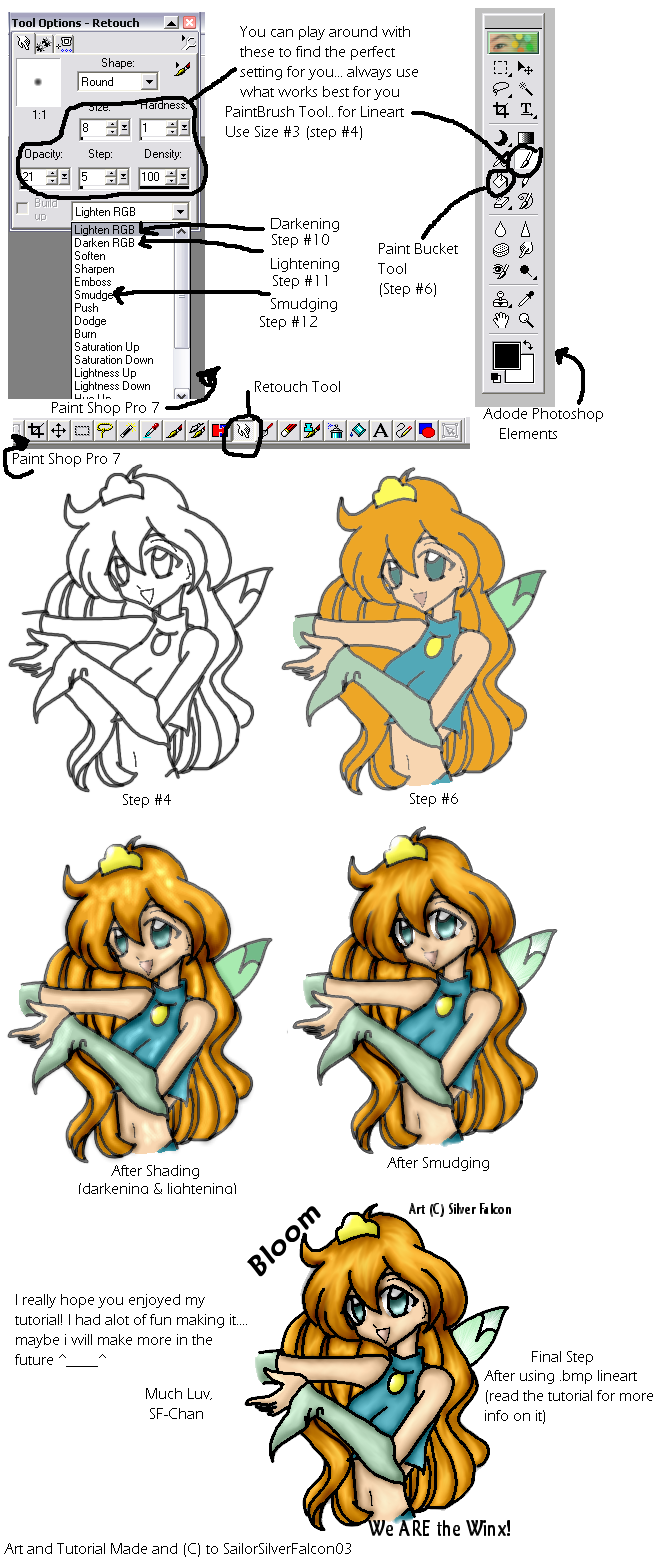
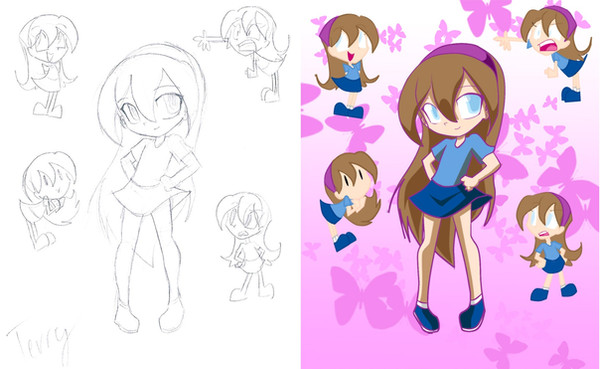
Sorry if it sucks... maybe some of you will try it lol.. well, hope fully it will help some peepies... maybe if people like it ill make moreWell, here is the tutorial:
++++++++++++++++++++++
LINEART
++++++++++++++++++++++
Step #1: Scan your drawing/ sketch (XD that was simple)
Step #2: Once you have your picture, paste it into Adobe Photoshop (also known as PS) and then click on the “Layer Menu” and select “new”. You can name it whatever you want, I usually just name it Line art.
Step #3: Ok now that you have a second layer, click on the “Paintbrush Tool”. Then right click on the picture and select size 3. (Have the color be black)
Step #4: Draw over your picture with the Paintbrush tool. (Note, for smaller details, like the nose, mouth, lower eyelid, you want to use size 1… that is optional though)
++++++++++++++++++++++
COLORING
++++++++++++++++++++++
Step #5: Now, copy your completed lineart and paste it in paint. When you paste it, obviously, you will only be seeing the lineart. Copy it, and paste it again in PS (that is what I usually do.) So now you have two copies of the lineart, one with the sketch in the backround, and one without it. You can delete the sketch one if you want to, but I usually have the sketch and then the lineart in a paint… that way if I screw up, I can just copy the picture from paint and paste it again.
Step #6: Ok, now that you have your fresh lineart, all you have to do is use the “Paint Bucket Tooler ” and fill in the colors.
++++++++++++++++++++++
SHADING
++++++++++++++++++++++
Step #7: Now you have your colored image, don’t stop here, your not done yet… but close. Now you need shading! Actually, this may be the easier part (for me anywho lol). Next, you have the paste your colored picture into Paint Shop Pro (Also known as PSP).
Step #8: Select the “Retouch” tool (the white hand).
Step #9: In the Drop Box, select “Darken RGB”. (see the image for the rest of the settings)
Step #10: Shade the picture! Just hold down the mouse where the picture should be darkened or AKA where the Shadows would be cast… this is something that is hard to explain, and is learned by just experimenting and trying.
Step #11: Do the same thing, except select “Lighten RGB”… put the hightlights or where the sun’s light would be.
Step #12: You can be done at this step if you wish, but to clean up your picture a bit, select the “Smudge” under the Retouch. With the smudge, you can make the picture look more smooth… but be warned, the smudge can smudge all of your drawing, so be careful.
What Now?
YOUR DONE!!! ^___^ again, this is just a simple tutorial, if you need more help feel free to note me… im not the best at this or anything so I’ sorry if this was of no help. This will also take practice, so if your picture doesn’t come out perfect the first time, just keep trying! Be sure to save your work in Paint document as you go along to
") (comes in handy.. trust me)
(comes in handy.. trust me)++++++++++++++++++++++
OTHER TIPS & POINTERS
++++++++++++++++++++++
Okies, lemme think here…. O ya! I have one tip for you right now… If you line art looks icky now that your done shading and smudging, copy the line art (make SURE to copy what you do every step, the lineart im talking about is the lineart that has NO color in it, its is empy) paste it in a new paint, and save it as a “Monochrome Bitmap (*.bmp;*.dib). Once you do that, the lineart will be all black, just paste it ontop of your completed image and line it up correctly, and badabig badaboom, your lineart is all nice and completely black.
Also, when your using something that need a size for the brush or retouch tool, or anything like that, use what suits your drawing. If the brush size is to big, then make it smaller, it is to small, make it bigger, simple as that.
One more tip: COPY YOUR PICTURE EVERY FRICKING STEP OF THE WAY!! U__U I cannot stress that enough…. It REALLY comes in hand…
ALSO, for all you layer haters, this tutorial only uses layers ONCE and that is just for making the lineart (trust me.. I hated em to lol)
BTW, please, if you don’t like my tutorial, don’t flame me! If you don’t like, then just done use it!
PS… I am thinking about making a tutorial on how I do my hair… if I anyone is interested, lemme kno.
Art and Tutorial (C)
Related content


Comments: 18


Oh this tutorial looks very helpful! I'll have o try it by my pictures never turn out like the other when I use tutorials! D: Yours looks pretty easy to follow though :3
👍: 0 ⏩: 0

THANK-YOU SO MUCH!!!!!!!!!!!!!!! 
👍: 0 ⏩: 0

Thank you so much for having the great sense to put up a simple tutorial. I just needed to know what tools to get started with, but most focused on how to do such and such with the hair or different textures on the clothes...
This was exactly what I needed, many thanks. ^^ To think I was just gonna' leave the program to rot...(No instructions, I'm too dumb to work out how it all works without help ")
👍: 0 ⏩: 0

Wow, thanks! This tutorial really helped me, the rest are so confusing! But you made it all so simple! Thank you  (Smile)")

👍: 0 ⏩: 1

^^ you're welcome!! I'm so glad it helped! I tried to make it easy because i agree that most tutorial are so complicated and think you already know everything when the whole reason you go to a tutorial is so that you can find out. ^^ Thank you!
👍: 0 ⏩: 0


^-^ i got my Paint Shop Pro from Best buy (O__O i think, cuz my dad bought it, and that was like 2 years ago, back when i could care less where he got it from.) but yah, im positive you would be able to get it there... and i got Adobe Photoshop Elements from my tablet. I got a tablet for christmas last year, and it gave me sum programs with it, soo thats where i got that lol. You could probably also buy that at Best buy, or an electronics kinda store... tho, since i didnt know how much they were, they are probably expensive T__T
👍: 0 ⏩: 0

ooh this was very interesting.. ahahaa its interesting finding out how other people colour their art. I personally prefer having lots of layers and colouring more cel-style.. *shrugs* ^^ Hnn.. Is the Darken RGB and Lighten RGB like the Dodge and Burn tools?
👍: 0 ⏩: 0

You know, it would just be easier to adjust the sharpness and lightness....
👍: 0 ⏩: 0

i'd love to see a tutorial about hair ^^
please let me know if you deside to make one
👍: 0 ⏩: 0

Woo-hoo! Finally a tutorial that isn't really complicated 
👍: 0 ⏩: 0


Oooh wow thank you lots! ^^ now i can color my drawings!!!!!!!!!!!!!! Me excited!
👍: 0 ⏩: 0

LOL I was actually hoping for a Drawing, not a coloring tutorial, but I defianlty would love your coloring skills too
👍: 0 ⏩: 0
Please note (XD forgot to put this) THis tutorial is for Photoshop AND PaintShopPro... but i used PSP for the selection cuz PSP is used more than PS in the tutorial
👍: 0 ⏩: 0