HOME | DD
 Scypod — How to Polish a Turd
Published: 2012-03-31 21:08:40 +0000 UTC; Views: 1586; Favourites: 37; Downloads: 12
Redirect to original
Description
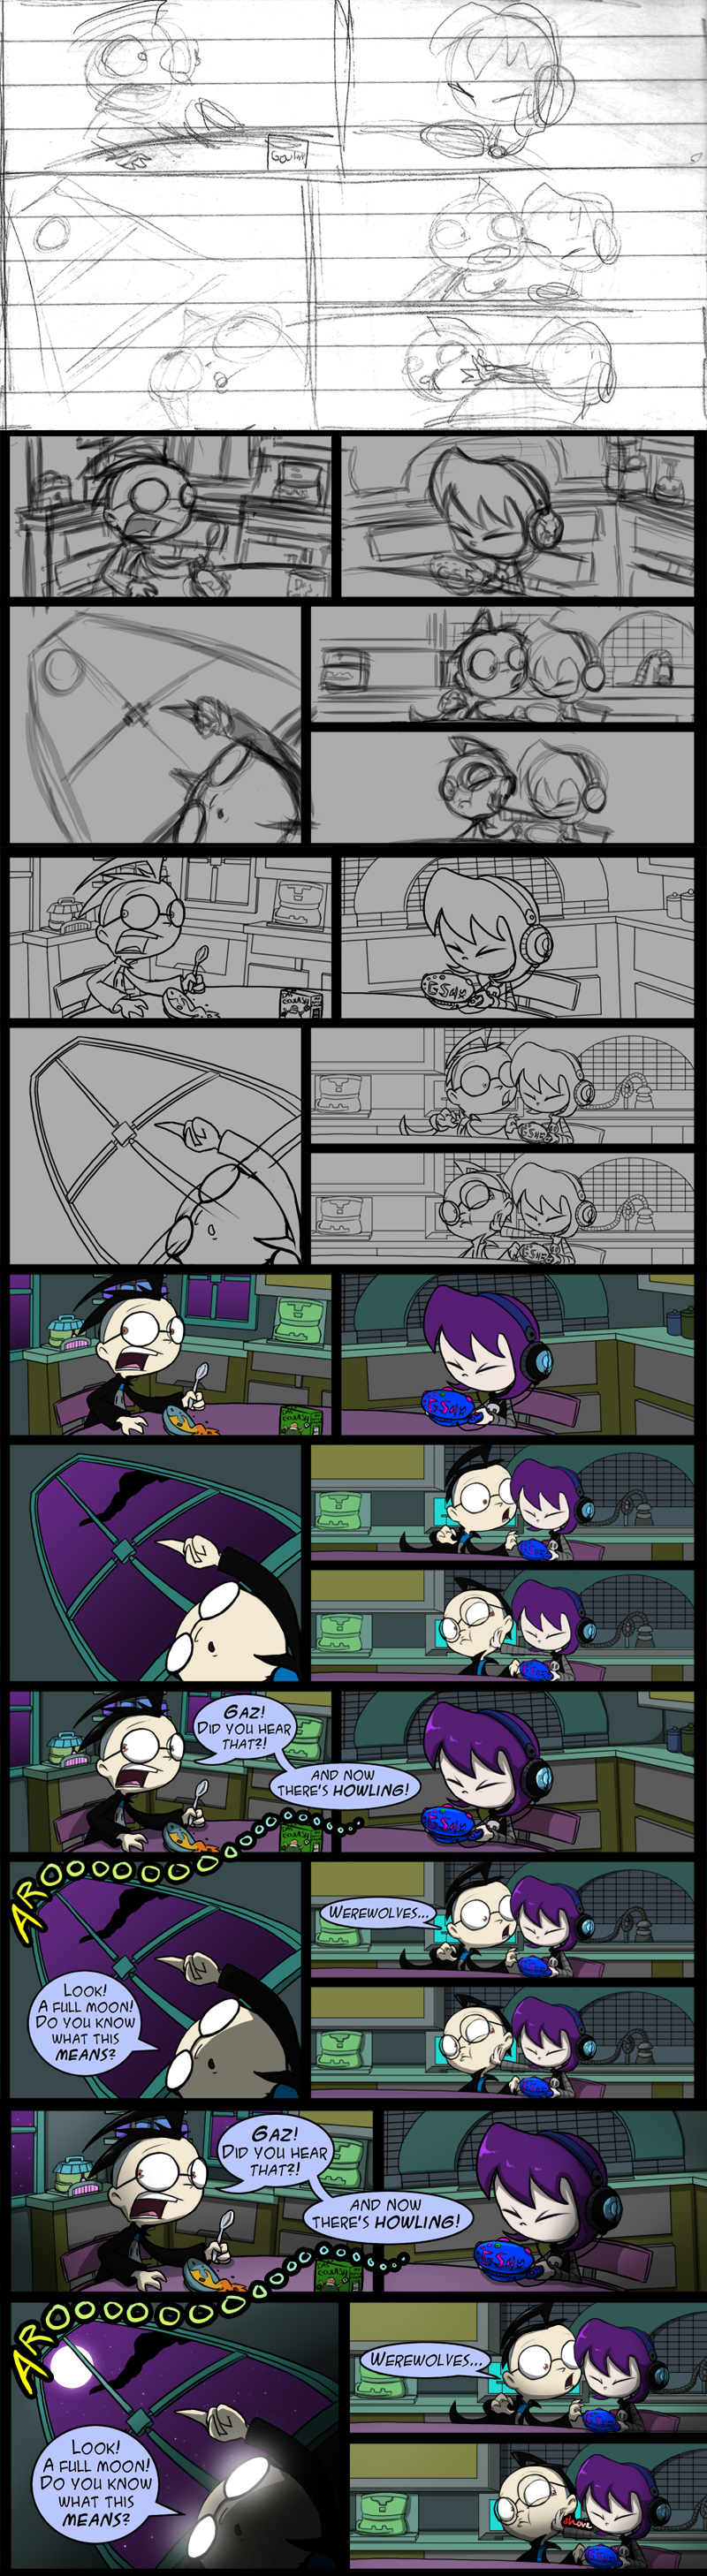
EDIT: A slight change to the order from the picture above, we now do speech bubbles and effects near the beginning stage, just so we know what parts of the art aren't being shown, and we don't waste time drawing/colouring over something that won't be seen. Helps to show if we need to reorganize the panel as well.Well, since Trad decided to show some of the early steps in the scraps as separate deviations, I just told him it would be better to put them all in one file to look at.
STEP 1:
Really, really rough sketch.
These are done in a notebook. (OH NOES LINED PAPER). The lines actually helped us do the grid, at least going across. They are really crappy drawings, but it's just to get an idea of where to put things and how the page is set up.
STEP 2:
A much better sketch is made.
This is where we make sure things look okay before drawing final lines, although we do make some adjustments after the final lines are made because sometimes you can't quite tell with the sketch how it will look.
STEP 3:
Line art.
This process is very tedious, trying to make the lines as smooth as possible and working with separate layers and collapsing them and all that stuff. Of course the characters are kept separate from the background lines, and sometimes we need foreground items separated as well. (This is for coloring and shading purposes.)
STEP 4:
Colors
Trad takes over at this point, after I have done the sketching and lines. Coloring actually takes up a good amount of time. (Not necessarily because it's supposed to.) Slow-poke <_<
Seriously, though, coloring is a pain in the butt and does take a good amount of time.
STEP 5:
Bubbles and cell shading
Trad figures out where to put the speech bubbles before we do shading so we don't end up doing some extra work for nothing. Just in case I work reaaaaaaaallly hard on a toaster or something and....it gets covered by some incredibly dumb bit of dialogue.
Then, it gets treated to some cell shading on the characters and background. Highlights for shiny things like hair and eyes are put in as well.
STEP 6:
Everything else.
Yep, after that it's doing secondary shadows, gradients, and effects such as different colored lighting effects, motion, glowing objects, etc.
Then it's done!
This process takes about 10-12 hours (we think, we'd have to actually time ourselves someday) depending on the complexity of the page.
Related content


Comments: 12

I saw the title and wanted to imitate peanut and be like
"polish a turd its still a turd!" just when I saw the title. thank you for making this I'v just started making a comic and this helped me.
👍: 0 ⏩: 1

That's awesome! Always glad to hear when people can take away something from stuff we did.
Just a quick note, there's a minor change in our method which involves doing the speech bubbles near the beginning, so that we know what amount of space we're working with per panel, and seeing if they need to be redrawn, or if we need to rewrite the script slightly.
👍: 0 ⏩: 0


I know... That's why it's called "How to polish a turd"
👍: 0 ⏩: 1

Is it bad if I want to try to do this?
👍: 0 ⏩: 1
XD What are you going to polish? Olly poo?
👍: 0 ⏩: 1