HOME | DD
 Shydrake — Troll Mask
Published: 2011-06-07 14:14:17 +0000 UTC; Views: 1173; Favourites: 15; Downloads: 7
Redirect to original
Description
I don't understand you DeviantArt categorizing...!And this is a Troll mask I made for Anime North (I went as Successful Troll). Tonnes of fun~ It kept slipping down my head though...But anyway!
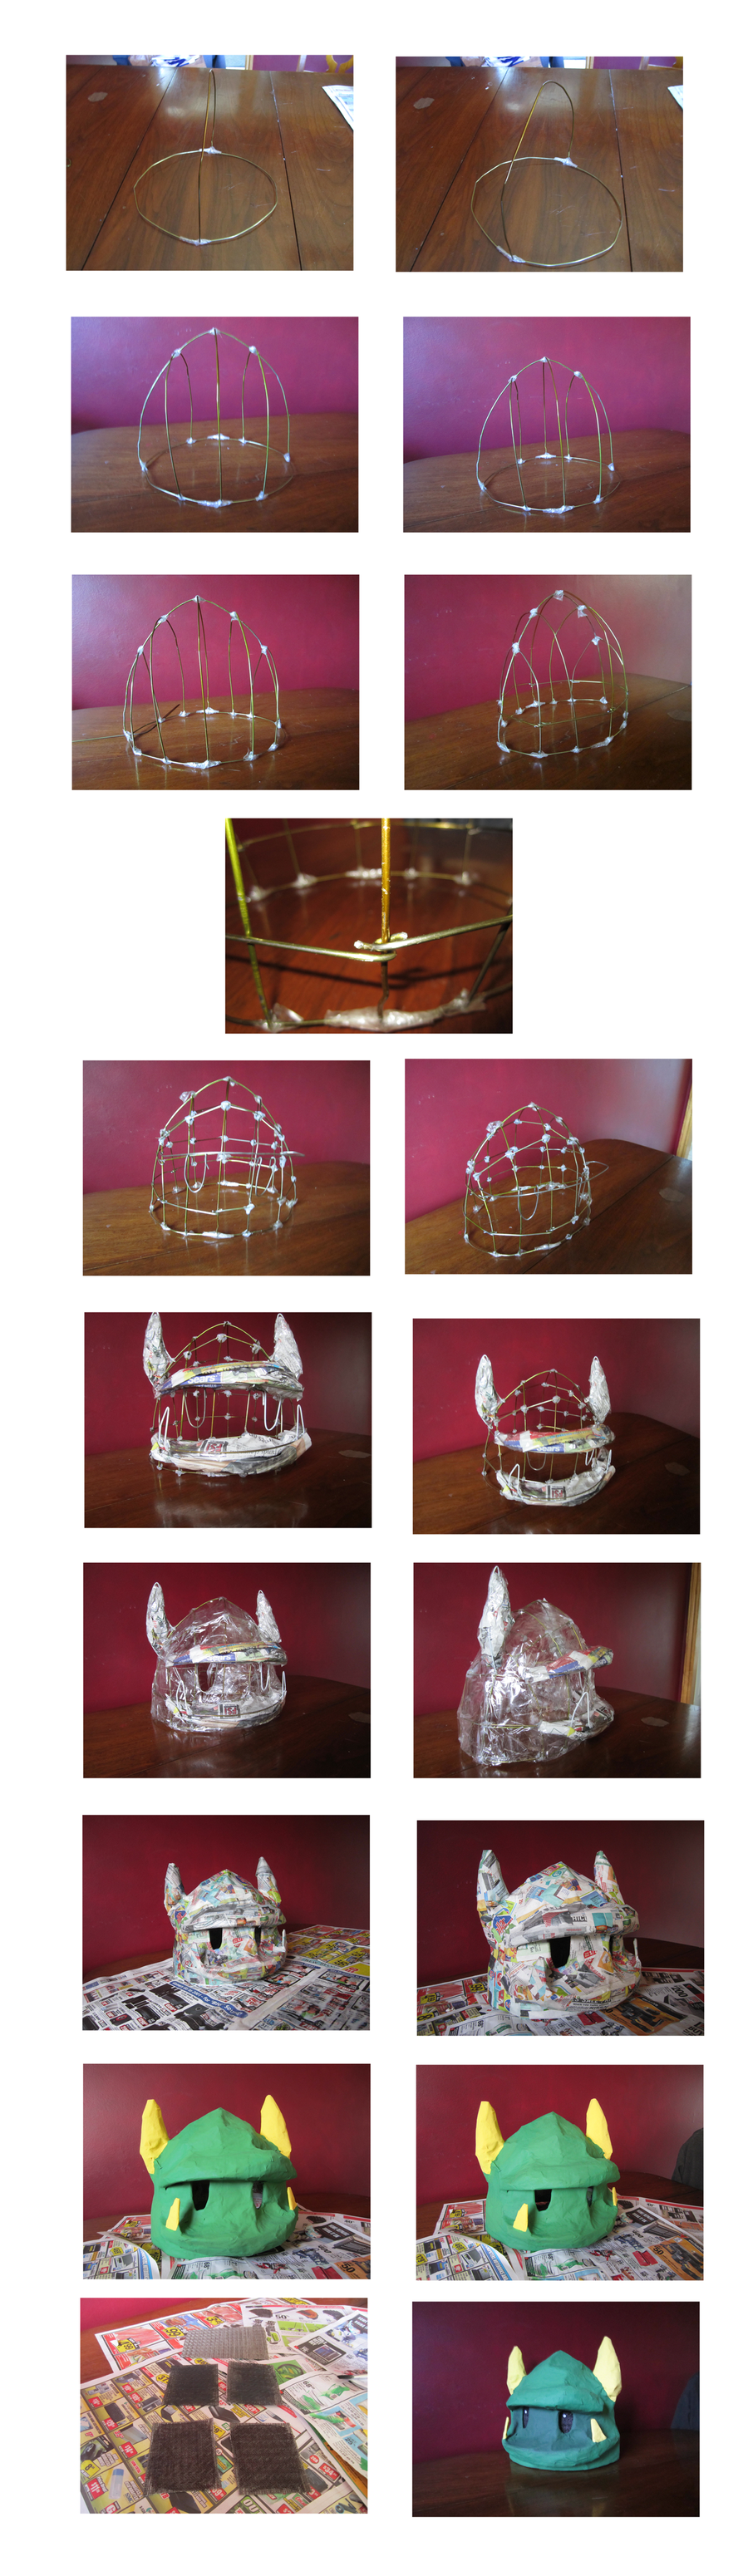
Step 1: COAT HANGERS
COAT HANGERS! YOU NEED LUTES AND LUTES OF COAT HANGARS! I used around 12 coat hangers for this piece (and I wish I had used more....) This step uses two coat hangers. It is the very very very basic shape of your mask.
Step 2: Adding Details
Keep adding wires to shape out the basic shape of your head, whatever it may be! The more the better! I was using clear tape to hold everything down because it held things together, and I could still more pieces that seemed wonky. (Once everything was in place, I hot glue gunned everything in place. I'm not sure if it was necessary, but that's what I did xD )
Step 3: Adding More Details
See aboove
Step 4: Not Really A Step
Not really a step, but I wanted to show how I was connected the wires together. I didn't just tape the ends together, of lawd no...I hooked every end to it could hook around the wire better. It was just easier. It can mess up your measurements though...!
Step 5: Adding Even More Details
Just adding more and more details to the mask~ You really should make any eye-pieces bigger than normal. I had a blind spot in the front of my face (Not a big blind spot, but a blind spot none-the-less)
Step 6: Padding Out
Next I padded out any details that needed to be padded out. It felt nice to know that something that I learned from Art Attack actually worked! He wasn't kidding when he said to use lots of tape here too...! Speaking of using a LOT of tape...
Step 7: TAPE
TAPE! I taped the WHOOOLLLEE thing because I was going to paper mache it next, and I wanted something for the paper mache to stick too! This step was so fun and cool! But, if you're going to do this step, be sure to tape the INSIDE of the mask as well (especially before putting it on your head!). Be prepared to run out of tape at this point!
Step 8
") aper Mache
aper Mache Next was to paper mache the whole thing! Apparently some glues don't work for paper mache...Whoulda thunk it? I was doing it slowly by hand with a paint brush at first then I went "wtf!? No! You get your hands dirty!" and it made the whole process go by a loooot faster. But this is the longest part the mask - it takes forever to dry...
Step 9: Paint
Yay Paint! I used cheap dollar store acrylic paint and it worked surprisingly well...It even with-stood the rain that happened at the convention o_< I owe you a lot Dollar Store!
Step 10: Eyes
I Love the Dollar Store So Much! I found these dinner place mats at the dollar store that's relatively easy to see out of. I cut up some rectangles and painted them black. It looked good, but the paint blotted up in the mesh of the placemat and made it hard to see out of, so I took a black Sharpie and just scribbled on it. Looks just as good and it doesn't blot up any patches on the inside. I then took those ring-hole stickers (You know those little ring hole stickers you use to fix up ripped papers in your binder? Those!) I took the middle dot, the part that no one uses and used that as the shine on the trolls eye
And done!
The whole process took me about a week to two weeks (I'm surprised I stuck with it), but if you one helluh-vah procrastinator, then you could probably pull one together in three days. I know I couldn't because I kept getting hand cramps from cutting the wire up (and it scratched up my hands something firece!)
And that's it! I'm sure you can take the basic idea of this and turn it into something else like a Me gusta head or MECHA HEAD....I think! Try it yourself! You're very own, Troll Mask!
Related content


Comments: 6

never would have thought to use coathangers! So cute and came out really well.  (Smile)")
👍: 0 ⏩: 0

This is really awesome!
I suggest submitting it to the Resources & Stock Images > Tutorials > Artisan Crafts category.
Keep up the good work!
👍: 0 ⏩: 0

Nice tutorial ^^! I found the idea of using wires for your base really interesting, I think I might use it!
👍: 0 ⏩: 1

Thank-you kindly! The wires made the head look a little polygonal in the end, but I prolly should added a few more layers of paper mache...Just a heads up and good luck with any future projects!
")
👍: 0 ⏩: 1
You're welcome!
Yeah that's a bit what I fear about the wire structure... being too "polygonal". But I think, like you said, that if I add more layers it'll be ok. Anyways, I'll try it and if I'm successfull I'll probably post a picture of the final product with a link back to your tutorial  (Wink)")
👍: 0 ⏩: 0
