HOME | DD
 soup-sammich — Pleated Skirt Tutorial (Marvelous Designer)
#tutorial #marvelousdesigner #tutorialmarvelousdesigner #tutorialhowto
Published: 2018-06-25 06:00:44 +0000 UTC; Views: 5867; Favourites: 43; Downloads: 107
Redirect to original
Description
I've gotten a couple comments and questions about making pleated skirts in Marvelous Designer, so I thought it was high time I did a tutorial of how I make them. The wonderful folks who work on Marvelous Designer have provided a "Pleat Tool" to sew and fold pleats, but I've never had much luck getting a decent result with it, so I use a slightly more complicated approach.
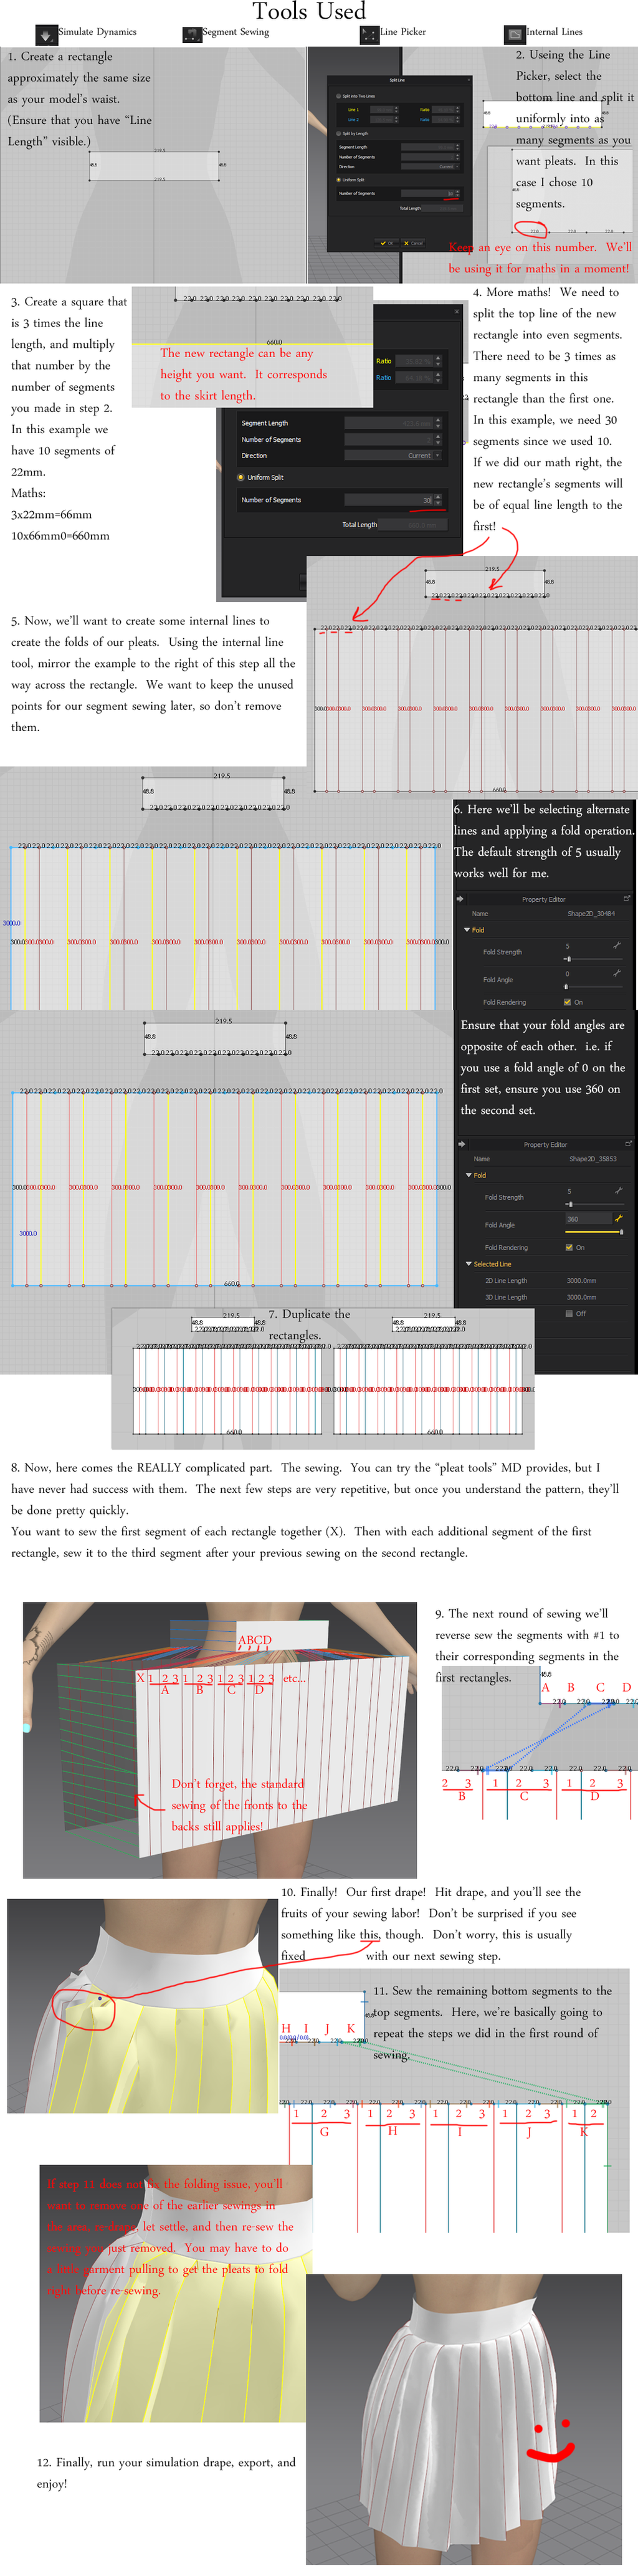
1. First, create a rectangle about the same width as your model's waist, hips, or wherever you want the pleats to begin. The width doesn't have to be a whole number, but the closer you can get it, the better. Height in all measurements is purely subjective, so use your own discretion. In this example we're making a rectangle around 220mm in length. We'll be referring to this rectangle as the "first rectangle."
2. Select the bottom line of your first rectangle and using a "Uniform Split" divide the line into segments. The fewer segments you use, the wider your pleats will be. Naturally, more segments makes for narrower pleats (and a LOT more sewing). In this example I chose the simple number of 10 for the segments.
-2.a. Make a note of the length of your segments. If you haven't done so already, turn on "Line Lengths." We'll be using this number for the most dreaded of subjects, MATHS!
3. The next rectangle (aka "second rectangle") you'll be making is the skirt fabric itself. Since pleats are typically two folds and a bit more fabric to start the next pleat, we'll need 3 times as much length as our first rectangle. How you get that result is up to you, but I typically forget how long my first rectangle is after splitting it up, so I multiply my segment lengths (22mm in this case) by 3. For our example that gives me a beginning number of 66. Since we're using 10 segments, I'll multiply the length of the pleat (66mm) by 10 to get an overall length of 660mm. Again, the height is purely subjective here, but you'll probably want to give it more height than your first rectangle.
4. Now that we have our second rectangle created, we need to split the top line evenly (bottom line too, if you want, but it's not really necessary). Once again, we'll be using the "Uniform Split" function of MD. The easiest way to get our segment lengths for the second rectangle is to multiply the number of segments in the first rectangle by 3. In our example, we'll be using 30 segments in the second rectangle.
5. Next we'll be utilizing the "Internal Line" tool to create the pleat folds. We'll be starting at the first point (interior, not corner) in the top line. Click on it, and drag your mouse to the bottom of the rectangle. Double-click to end the line and start a new one. Move to the next point and repeat the process. Skip the third point, and start again on the fourth. Continue the pattern of two lines, skip a point, two lines, skip a point, until you're at the end of the rectangle.
6. Using the line selection tool, select every other internal line. Once you have selected half of the total internal lines, you'll need to change the fold angle. An angle of 0 will fold the fabric so that the interiors of the fabric will meet. A fold of 360 will fold the fabric so that the exteriors of the of the fabric will meet. If you follow the example in the image, you'll have pleats that point counter-clockwise around your model. If you choose to invert the numbers, the pleats will point clockwise around your model. Once you have picked an angle for the first set of internal lines, you'll need to select the remaining lines and enter the opposite fold angle. MD will visually help you with the selection of the remaining lines. A fold angle of 0 will turn the color of the line to a brighter red, and a fold angle of 360 will change the internal line color to blue.
7. Next we duplicate our rectangles! Move the duplicated rectangles to the rear of your model and rotate/flip as appropriate.
8. This is where it gets complicated, "Segment Sewing" each of the pleats to get a decent result. You can try the "Pleat Sewing" tool, but nothing ever folds right for me when I use it. I always start with sewing the first segment of the first rectangle to the first segment of the second rectangle. In the images, I've labeled the segments A (first segment, first rectangle) and X (first segment, second rectangle). The remaining segments of the first rectangle I've identified with letters (granted partially) B-K (although I realize now that I miscounted and should have stopped at J, either way, the concept holds), the second rectangle, starting with the second segment, I've numbered with a repeating sequence of 123123... and each 123 is assigned a corresponding letter. For the first round of sewing, sew A to X, B to B3, C to C3, D to D3, etc. Also, ensure that you've sewn the appropriate vertical lines for the sides of the skirt together before continuing.
9. The next round of sewing is a little trickier. (You can drape here if you want, but it's not necessary.) You'll want to reverse the sewing direction of one side of the segments. This will ensure your pleats fold appropriately for the final drape. Reverse sew A to A1, B to B1, C to C1, D to D1, etc.
10. Once the sewing of step 9 is complete, drape the clothing and watch those pleats take shape before your eyes!
")
-10.a. You'll probably encounter a few odd folds at this stage. Don't worry, 99% of the time the next step will take care of that little issue. However, if it doesn't, you'll need to do some virtual seam ripping and delete the segment sewing in the problem areas. It's not always necessary to delete both of the seams, but at times it helps. Drape and pull the fabric as necessary, pause the drape and re-sew the more interior segments first.
11. Sew the remaining segments. A to A2, B to B2, C to C2, D to D2, etc. Drape to set the new seams.
12. Congratulations! You've just made a pleated skirt in Marvelous Designer! Run your drape simulation and/or animation, export, and enjoy!
Related content


Comments: 6


Thank you, my friend!
👍: 0 ⏩: 0
