HOME | DD
 Tervola — Digital Painting Tutorial
Published: 2011-08-21 14:57:45 +0000 UTC; Views: 114042; Favourites: 4148; Downloads: 2752
Redirect to original
Description
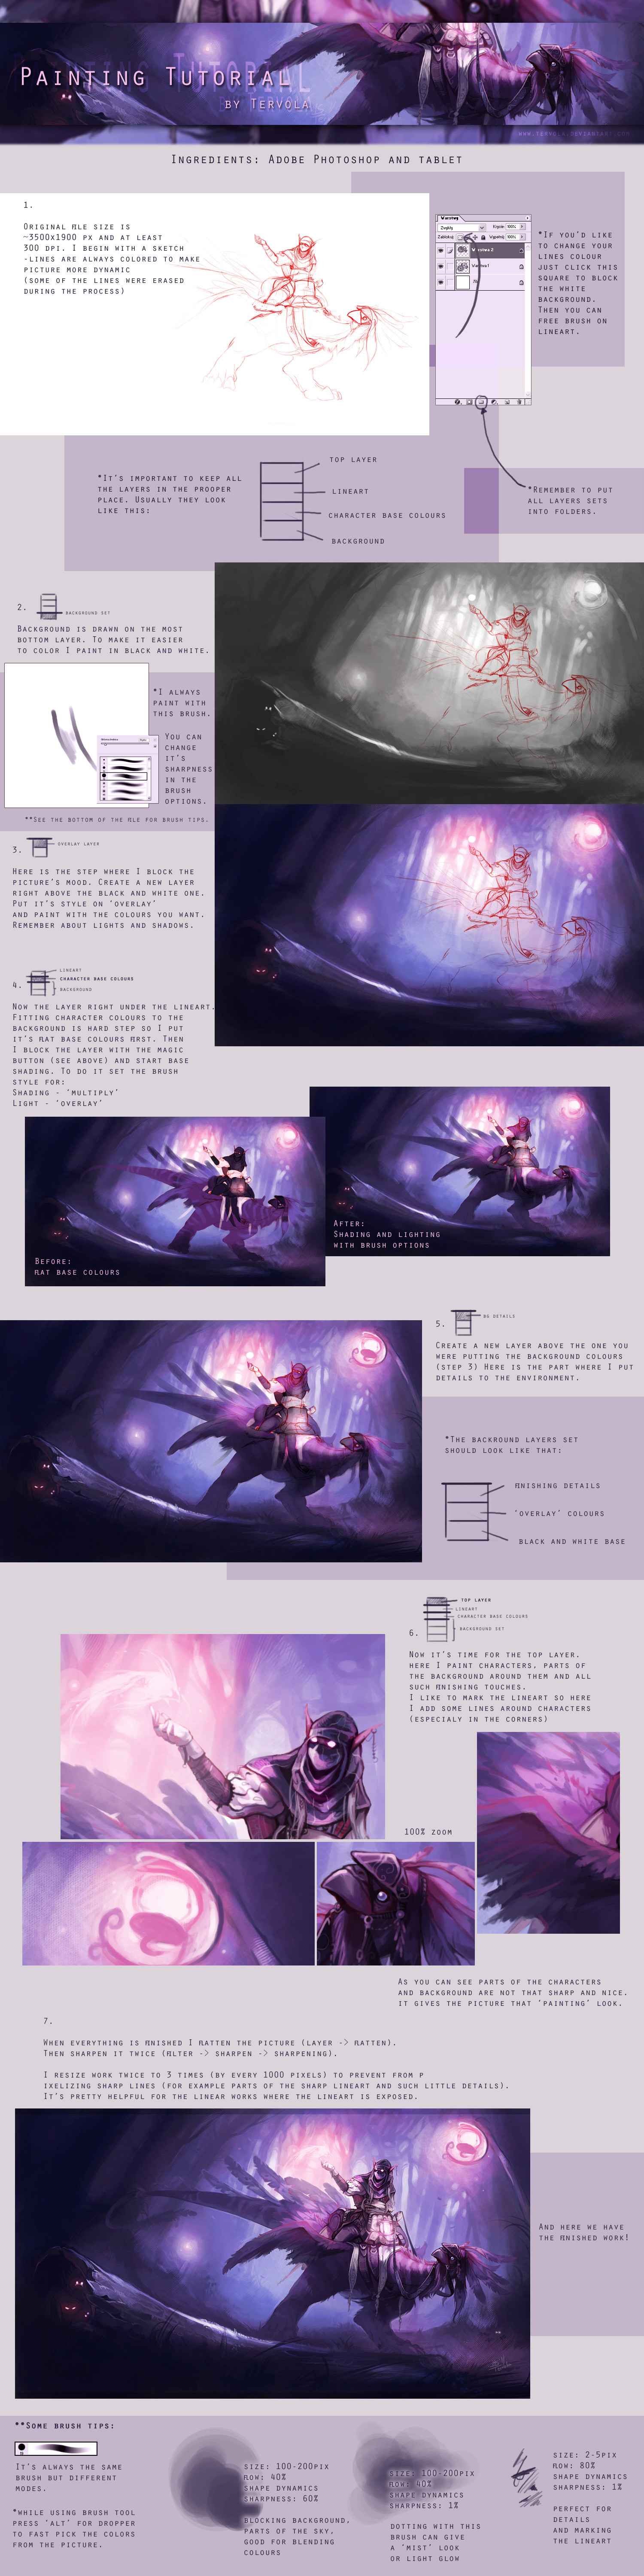
*BIG file*Here is the tutorial based on my previous work (I used it's PSD file for it). That's my own digital painting way and actualy a mix of different styles. The latest 14 works were made this way.
*I don't have Photoshop in english so I tried to translate all the options. I'm sorry if sometimes there is not prooper translation but I hope you will understand what I mean anyway

Hope it's clear enough. In case you don't understand something, feel free to ask question
 (Smile)")
---
Texture tutorial [link]
Color adjustment tutorial [link]
Related content


Comments: 393

Sketch was made all in photoshop but sometimes I also work with scanner. This is the same process for this style. I'm glad you really like it, thank you, this means so much for me

👍: 0 ⏩: 1


Bardzo podoba mi się styl, w jakim rysujesz. To jest jeden z tych efektów, których od dawna chciałam się nauczyć... Tylko borze najzieleńszy, totalnie nie jestem w stanie przyswoić, jak nakładasz cienie i światło. Ja wiem, że to wszystko opcje pędzla, ale kurczę, przecież wtedy żeby dostać jednolitą plamę, nie możesz oderwać pędzla od podłoża, bo inaczej będzie się nakładać?! A wtedy precyzja jest dla mnie totalnie niemożliwa... Próbuję od dłuższego czasu się z tym oswoić, no ale za Chiny nie jestem w stanie użyć tego cieniowania...
Tym bardziej podziwiam. Może kiedyś, kiedyś... Dzięki za pracę włożoną w ten tutorial
 (Wink)")
👍: 0 ⏩: 1
Z cieniowaniem jest właściwie tak jak mówisz - trzeba zrobić plamę jednym zdecydowanym ruchem, a potem przyciemniać obszary gdzie jest więcej cienia. Na tym etapie nie masz się co martwić o dokładne cieniowanie. To i tak jest szkic tylko po to, żeby założyć sobie kolor cienia. Potem będziesz cieniować dokładnie. Tak samo działa sprawa z rozświetlaniem.
Czyli jak chcesz założyć cień, to jakimś kolorem z środka palety (nie z tych dolnych czarnych, bo ci czarna plama wyjdzie) i tylko lekko jednym ruchem przejeżdżasz gdzie ma być strona zacieniona. Nie musisz się martwić o kontury, bo i tak potem się wszystko zamaluje.
Miło, że jest pomocny, dziękuję 
👍: 0 ⏩: 0


very VERY useful, thanx a lot :*
👍: 0 ⏩: 1

slovak.... ")
If ur not from Poland
👍: 0 ⏩: 1
I'm from Poland but I can understand you a little
👍: 0 ⏩: 1
I got another question,,I tried to use similiar setup fo brush like you have... But it doesnt look like that... Do u use Shape dynamics only? Or with "Other dynamics" too,,I tried it without Other dynamics,is it good to work with "Other..." ? I think its better.
👍: 0 ⏩: 1
The brush I use it has saved "other dynamics" in its settings. If you use the first basic brush it will have the same effects if you mark that option for it.
👍: 0 ⏩: 1
Thank you,that I wanted to know
Its OK Im usin same option,but with Shape Dynamics too,it works fine for me
Your tutorial really hepled me,Im usin this method only now
If u have some time,u can look at my newer pics
Thx.
👍: 0 ⏩: 1
Glad to help you
Good luck on the further practice!
👍: 0 ⏩: 0

how do I change the brush sharpness please? may be a dumb question but really I cannot find it.. I use adobe cs6 :/
👍: 0 ⏩: 1
On the top bar, where you have "flow, opacity" options, there is "brush palette" button. To change sharpness choose the first top option.
I don't know how it looks in CS6 but that's how is in my older PS.
👍: 0 ⏩: 2
Im usin CS4 but I cant find that sharpness option,isnt it Hardness? under Master diameter
👍: 0 ⏩: 1
I think it's probably the same. Sorry, I don't have PS in english so I may translate some things wrong
👍: 0 ⏩: 1
Oh,,that I did not know
In my opinion,,english PS is better than other translations.
👍: 0 ⏩: 0
Size - xx px
Hardness - 0-100% , is hardness the sharpness ?
👍: 0 ⏩: 1
The "brush palette" button is to the right of "flow/opacity" options on the top bar. Then you click the icon and you have "brush settings". The first option is "shape dynamics". In this option you use first swatch to control brush sharpness (1-100%).
I'm sorry, I don't have photoshop in english so it's hard for me to rename all the options. You can always try if you are not sure about the option.
👍: 0 ⏩: 1
it's size jitter , but I think that's exactly what does. Thanks! I gonna try to follow the tutorial and improve my painting ^^! If you'd have some time , please check some of mine beginner works
👍: 0 ⏩: 1
Ah that's good
👍: 0 ⏩: 0

You said: " i always paint with this brush" i supose you use a table to capture pen pressure, is it possible to achive that brush effect using only mouse?
👍: 0 ⏩: 1
Yes, I use tablet for this. It won't work with the mouse, this effect requires pen pressure unfortunately.
👍: 0 ⏩: 1
Thank you, im willing to buy a wacom baboo pen and touch as a first table, im a begginer in digital paiting.
👍: 0 ⏩: 2

best bet is to look for an older model bamboo on ebay, they are WAY cheaper plus they have the added feature of an eraser tip on the opposite side of the pen. as well as shortcut buttons on the tablet. and a touch sensitive scroll/rotate pad. the new bamboo tablets have only a pressure sensitive pen with no eraser tip and the tablet only has the work area on it, no buttons and no scroll/rotate/zoom
👍: 0 ⏩: 1
i have try´d a new bamboo pen and touch, it have 4 buttons and multi touch, i have to say that i never used the multi touch or the buttons, for me i think the basic bamboo will do the job. thanks for your concern
👍: 0 ⏩: 1
well the older model bamboo is VERY cheap you could pick one up for about $20
👍: 0 ⏩: 0
Yes, it's really good to invest in some tablet, the work is much more easier with it
👍: 0 ⏩: 0

Thank you very much for this tutorial
I just startet to use my bamboo i've got 2 years ago and must say it's kinda hard, your tutorial is very helpfull and i can't wait to come home to experiement way of drwaing :3
Especially your brush tips are helpfull as f*ck
Wahh want to go home now and try this out >.<
👍: 0 ⏩: 1
Ahh that's great you find this helpful
👍: 0 ⏩: 1
Thank you (:
And it is a good practise, a learned a bunch of new ways how to use the brush ^-^
👍: 0 ⏩: 0

Really really really helpful!Thanks alot
👍: 0 ⏩: 1

gosh, this is pretty
so basically, pretend i'm painting on an actual canvas and work from background to front?
i hope i can do this on gimp one day
👍: 0 ⏩: 1
Yes, that's actualy how it works
👍: 0 ⏩: 1

Mercy, this is a beautiful method.
I really like this. Thank you so much.
👍: 0 ⏩: 1
Glad you find it good fior you, you're welcome
👍: 0 ⏩: 0

I painted this along with the tutorial, but for some reason my blacks always become too black. I think it happens when I turn the image from greyscale to color (I selected a midtone dark blue, set layer to multiply for shadows, and began painting over shadow areas). When I looked at the histogram it was blown way out. Do you have a suggestion? My paintings always have too much black! - Thanks.
👍: 0 ⏩: 1
If you paint on the shadow areas with dark color on "multiply" mode it gets even more darker till the shadow area stops blend the color and it pixelizes (it also happens to me when I use too much shadows). I reccomend you to use lighter color (midletone to top colors) and paint with them a little over the shadow areas.
👍: 0 ⏩: 1
So if it gets too dark, just paint over it again with midtones or highlights set to overlay? Love the tutorial man.
👍: 0 ⏩: 1
Oh, and I see you're a lady, sorry. I think everyone first assumes everyone is a man on the internet lol.
👍: 0 ⏩: 1
The "overlay" mode may darken it still. It's better to use "normal" mode or some "lighten" one and use those brighter colors. You can always create a new layer to correct shadow areas.
I know it may sound difficult but sometimes is just a matter of trying over and over again.
And no problem about that
👍: 0 ⏩: 1

I has reading this too and i tryied myself with just a random drawing of mine just to see the effect and i couldn´t make the Nº7 note in your toturial ")
👍: 0 ⏩: 1
This step is just for resizing your work and save it as the final version. When you resize to smaller dimensions the little details get blurred, that's why the work has to be sharpened first.
Follow the options steps I wrote here, flat all the layers, sharp picture using filter options. Then go: picture -> picture size. There you have dimensions in the pixels (my original work is 3500x1900 pixels). Then I resize it to 2500x1350; then to 1500x815 (like every 100 pixels. The quality may get lower if you resize it so much at once).
Hope this explains a little
👍: 0 ⏩: 1
ohh i see 

👍: 0 ⏩: 0

this was incredibly helpful. thank you
👍: 0 ⏩: 1
<= Prev | | Next =>