HOME | DD
 That-One-Midget — Inking Tutorial

Published: 2011-01-25 04:54:38 +0000 UTC; Views: 3504; Favourites: 65; Downloads: 58
Redirect to original
Description
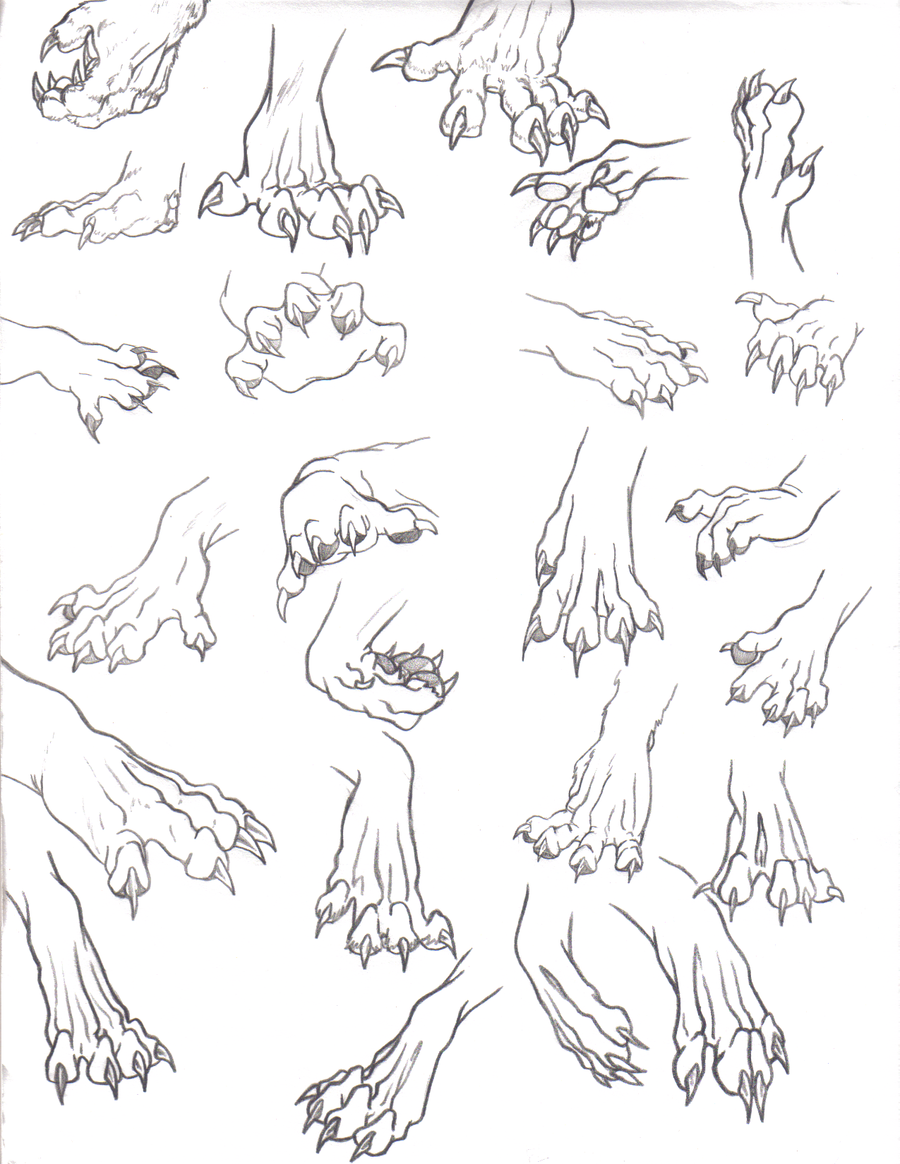
So, here's my first tutorial. I decided to talk about how I ink my drawings, since the question gets raised sometimes. Additionally, I was overwhelmed by the sheer number of manga inking tutorials and disappointed in the lack of general inking tutorials. I decided to change that and make one of my own.Hopefully someone enjoys it. If so, part 2 is going a bit more in depth and should be much more helpful.
Enjoy!
 (Smile)")
Related content


Comments: 15

")

Thanks! Glad I could help.
👍: 0 ⏩: 0

Don't Sharpies turn green after a while? That's what I've heard about them, so they're apparently useless.
👍: 0 ⏩: 1
I've...never heard that before, but if that is valid, it probably has to do with the paper being used.
I've used Sharpies for years and the drawings are still black. Really the only thing I don't like is how much they bleed.
👍: 0 ⏩: 0

Lead holder? I seem to break number 7's easily, hence I use 9. But can you get lead holders that hold it without breaking the lead?
👍: 0 ⏩: 1
Well, the lead holder in the picture is for 2 mm lead. If I'm understanding you correctly, you have .7mm and .9mm lead. Usually a mechanical pencil is good for .7 and .9 lead. However, the more lead is sticking out of the end, the more brittle it's going to be. I generally have only 2-3 mm of the lead out of the tip, it's usually fairly sturdy. Additionally, try to hold the pencil at around a 45-60 degree angle. I've noticed that the lead on my pencil tends to break when I'm holding the pencil at an angle less than 45 degrees.
👍: 0 ⏩: 1
Thank you. Oh, so .2 is much finer or harder?
Oh, well have an unnatural writing position it's due to a nero issue (disability) so, I grasp the pencil hard. I try not to, and try to work with colored pencil to not erase and just go with the flow.
Since have a habit of wanting things to look right I tense up more.
👍: 0 ⏩: 1
Ooh okay, I apologize.
As far as lead goes, there are a few different things. There are #1, #2, #2.5, #3, and #4 pencils. Those have to do with the hardness of the lead and the darkness of the lead. #2 is the most common lead and is the equivalent of an HB ("hard" and "black") pencil and is the most common.
Then you have B, HB, F, H, and 2H. B stands for "black" and refers to how dark the marks will be. H stands for "hard" and refers to how hard the lead is. Depending on who you ask, F stands for "fine" or "firm." This all correspond with the # pencils as follows:
B = #1, HB = #2, F = #2.5, H = #3 and 2H = #4
Now, when I say .5, .7, .9, or 2mm, I'm referring to the thickness of the lead. .5 lead would be lead that has a diameter of .5 millimeters, .7 lead is .7 millimeters in diameter, .9 is .9 millimeters, and 2mm is...well, you get the picture. .7 is the most common pencil lead in mechanical pencils, but does have a tendency to break. This is why 2mm lead is good - you have to press really hard to break. It's fairly similar to a wooden pencil, expect that wooden pencils tend to give a little, making it easier to crack the lead higher up in the pencil. Not to mention that wooden pencils are almost always #2.
Hope what I wrote was fairly concise. I tend to talk quite a bit, haha.
👍: 0 ⏩: 1
Yep, sof for a 2mm one they have lead holders with a sharp point? Or do I have to sharpen it
👍: 0 ⏩: 1
Eventually the lead will get dull, yes. I keep mine sharp by constantly twisting the lead holder while I'm drawing, but I'm sure there are some sharpeners out there.
👍: 0 ⏩: 1


Excellent tutorial, this is the method most people should start out with no matter what style they're using.
After changing methods myself from a variety or sources over the years I've adapted the thicker outline and thinner details myself. It's pretty much clutch though it is easy to get carried away on the thicker outlines, lol. It just looks clutch when done correctly.
All this talk about thinner lines for where the light it, thicker for the shadows, it can get confusing when you have a pretty busy picture to ink. Start simple and work your way up, that's the best way to go.
👍: 0 ⏩: 1
Thanks!
I really like making thick outlines, not just for aesthetic reasons, but it all around makes for a cleaner looking lineart.
I've never consciously done a lineart with thinner lines where the light is and thicker with the shadows, though it seems like a good idea. Kinda gives pictures a slight noir feel.
👍: 0 ⏩: 0

It's really good so far! Can't wait for part 2~
👍: 0 ⏩: 1
Thanks. I'll work on it.
👍: 0 ⏩: 0