HOME | DD
 TheGriffinQueen — Basic Frame Tutorial
Published: 2014-06-30 17:02:32 +0000 UTC; Views: 9608; Favourites: 38; Downloads: 89
Redirect to original
Description
Ok, so several people have been asking for a tutorial. Here is how I make the basic frame of my wings.Materials:
9 Guage galvanized wire
Chicken wire
Electrical tape (in the color of your feathers or top, or at least close)
Thin wire
You can get all of this at Home Depot. For the next step you will need felt (you can get it at the fabric store. Get it cut from a bolt, dont buy a bunch of little squares) and a bunch of feathers. Smileyme.com has great bulk feather prices, but not a ton of selection. I go to them for my Turkey Quills. For the shoulder feathers I use goose shoulder feathers from tonyhill.net. For a large set of wings you will need at least 4 strung ft of feathers.
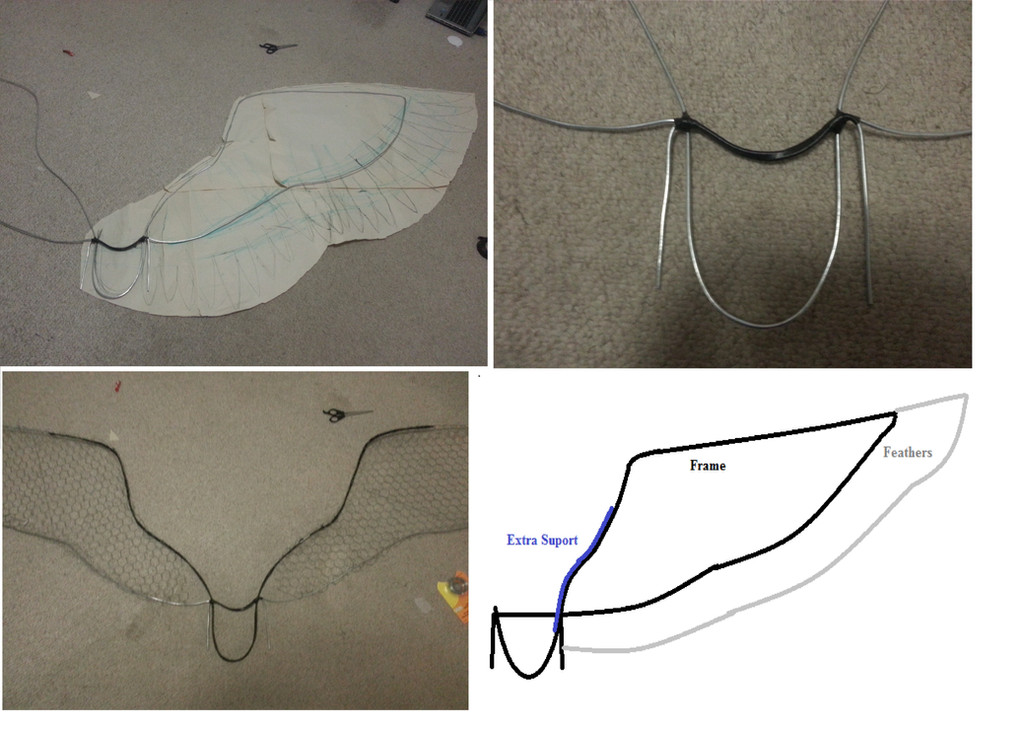
Step one is to create a full sized sketch of the wing you want along with the back brace size. This back brace size will change based on who the wings are for. Basically the beginning of the wing should start at around your shoulder blades, so your U bend should be no thicker at the top than that distance. The U bend should be no longer than the corset you are going to be wearing, or just slightly longer than where you put your waist strap if you are going with straps instead (though the design shown is for a corset). The U bend should AT LEAST go to the waist for stability.
Use the 9 guaged galvanized wire to frame the wings. Start at one of the stabilizing bars (the strait bars on the side of the U back brace), making a slight U bend across the top of the frame so that the wire dips below the corset once it is on. From here frame the bottom of the first wing, then the top. This will bring you back to the back brace where you will form your large U bend. After crossing over where the first stabilizing bar and the top small u bend connect, frame the top of the second wing, THEN the bottom (so in reverse of the first wing). Once you come back to the back brace, try and shape the small top u bend to match the first and end by creating the second stabilizing bar. For you visual learners out there you can kind of see this order in the top two images. Tape the two sides of the small U bend together and to the large U bend of the frame using electrical tape. Making the frame out of one piece of wire is annoying but it increases its stability and means that the whole thing is way less likely to break. For spread wings you are going to want to add extra supports along the top of the wing so that they do not bounce too much. You can see this in the bottom image. I go over the top of the wings and the U bend in 1 piece, then tape that piece along the entire support using electrical tape.
Next cut out the chicken wire just slightly larger than your frame. Cut the wire so that there is no chicken wire over where the wings will touch your shoulders and back. The wire may poke through the felt and feather layers and scratch you. Badly. It hurts. Just trust me on this
") . Once you cut out the first one, flip it over and use it as a template for the second so that your frames are the same shape. Your chicken wire will want to fold inwards based on how it was rolled, so be sure to make a mirror image of your wings so that when you put the wire on the both curve inward on the same side. This will be the front of your wings. Fold the chicken wire around the 9guage wire frame. To make the wire super secure use your thin wire to loop around the frame and chicken wire and tie them together.
. Once you cut out the first one, flip it over and use it as a template for the second so that your frames are the same shape. Your chicken wire will want to fold inwards based on how it was rolled, so be sure to make a mirror image of your wings so that when you put the wire on the both curve inward on the same side. This will be the front of your wings. Fold the chicken wire around the 9guage wire frame. To make the wire super secure use your thin wire to loop around the frame and chicken wire and tie them together. Lastly, put a bit of felt at the ends of the stabilizing bars so that they do not accidentally scratch you when you put them on. I first glue them on a bit, then tape them down using electrical tape.
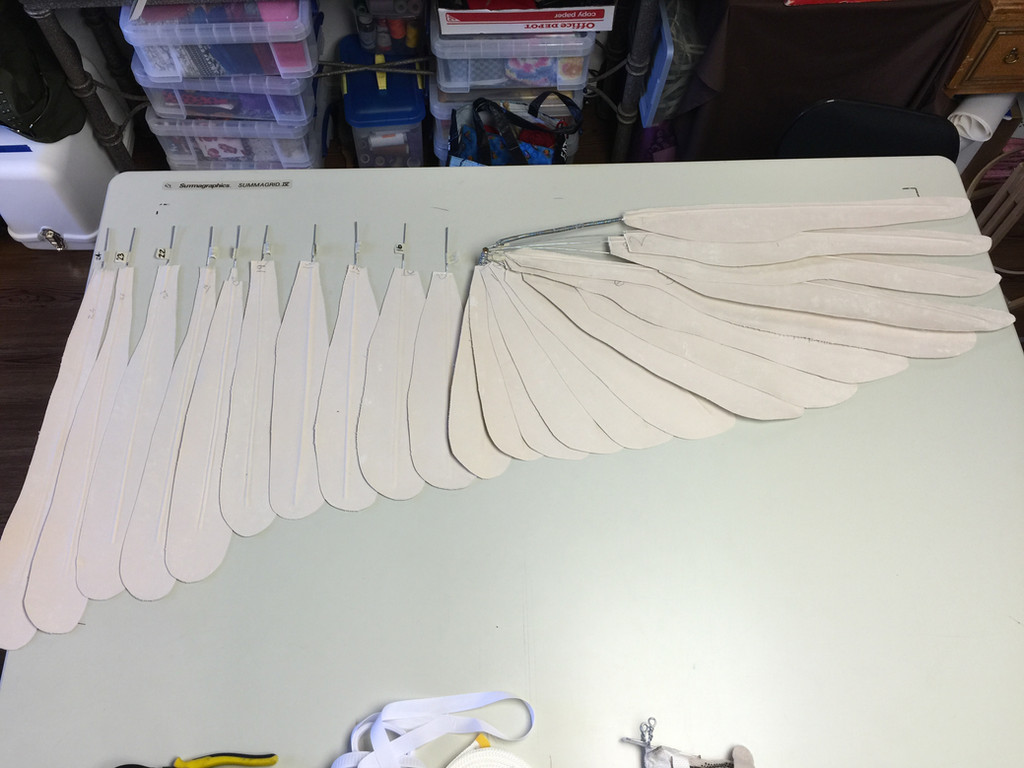
The next steps are to add your felt layers and feathers. The long and the short of it is to cut out your felt about an inch larger than your frame along the top, and as long as is needed on the bottom for your design. Just be sure that you do not make the felt so large that your feathers cant reach the wire frame or they will just flop around. Use hot glue to glue the felt to the top of the frame and to the second felt layer on the opposite side. Then use hot glue to glue your feathers on in the pattern you sketched out in your design. Remember, feathers FAN out from the wrist and elbow joints of a bird. For more realistic wings be sure to layer your feathers down appropriately. Be careful when gluing feathers. The heat from the glue will seep through quickly and can burn. Also, wear work gloves so that you do not get hot glue on your fingers.... trust me... so many blisters...
Have fun!
Related content


Comments: 7

Do you happen to have a video tutorial on this. im trying so hard to understand but I am such a visual learner that certain parts are confusing for me. BUT I WANT TO MAKE THIS SO BAD FOR MY STEAMPUNK TWILIGHT SPARKLE COSPLAY.
👍: 1 ⏩: 0

If I may ask I'm gonna use this base and use different materials that I'm finding around my house such as; many wired hangers, old paper that end up in the garbage in the end, a black spray can, and card board (lots of it) owo
👍: 0 ⏩: 0

For a large set of wings, about how many turkey quills would you need? I'm looking at ordering feathers, but I have no idea how many to order!
Also, I'm slightly confused by the felt step. Is the felt covering both sides of the frame over the chicken wire?
👍: 0 ⏩: 1

I use 1 lb of turkey feathers, half lb of right hand half lb or left feathers. Usually the "mixed lb" has half and half. This is usually between 225 and 250 feathers. Also YES, Cover both sides in felt!
👍: 0 ⏩: 1
Awesome- thanks!
👍: 0 ⏩: 0

I see you found it
You can also add straps instead of the corset design shown by nixing the stabilizing bars and adding some circles to the sides of the U bend towards the bottom with some 12 guage wire (dont try and make the loops with the 9 guage... unless you are superman you loops will be like 3 inches in diameter...). Attach the shoulder straps to the top of the wing frame where the wing meets the U, and to the loops, then add an underbust strap (or under peck strap if your a guy... cant tell by our name...) to the loops. The underbust strap is a serious must if you do straps. Eventually, when I have a life again, I will post more back brace pictures.
👍: 0 ⏩: 0