HOME | DD
 Visoutre — Ambient Occlusion/Masking Tutorial
#1920 #3d #bio #bioshock #burton #concept #cyber #diesel #dieselpunk #dishonored #futurism #game #girl #goth #gothic #hair #jetpack #leather #lighting #manga #mask #masquerade #material #maya #npc #paintover #police #rendering #retro #rim #robot #sexy #steam #steampunk #tight #time #timelapse #tutorial #video #wet #zbrush #art
Published: 2014-09-29 01:35:00 +0000 UTC; Views: 52328; Favourites: 516; Downloads: 0
Redirect to original
Description
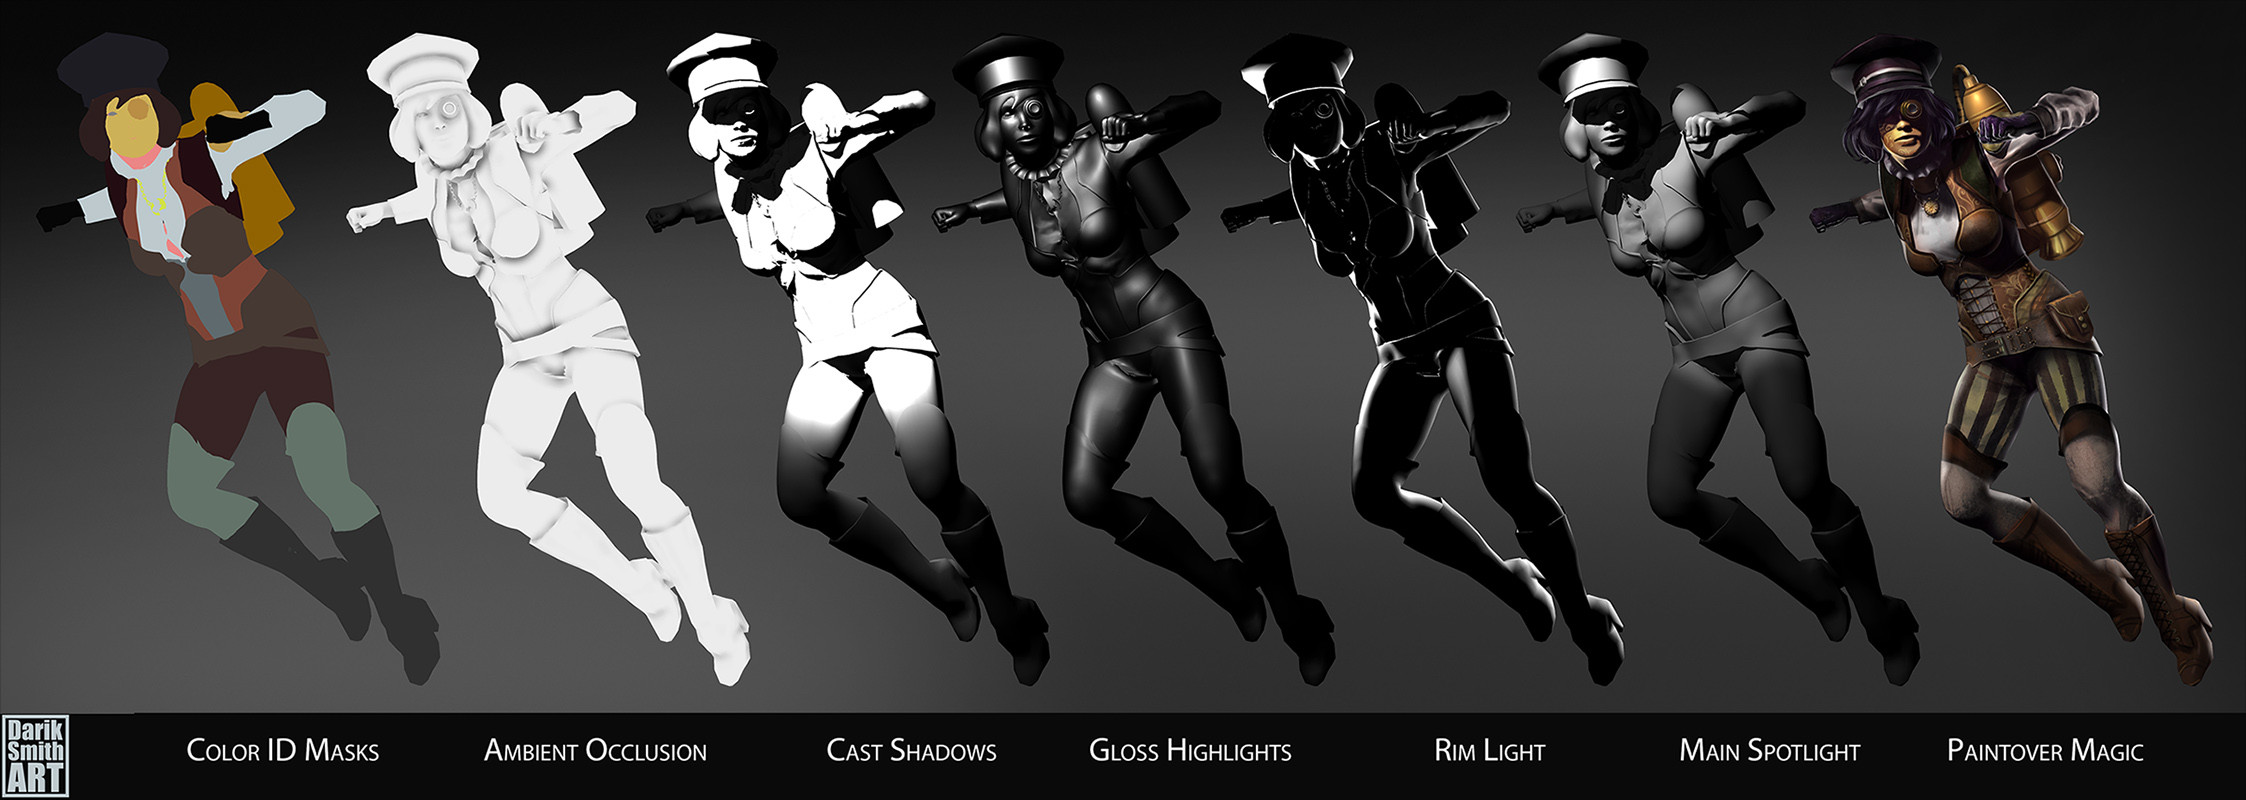
This is just a useful technique I started experimenting with, rendering out masks and lighting from a 3D program (Maya) to make painting a lot easier, have more control and this workflow is non-destructive.I find it's most useful for when you have a basemesh modeled and you want to do a paintover of the final design before spending hours sculpting/texturing. But if you are just a 2D artist you can technically hand paint each layer and your final result will have a pretty cool look. There are a few tutorials for this technique out there, but I thought I would just make one since I recorded my whole process.
Basically to get the masks you assign a different colored material to each object you want isolated and render with flat lighting. In photoshop use the magic wand tool to select the parts you want isolated, or create groups with layer masks for each part.
The lighting works best when you isolate different elements so you can play with the intensity and stuff in Photoshop. Put the AO and shadow on multiply and for the lights I used screen or color dodge.
Then you can paint your details underneath and the lighting will be on top. You can also assign color to the light layers, like if you want colored rim lighting or non-black shadows, it's pretty easy and non-destructive.
I made a group and layers above everything for additional design elements that weren't made in 3D yet and it still works pretty good.
There's also a video (no audio) of exporting the masks from Maya here: www.youtube.com/watch?v=niNrqA…
And a Timelapse video (no audio) of the paint process (5 hours cut down to 12 mins) www.youtube.com/watch?v=cucD3T…
Hopefully this inspires you. See the full final artwork: The Nightwatch
Related content


Comments: 17

👍: 0 ⏩: 0


I can't remember but I think that was a Daz3D genesis 3 character that I exported to Maya. Then I added some outfit geo in Maya/Zbrush. It's only a paint over for design purpose so the Daz3D figure was handy. But I made a character entirely modeled in Zbrush and rigged/animation done in Maya. Was crazy times in art school!
👍: 0 ⏩: 0

These are really cool layouts of different lighting effects. As a 2D artist I think I could even use this as a guide to my color work and creating different lighting effects. Very cool - thank you for sharing it with us!
👍: 0 ⏩: 1
Yeah it's helpful to separate the lighting into layers, even in 2D. You can alter the lighting so much easier than if everything was merged and painted into 1.
By the way awesome pinup gallery!
Also in terms of lighting reference, there is a free 3D program I have been implementing lately into my workflow called Daz Studio. The renders are pretty amazing and you can play with the lighting like a photographer minus the cost of models/equipment. Here's an example of some lighting presets, although it's easy to make your own without buying packs: www.daz3d.com/dramatic-iray-li…
👍: 0 ⏩: 0

It's a matter of perspective. I'm still crying from seeing the front page of www.artstation.com/

👍: 0 ⏩: 0
Sorry for replying so late. The main spotlight is the same light as the Cast Shadow and it is the closet natural lighting values the final painting will have. Keep in mind that this is just an overview of how I approached this painting and if you were to apply this technique to your own work you can have additional light sources/ render passes. Like most studio lighting setups involve a dominant light + rim light and also a fill light, which I didn't include here but could have.
👍: 0 ⏩: 1

Wow...that's so detailed! I probably won't do 3D art, but this process is useful to 2D art, too. Thank you for the explanation and your gallery is very impressive!
👍: 0 ⏩: 1
yeah, you can learn a lot of valuable principles using this technique. To see this method used for 2D, an artist Alex Negrea made a video on how he applied the techniques alexnegrea.deviantart.com/art/…
👍: 0 ⏩: 1
Yeah, this is definitely a technique I will try out when I have time! Thanks again for the information  (Smile)")
👍: 0 ⏩: 0

")


Wow, this can actually be *extremely* useful! Thank you for the tutorial!
👍: 0 ⏩: 0