HOME | DD
 WebsterWorks — Making of Korok Trio
#tutorial #zelda #botw
Published: 2018-03-26 00:15:00 +0000 UTC; Views: 574; Favourites: 8; Downloads: 0
Redirect to original
Description
See the finished piece HERE !
I was honestly pretty surprised that this worked as well as it did! This was my first time making a two-part mold and it is quite a bit more complicated than simple one-part molds I’ve done before. Thankfully, there are many tutorials out there for a beginner like me, and I learned as I went along!
This tutorial on Instructables was particularly good, and this video helped a lot too.
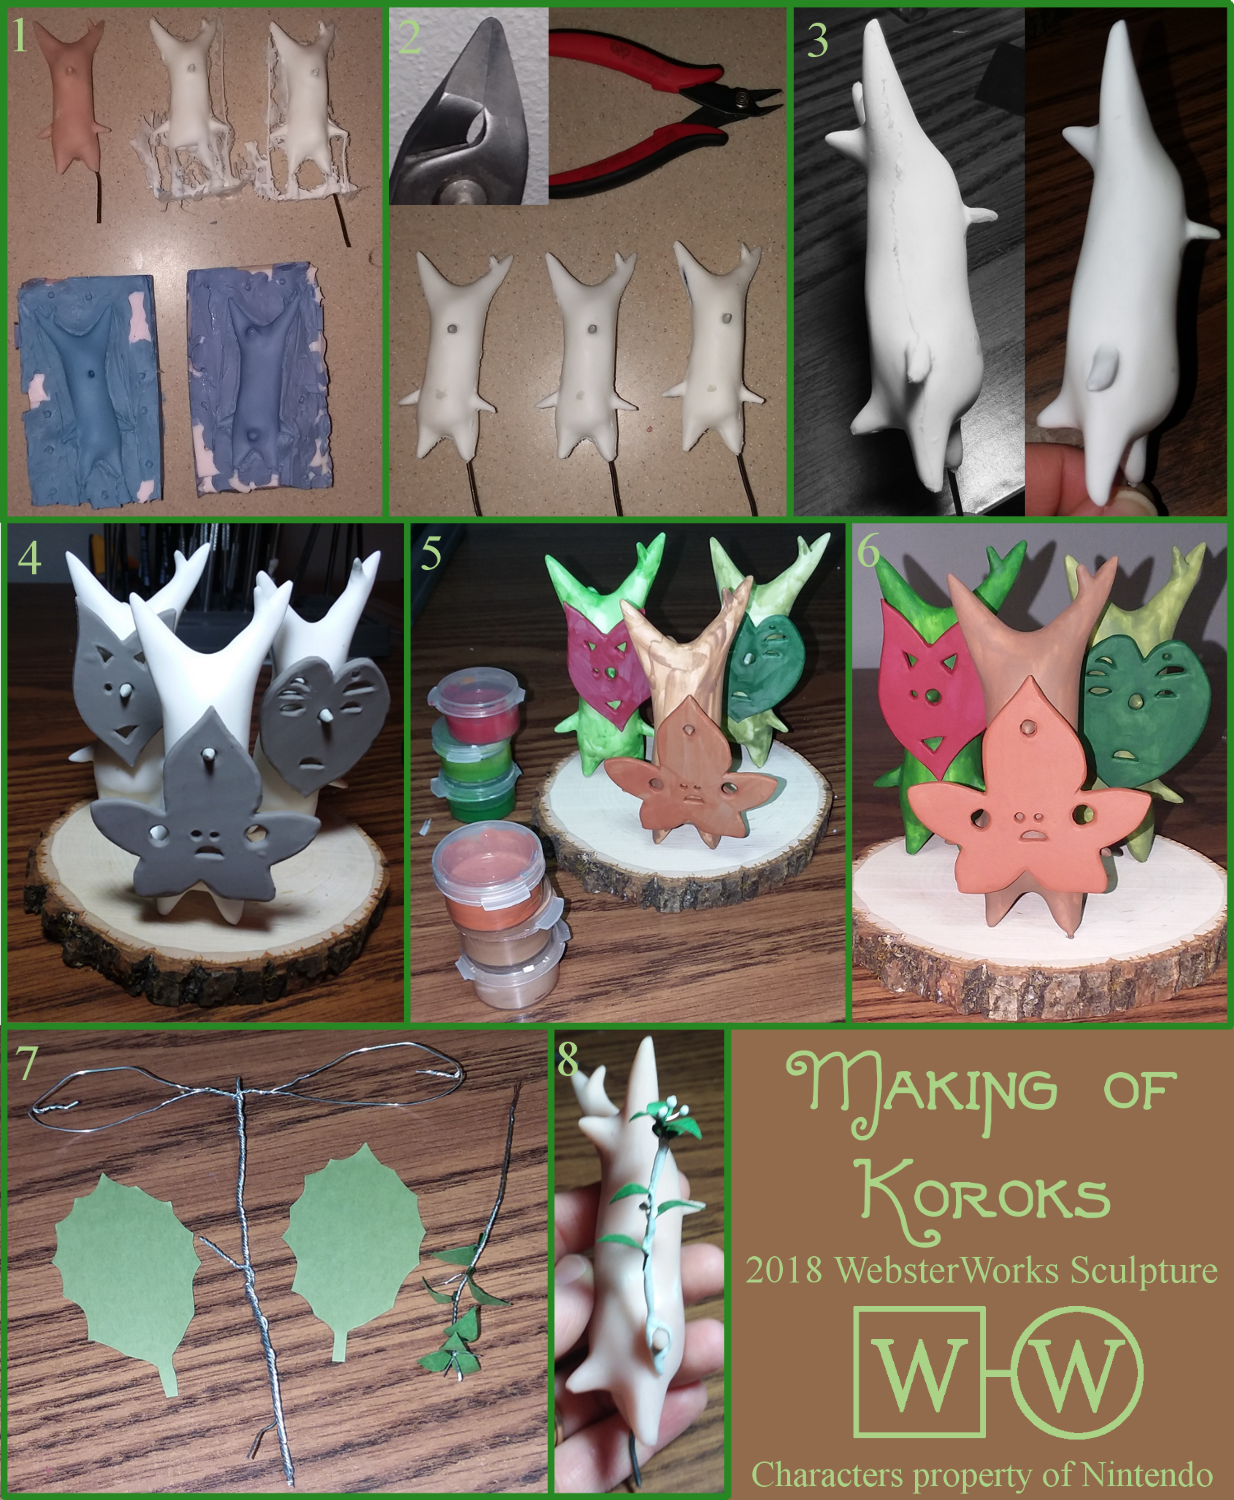
1) This picture is a great showcase of all the mistakes I made! The beige sculpture is the original Korok I made out of a core of aluminum foil with Super Sculpey Original around it. I didn’t bother with an armature or try to make it very strong because the original sculpture was only going to be used to make the mold anyways. I sort of followed the instructions and put my Korok model in a mold box, then built clay up around it to cover half. Except the only clay I had was more Super Sculpey, which is NOT the right clay for this job. It’s not malleable enough, and it kept separating from the figure as I tried to pack it in. Also I just barely had enough. So it wasn’t nearly as smooth as I wanted it, and the lines between the clay and the figure were not crisp at all. I was so frustrated with this step that immediately after I was done I ordered some Monster Clay so I would never have to do it again. In the clay mold, I also didn’t make nearly enough keys (the sort of pegboard-like pieces that allow the two halves to line up).
But after the clay was in, I added wires at the end of his arms and nose to make a gap in the mold and allow air to escape. If you don’t have vents for little pieces like this, air can become trapped and your resin won’t fill in all the way (this still kind of happened with the noses, probably because my vents weren’t large enough or aligned very well).
You will also notice that the two halves of the mold are different colors. That’s because the OOMOO comes in two parts. One is blue and one is pink. You should mix an equal amount of them together to get a nice purple mold. The first time I did it, as you can see, I didn’t really get the amounts right. But it still worked! I was amazed that it was so forgiving. The little chunks of pink are pieces from my old molds that I cut up and put in the empty space to reduce the amount of silicone I need to use. That’s another tip I got from emilySculpts !
The second (middle) Korok was my first test. I used Amazing Casting Resin from a local craft shop for that one, and while it’s good for small, simple pieces, it started to harden before I could pour all of it! I ended up with a Korok with no legs and a quarter of a plastic cup of solidified resin. This wasn’t helped by the fact that my pour holes were a bit small, so I had to pour slowly so as to not clog up the funnel. I enlarged them a bit with a dremel before proceeding. That was interesting… but if it’s stupid and it works then it’s not stupid, right? At least whenever I have leftover epoxy I am slowly using it to give that poor guy some legs.
The third (rightmost) Korok was the first success! For that I used Smooth-Cast 305 , which stays liquid longer before it starts to harden. I don’t have a pressure pot or digital scale or anything like that, so I like how you can just mix this by volume and don’t have to worry about air bubbles. I can’t recommend it enough! To allow the Korok to stand on his own, I inserted some 16 gauge wire in his leg while the resin was still liquid and held it there with a clothespin. It’s so messy because my entire mold-making process was less than ideal, but it worked! And I’m happy with that!
2) Here’s the crew after I did most of the cleanup! Took a while but they look so much better now! I filled in a bit on their noses and the tips of their head spikes with Apoxie Sculpt . There were still a few places the resin didn’t reach and some air bubbles that I had to patch. To get all the extra material off, I used a flush cutter to snip off the larger pieces. If you look at the close-ups of the blades, they are like two right triangles that come together. The bottom is flat, so they make a clean straight cut as close to the surface of the model as you can get. It reduces the amount of sanding I have to do by a lot, so I highly recommend it!
3) Speaking of sanding – there was still quite a bit to do because the way I blocked out my half mold with clay was not super great, and it left a really jagged and obvious mold line. Nothing a little sandpaper and elbow grease can’t fix though! If I wanted to mass-produce these guys this wouldn’t be sustainable at all because it was actually quite a bit of work making them presentable. Sometimes I do wonder if it would have been less work to just make them all from Sculpey like I am used to. It certainly would have cost less in materials! But hey I learned a lot while doing it so that probably makes it worthwhile! Also if I made them individually they wouldn't have been exactly the same, and the props likely wouldn't have been interchangeable because they have to fit in their "hands" just right to be able to stay in place.
4) The masks were made from Sculpey Medium. I used my handy pasta roller to get it a uniform thickness, then simply cut the masks out, rounded the edges, and baked them. This was before sanding them, too, so you can see some air bubbles that were present. Now if you are familiar with Koroks (or if you just google them) you can see the wide variety of masks they have! But as it turns out, I had no choice but to make those three because the rest wouldn’t work by just hanging on the Korok’s nose. If you look at some of the other examples, they would just turn upside-down because most of their weight is above the nose-hole. If I wanted to make those masks I would have to completely redo it, and probably make the nose as part of the mask, with a magnet or some other kind of attachment. But I don’t mind, I really like the ones I ended up making! I was mostly going for variety anyway and I think these three do just fine. I also finally drilled holes in the base so they could stand up.
5) Here’s after one coat of paint. I waster my acrylic paint down a ton because I still don’t have any really high-quality brushes, and this helps eliminate brush strokes or globs. It does dry quite quickly though!
6) This is after three or four coats. The color is getting quite uniform, but a few more coats are need until it’s completely solid. The designs on the leaf and the stripes on the Koroks were simple freehanded with colors that weren’t as watered down.
7) Here’s the framework for the little props. I made the core by twisting thin wire together and separating a few strands for the ‘handle.’ The leaves were made with construction paper, but after I shaped them how I wanted I applied a thin coat of super glue to the back. This actually makes them pretty sturdy! I then covered the wire with epoxy sculpt and painted the Korok leaf.
There you have it! Altogether another successful experiment, but with plenty of opportunity to learn from my mistakes!
Related content


Comments: 6

I totally understand the struggle of these mold lines, i sanded myself to death when i made molds of this figure (the final fursuit woof [figurine] ). Never again! Smooth-on makes the absolute best resins and thank you for recommending this one because the one i always used was smooth-cast 65D which is usually made for masks and not for casting figures. Im assuming the one you used was less thick so it worked better, thats good to know! Thank you for sharing what you learned when making these
 (Smile)")
👍: 0 ⏩: 1

Wait... those are all casts of the same thing? I had no idea! You made them look so different, I thought they were a completely different sculpture every time! You must have gone crazy with the sanding to make the seams between the different tails and hair look so smooth. That's amazing!
And you are welcome! The main reason I post these is so people don't make the same mistakes as me. That stuff is expensive! The less you can waste the better. I haven't actually tried any of their other resins because for most they recommend a scale to mix by weight and a pressure chamber, neither of which I have. Between 300, 305, and 310 it's in the middle as far as pot life and cure time. I don't think I could ever use the 300 because you only have 3 minutes to mix and pour, and I am definitely not that fast!
👍: 0 ⏩: 1
Oh yea the pressure chambers are for air bubbles i think, i never use those either (they sound pretty scary to be honest..). You're right tho, very expensive products >.< But i think they're fairly easy to use compared to other brands which is nice. The one i used is specifically for making hollow casts so it hardens fairly quickly and you need to move the mold around while the resin hardens so it sticks to the walls. Pretty cool for masks, pretty annoying for figures :'D
👍: 0 ⏩: 1
Yes actually that's exactly what it's for! In high pressure it squishes any air bubbles so they are too small to see, and then the resin hardens and you bring it back to normal pressure it stays! I've looked into getting one but they are pretty expensive then you also need an air compressor to get the pressure up... yeah, I don't think I will be using one any time soon.
That sounds like really interesting resin, I've never used it but I will keep it in mind for any new projects!
👍: 0 ⏩: 0

It sounds as though you learnt quite a lot from this and I think they turned out great.
👍: 0 ⏩: 1
Thank you! Yes, that was the idea! It seemed like a simple enough thing to try my first time through. I am really glad it worked as well as it did otherwise it would have been really discouraging and I probably would have just stuck with Sculpey. But now I want to try more things eventually!
👍: 0 ⏩: 0