HOME | DD
 WebsterWorks — Making of Pyramos
Published: 2017-08-06 13:44:43 +0000 UTC; Views: 564; Favourites: 4; Downloads: 0
Redirect to original
Description
See the finished sculpture here!After almost obsessively going over the WIP’s on ViiStar’s instagram and asking her a few questions I felt like I was ready to take my armature up to the next level and make something with thick wire and removable parts. Creating Pyramos was great practice! For structural reasons it wasn’t necessary to make the tail and arm removable, but I knew I wanted to send it to Finland and any pieces sticking out would be susceptible to breaking, especially the thin pointing finger. It would be better if it could be wrapped up and supported on all sides, plus with international shipping customs can go through and unpack everything, and not necessarily put it back the same way. As it was the first time I made something with the brass rods, it was good to try it first on an easier project.
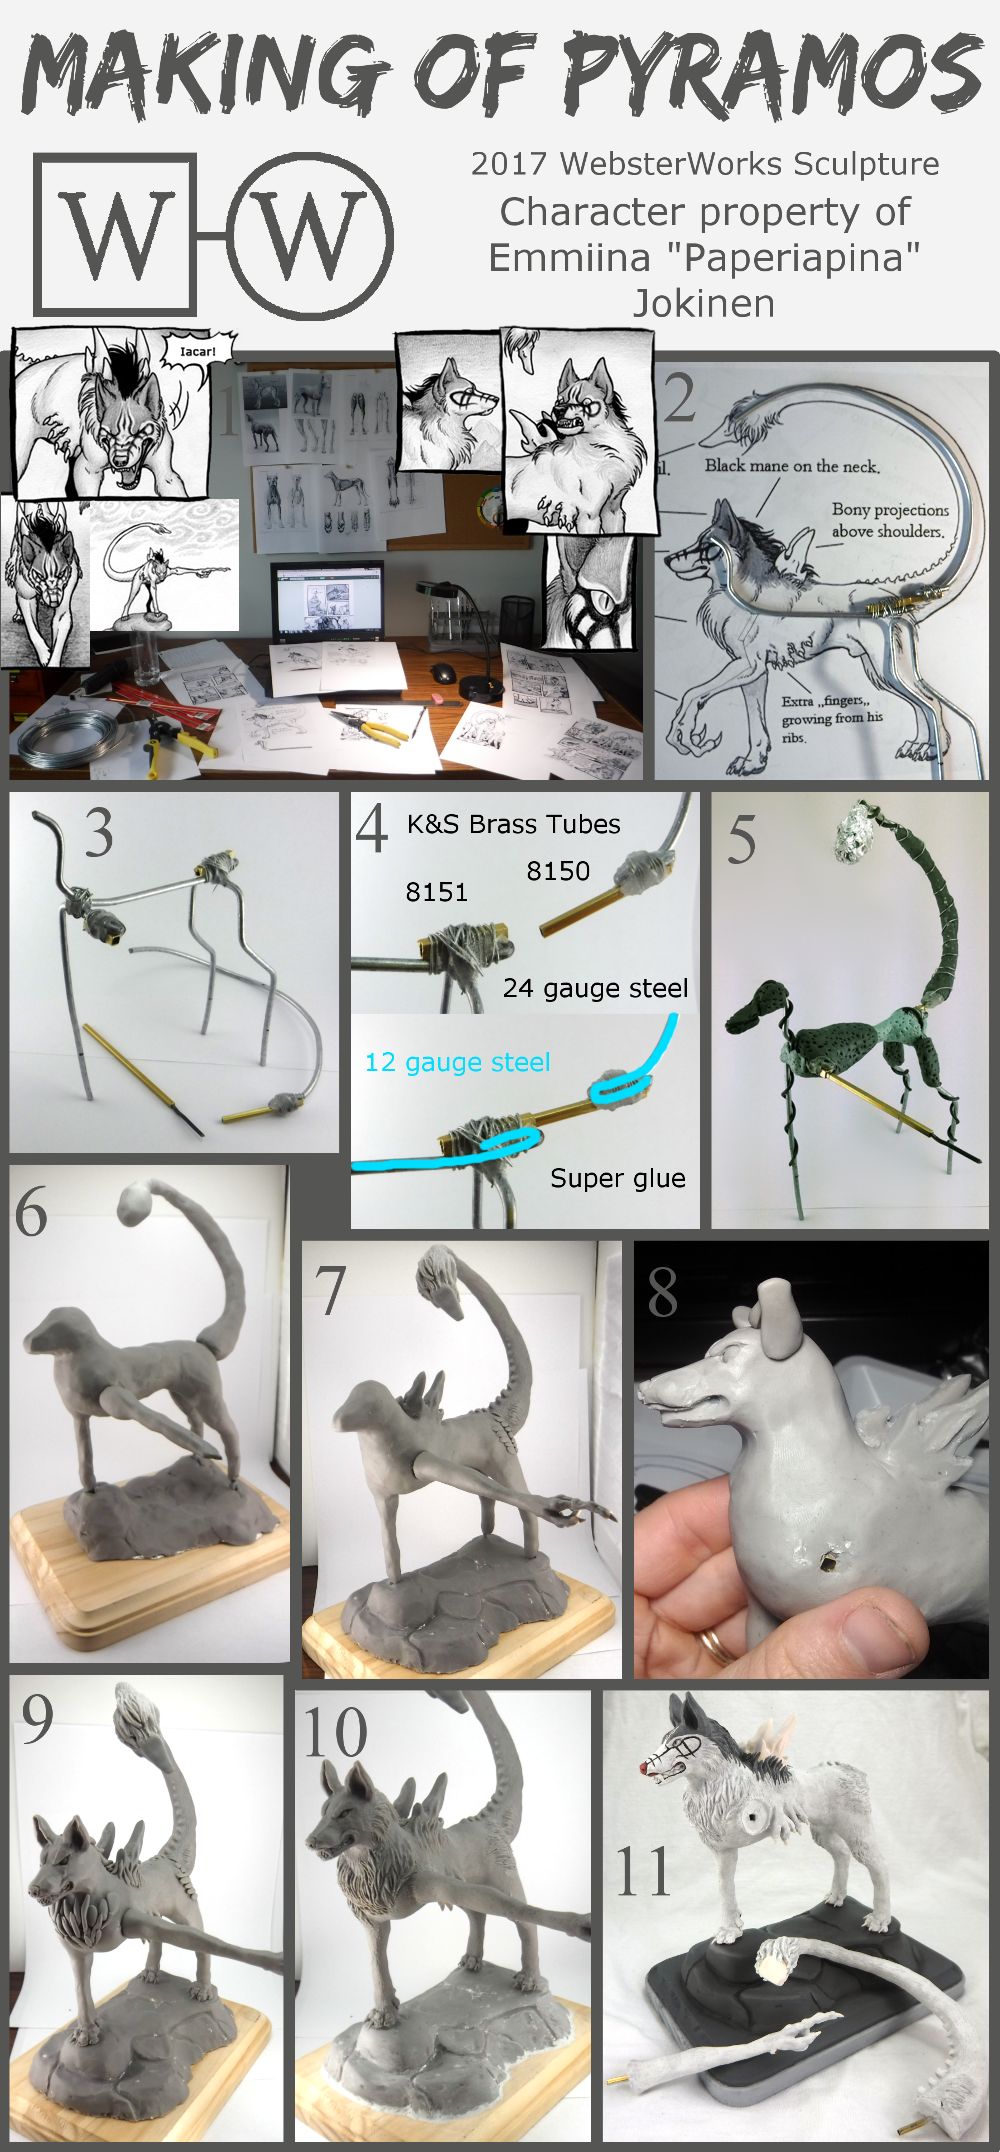
1. Do I have too many references? Of course not. You can never have too many references. I have been following the Wurr comic for more than 5 years now (read it here! ), so I printed off as many frames of the character from as many angles as I could find. Even though Pyramos here is a mutant hound, his anatomy is grounded in real dogs so I printed off skeleton and musculature references as well. And I swear this wasn’t a setup for picture purposes; it’s actually what my desk looked like throughout most of my sculpting process (although it got progressively messier).
2. I loooove reference sheets. Most artists don’t draw their characters in a boring, static pose directly from the side or the front because it’s just not interesting. Thankfully, that’s exactly what reference sheets are for! This was the picture I used the most to get all of Pyramos’ proportions right. I enlarged the image and printed it at the size I wanted the sculpture to be. At nearly every point I held the armature up to the reference picture to make sure it matched up. Here I have made his spine/head, back legs, and tail. I will detail how I attached the tail in section 4.
3. Here is the complete wire armature with the arm and tail removed. They will be removable on the finished piece as well. The pose I picked is similar to the small picture above (where he is standing on the rock and pointing), but his head will be up because the base he will be on won’t be as tall as the one in the comic, and it would look strange for him to be looking down at nothing. Luckily, that pose is similar to the reference sheet so I can match it up right to the picture and not have to change any of the joints. I still drew on the wire with sharpie where the joints and the bottom of the feet are, so if the pose was going to be different I would have just bent it at the sharpie marks. The wire is longer than his feet so that I can anchor it into the base.
4. Here is how I made the removable pieces. The thick wire is 12 gauge galvanized steel. The square brass tubes can be found here . The larger tube is stock number 8151 and the smaller is 8150. It is difficult to cut the brass tubes without deforming the ends and preventing them from fitting into one another. I used a cutting blade on a dremel tool, but if you don’t have one you can sort of saw at it with a box cutter until it scores enough to snap off. Thick steel wire is difficult to bend! I didn't think it would be as big of an issue as it was, so make sure you have two pliers at a minimum. At the end of the armature where I was going to attach the brass tube, I made U-bend in the thick wire. This was harder than it seems and involved a hammer. I then put the tube on the U-bend and held it on with smaller 24 gauge steel wire. After it was secure, I then dripped on some super glue and covered it with baking soda, which causes it to harden instantly (thanks for the tip, ViiStar!). I also purposefully bent the front end of the larger tube (the one pointing away from the tail) so the smaller tube won’t slide all the way through.
5. Here is the completed armature reinforced with plumbing putty. Before reinforcing, I wrapped the armature with 16 gauge annealed steel wire (the black stuff) and with that also added length to his pointing arm. Then I put plumber’s epoxy putty over the wires, further securing the brass tubes and strengthening the armature. Once again looking at all of ViiStar’s armatures, she textures the epoxy underneath so the clay has more surface area to grab. It works much better than putting clay over smooth epoxy! I used plumber’s putty for the inside (the different colors are just different brands). It is very strong but hardens in under 5 minutes so you have to work FAST. That’s actually why the tail is smooth and there is wire wrapped around the outside; it hardened too fast for me to poke the holes in! I also put aluminum foil around the tip of the tail to decrease the weight because that part doesn’t have to support anything. It also gives me something with a little give to anchor the tail bone in. I sometimes tend to make the inside bulking out too big, but everything was a good size here except I could have maybe made the head a bit smaller. Installing the eyes was a bit tricky as the epoxy ‘skull’ ended up almost not leaving enough room for it.
6. Here I have added the base. It has an epoxy core where the feet are inserted, but elsewhere it is bulked out with aluminum foil. I also blocked out the sculpture with rough shapes. I knew I wanted to texture the whole sculpture, so I made it with Super Sculpey Medium because it can hold a fair amount of detail. As you can see, I attempted to texture it all at once, but that makes it much easier to mess up a part I have already done by touching it and wiping away all the fur texture. It worked out fine, but the end was a bit tricky because I couldn’t touch any part of the sculpture for fear of rubbing off the texture. In the future, I will probably only block out the first half or so. That way I can have something to grab on to as I am adding the details. Then I can bake it and not have to worry about avoiding touching it.
7. I refined the shape (you can especially tell the difference in his left shoulder), finished the tail, and detailed the hand and the rocks he is standing on. His nails and the bony projections on his shoulders and tail were pre-baked, and inserted into the clay so the rest could be built around it. I have also added some dimension to what will eventually be the longer ruffs of fur on his hind legs. (You can also see the inside of my light box and how it’s getting a bit crowded with such a big sulpture... oops)
8. Now I have started detailing the face. I have the shape about how I want it, positioned the ears, and have started hollowing out the jaw where I will build up the teeth. You can also see his shoulder socket with the arm removed. Yikes!
9. Basic shape is completely done! I have the sculpture just how I want it, minus the texture. All that is left now is drawing many tiny little lines. So many. This tutorial was extremely helpful!
10. Finished the fur texture and added epoxy around the bottom of the rocks. Sculpey shifts around the wooden base after baking, but Apoxie Sculpt generally stays where it’s put.
11. Everything is painted and detailed! The tail and arms remain removable. I minimized the seam by building up some apoxie sculpt around it, texturing it, then pulling it apart and allowing it to dry. That way the pieces match up and the seam is nearly invisible.
I am pretty happy with how this came out and I hope Paperiapina is too! It also gave me really good experience so hopefully I can m more complicated sculptures in the future!
Related content


Comments: 11

I was wondering how you made Pyramos's fur when I saw your original photos (as I have tested making fur myself and it isn't easy to achieve a specific appearance), so nice to find out now, especially how you apply lumps of clay first to give the final fur undulations, and you also posted a link to the tutorial ")
Its realy kind of you to be making Pyramos for Paperiapina, and considering the amount of research, time and skill it takes to make such a model a very thoughful and generous gift.
👍: 0 ⏩: 1

Thank you! I am glad you learned something! I've picked up mostly everything I know from the internet too so it's good to be giving back!
I wish I could make more things for everyone whose comics I read online, completely for free. It really takes a special person to put all this work into something and offer it to everyone without getting anything in return for the most part.
But hey, your mention of the fur made me remember! I took a few more close-up shots of the process that I completely forgot to post. Maybe I can dig them up and put another tutorial together.
👍: 0 ⏩: 0

It looks like that fur tutorial worked out really well for you. I also happen to follow that account.
It's always interesting to see how other people do things and what materials they use.
I bought myself a few rubber tip acrylic shapers a few years back but I think I've only used them once. I tend to still use metal tools and then brush over the clay surface with nail varnish remover to smooth them out.
👍: 0 ⏩: 1
That's really interesting! Glad you liked how the fur turned out. I really wasn't sure if I could capture it well enough. I tried out metal tools and the lines they made were too harsh for me. I wonder if it's personal preference/style or the clay? I really have to try Fimo one of these days, but I have so much sculpey laying around that I can't bring myself to buy any more clay!
👍: 0 ⏩: 1
That's understandable. I hate having to buy more coloured clay when I already have a lot of clay in but it's the wrong colours for what I need. That's one of the reasons I mostly sculpt in grey or flesh and paint it afterwards now. That and I don't have to worry too much about keeping it clean.
👍: 0 ⏩: 1
I know! Painting is my least favorite part and I have been thinking about using colored clay but then I see how much it costs versus the bulk uncolored stuff and I can never being myself to buy it! Plus I already have a ton of acrylic paint that I have been collecting since middle school so there's really no reason to spend the extra money. Ah well. Plus painting gives you a lot more options so I will probably stick with that if I want to make semi-realistic sculptures anyways.
👍: 0 ⏩: 0

Good reference sheets are a lifesaver, i agree! Everytime an artist decides to draw a boring static pose of their character i'm like YESSSSSSS THATS WHAT I NEED
I saw VIIstar using this technique with the epoxy for her figures and honestly have no idea why i never tried it before myself, armatures are still by far my biggest weakness. But this looks like it would make your figure 500 times more sturdy. The most interesting part about this to me are the removable parts made with the brass tubes, that's so smart! I genuinly would've never thought of that.
I love seeing him unpainted because white figures always kinda reflect the light which makes it harder to see the details but they really stand out on the gray. You did SUCH a good job with the fur here and looking at him in your hand looks like he isn't too huge either meaning you did a lot of small detail work.
Thank you for sharing this again and writing all your steps, that stuff is always super interesting!!

👍: 0 ⏩: 1
OMG yes I am the same way. I have a folder of references and if I ever see one from a good angle I save it right away so I don't have to go looking for it again!
And yes you are absolutely right. The thick wires and epoxy absolutely make it super sturdy. I remember my first Mewtwo sculpture I didn't reinforce the armature at all and it was still a little bendy with the clay on, and after turning it around to paint it tiny hairline cracks formed in his leg that I needed to repair. Yikes! But Pyramos did not move once everything was hardened. When I was painting I could hold him by one leg or balance it wherever and it would be fine. I also don't think I could have worked out how to do the brass tubes without obsessively looking at Viistar's work. Everything she does is so gorgeous but not beginner-level at all! I hope in a few years I'll be able to make things as good as hers are now!
And thank you very much for the compliment! I had never tried to make fur before so all I could do was draw little lines and hope it would come out all right! I used these to make the texture: they are called Colour Shapers and I think they are originally for oil paint? I don't really know but the medium and firm ones work great on clay. My needle tools were leaving too harsh a line and the clay would sort of pill up (? I don't know what to call it, but it would get little tiny balls of clay near the edges of the texture), so the rubber tools worked the best for me.
👍: 0 ⏩: 1
Gah, being able to grab something by the leg and turning it all around is like an artist's dream come true haha. Your Mewtwo story is so relatable. The worst thing is that even if you fix the small cracks, the armature underneath will still stay bad so whenever you move it you have more cracks, it's like an endles fixing project which is really annoying and tedious.
VIIstar is a great inpsiration  (Smile)")
Yes, those rubber brushes are great for fur, that's pretty much all i use for hair and fur too! I always have about 6 in stock because the rubbing alcohol slowly eats them up over time and sometimes i don't even notice it. I sometimes see them advertised for nailart but it's very possible they were originally for oilpaints, i have no idea to be honest. But they're super neat and useful for blending clay in general!
👍: 0 ⏩: 1
You learn the most from your mistakes! Hopefully you can still salvage them though and make something that works. Mewtwo worked out in the end but when I think about it now, boy I did make a lot of mistakes. I just need more time to be able to devote to clay! I know it will be better in winter when I don't feel the need to go outside. That's neat that you use the rubber tools too! They are quickly becoming m favorite. I also got a bunch of old dentist's tools from a family member, and those are really nifty too!
👍: 0 ⏩: 1
Winter is a great time for sculpting! Especially because the cold makes the clay less soft and i think that's easier to work with. Rubber tools are great, just make sure you always have a "new" one to compare your current one too so you notice when it's completly worn out and might need a replacement
👍: 0 ⏩: 0