HOME | DD
 AmyClark — How I Draw - Yew
Published: 2009-07-16 23:17:18 +0000 UTC; Views: 25022; Favourites: 456; Downloads: 531
Redirect to original
Description
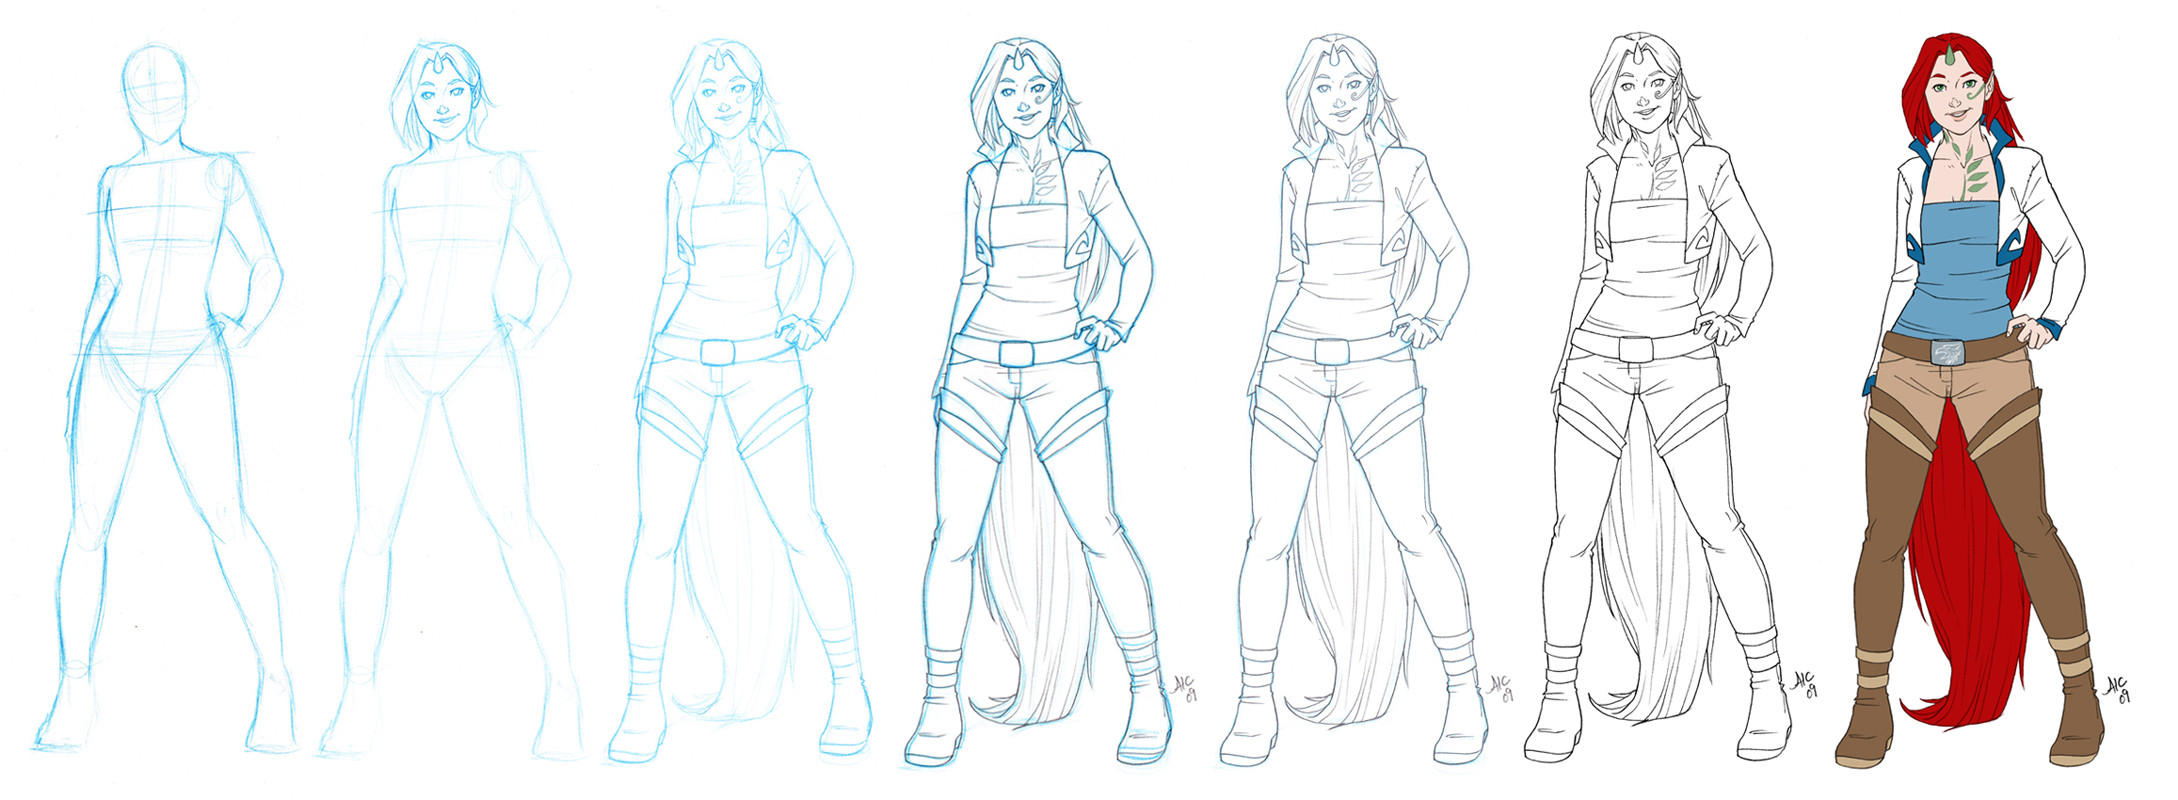
Well, it's not so much a tutorial as a "Here's how I do it, folks." I'd feel pretentious doing a tutorial, anyway. But I'm happy to share a WiP view of my process! This is my Unavisi character Yew, which I recently whipped out quickly to provide a required color reference. On a whim, I scanned the wip every now and then to show my progress.For the most part, I just work on computer printer paper. I like Brightness 96, Weight 24. The brighter paper helps me get a crisper image, and I just like the feel of the heavier paper.
Note: I upped the levels on the first four steps in Photoshop so that the blue lines are more visible.
1. Col-erase pencil. This is how I start every figure, mostly with basic forms, just sketching out the human body roughly to make sure everything is proportioned right before going into any details. I generally start with the head and draw the spine/action line from there to rough out the pose.
2. More col-erase. Once the body is roughed out, I start in on the face. I'd like to argue that starting at the top and working my way down the pages keeps the smudging at a minimum.... but I just really like doing the faces.
") I fill in all the facial details before moving on to the rest of the body. Kids, don't do this at home.
I fill in all the facial details before moving on to the rest of the body. Kids, don't do this at home.3. Col-erase. Once the face is done, I work my way down the page. Hair, neck, chest and torso, arms, hips, thighs, calves, feet - all in order from top to bottom. Often I'll leave one part semi-unfinished, work on another quickly, then go back to finish the previous part. I don't really think it through too much. I just follow my pencil.
4. 2B graphite pencil. Once all the details are in, I go in with my 2B pencil. I find it is just the right hardness/darkness for what I need. This part's pretty easy, but I keep sharpening my pencil a lot to keep the lines clean.
5. And then I clean up the blue a bit if I am so inclined.
6. Canon scanner, Intuos2 tablet, Photoshop CS4. Once the clean pencil lines are done, I scan my picture. If I decide that I don't want the blue lines in there anymore, I drop them out in Photoshop (via the Channels tab). I have an old Intuos2 tablet, which I use to clean up and rework the lineart in photoshop. Sometimes I do a lot of "re-inking" this way, redoing entire sections with my stylus. This image needed very little work, as I remember. When I am doing commissions, I do a lot of digital inking at this point to make sure I have a smooth hi-res file for the client.
7. Photoshop CS4, Intuos2. Here, I filled in colors really quickly (since it was just meant to be a fast color reference image). When I'm coloring quickly like that, I just create a new layer over the lineart, set it to multiply, and go to town.
Related content


Comments: 74

Thank you! Gotta do a sketch card tutorial someday - this one is super old! XD
👍: 0 ⏩: 0

mind giving some specifics on how you color? my lines seem to vanish. I'm using PHotoshop Elements; it's not what you're using, but it did cost 100 lol
👍: 0 ⏩: 1
Hmmm, I haven't colored digitally in quite a while now, but I would always create a separate layer for my line art and have my color layers be below the line art. There are a few different ways to do this, but I'm not sure what options PS Elements offers you, since I've never worked with it.
The simplest way is probably to set the top layer (containing only your clean line art on a pure white background) to multiply, and then doing your colors on a layer or layers underneath it. That method has some issues and is not as versatile.
What I do is a short process that actually isolates the lines and deletes the white background around it, leaving you with just the lines on an otherwise transparent layer. And again, I do the colors on layers beneath that. Here's a tutorial I found for you that basically shows what I do to the lineart: [link]
👍: 0 ⏩: 1
I'm gonna have to not be so lazy and do some trial and error on the program and find out how to do layers. If I can figure a video game without a book, and I can, I can figure that out.
👍: 0 ⏩: 0


That looks like Photoshop or any other picture edition program has been use to this drawing. Nice work, by the way! ^^
👍: 0 ⏩: 1
I draw straight on paper with pencils, but I did the coloring on this character digitally in Photoshop
👍: 0 ⏩: 0

This is awesome! I love the fact that she's not super thin as well. Great job. Thank you as well
👍: 0 ⏩: 1

That's awesome! 8D I think it would be a great idea if you made a tutorial >u<
👍: 0 ⏩: 1
Thanks! I'm getting better about scanning my art card drawings after each phase (pencils, inks, colors) but I can try to figure out how to show more of my individual drawing steps and set up a little tutorial. Are there any particular topics that you'd like to see me focus on, or would a start-to-finish photo-journey on one drawing be good?
👍: 0 ⏩: 1
You're welcome! Ummm~ There are a lot of things I need help with OTL So, a start-to-finish-tutorial would be amazing!
👍: 0 ⏩: 0

You have so much life in you drawing/illustrations!! I'm sure your busy but I have a question: How do I add life to my drawings? When I draw a pose it just ends up looking lifeless and dull, I practice with still life/anatomy books but I feel like I'm not getting anywhere. This step by step has really inspired me to draw something right now!
👍: 0 ⏩: 2
Thanks, you've been extremely helpful,these are great suggestions. I've never tried drawing others in 3D/life before. It sounds like a really good idea. Haha, drawing others in bookstores sounds like fun!
Wow a whole day 
👍: 0 ⏩: 0
That's a really tough question - and I actually thought about it all day before replying. 
The art books are good teachers. It's great that you're willing to research drawing procedure and to commit yourself to learning the fundamentals of anatomy. That's a necessary background to have, albeit one that many people seem to want to avoid. Kudos for your drive to challenge yourself and develop your skills!
It sounds like you are ready to take your book practice to the next level. Practice drawing from life (drawing from 3D instead of a 2D book). With your knowledge of anatomy, you can plant yourself in a mall or cafe or bookstore and draw what you see people doing. Emulate the movements and the unique, individual expressions and gestures they make. Or, if you don't feel comfortable trying this yet, perhaps you could try drawing from movies/dvds. I haven't tried this in a long while, but it could also give you a sense of how the body moves through three-dimensional space.
Maybe I'm off base, but I hope the suggestion helps. (And if you're already doing this, I apologize.) I don't draw strangers in bookstores anymore, but it was a fun and interesting exercise. (And you can always pretend you're a super-secret spy, hehehe!) :3
👍: 0 ⏩: 0

Wow, you stick very closely to the initial sketch all the way through! By the time that I go from the original guide to the final, it usual deviates like mad. XD
👍: 0 ⏩: 1
Now that you mention it, "sticking to the initial sketch" is only something I've been doing for the past 8 years or so. My characters used to decide to change position right in the middle of any sketch I ever made. XD I think the turning point came when I trained myself to map out the full body early on in the sketch. It helps me properly place the character in a scene, especially.
👍: 0 ⏩: 1
Hopefully mine will stay still one day; still haven't quite figured it out even though I do thumbs and wire-frame people and such before going in and fixing things. Usually, I think, it's just that my proportions in the initial person-placement phase are really out of whack, and sometimes that has a domino effect!
👍: 0 ⏩: 0


It's really helpful to see how the process of how you draw your characters. I especially enjoy this character's design and color scheme, especially the way the green compliments the red hair. Epic hair, btw.
I have a question regarding the alignment of facial features, since I notice you're doing it remarkably well here. Lately I have been noticing when I draw characters, the features tend to be lopsided when "mirrored" in Photoshop. I usually align them horizontally just fine, but they tend to be a bit twisted or vertically offset somehow- and I just don't know how to fix it. O.o it's like my brain is perpetually drawing lopsided features and I can't catch myself until it's too late. Do you know what could be done to help train my eye to catch these kinds of issues?
👍: 0 ⏩: 1
I used to have that problem all the time and I still have that problem at times, especially with certain angles. I set up a simple facial grid: a line up the middle and then two lines to draw the eyes between (not sure why two but it seems to work for me).
Years ago I used to start my faces with the eyes, and I think that's what got me in trouble. These days I start by sketching the ball of the nose. I think it helps me because it is a central point of the features and I can better visualize the other features in relation to it. I then draw one eye (the right), then lightly sketch the shape of the left eye and sit back to give it a good look before I commit myself to the shape or positioning. Somehow I still have problems aligning the ears - one is usually higher than the other in my rough sketches. XD
Sometimes I also like to get up and walk away from my picture before I commit it to ink. Then when you come back, it's easier to look at it with a fresh eye and catch little things like that before it's too late. But even if you don't have the time to be taking breaks like that, backing up and looking at it from a different distance (even if only a few inches farther away) can help you see if it's working or not before you commit to the darker lines or inks.
I don't know if that will help any or if you already do these things anyway. Man, now I feel rambly. ^_^;
👍: 0 ⏩: 2
This really helped me seriously. I always start off with the eyes, but I will try the nose.
👍: 0 ⏩: 0
Thanks so much! Don't worry about rambling, I love it when people ramble, and this helps a lot.
👍: 0 ⏩: 0


You know, you and I really need to collaborate some day. I didn't get nearly enough talking done with you in college, so I'll use this as an excuse  (Wink)")
👍: 0 ⏩: 1
Hells yeah! I agree - I wanted to talk more with you in college, but your work was kind of awesomely daunting! XD Let me mosey on over to Note you about further contact information, because I think that sounds like fun!
👍: 0 ⏩: 1
Ha! Flattery, you know how to make a man's day
👍: 0 ⏩: 0

I really need to get back into drawing! You always do such beautiful work though, its inspiring!
👍: 0 ⏩: 1
Thanks! Why'd you stop drawing? D:
👍: 0 ⏩: 1
I guess in part I was discouraged by a lot of the other art I came across and then I wanted to take my novel more seriously and work at that, though it is almost done now and all I can think is "I should draw these characters doing X".
👍: 0 ⏩: 0


These step by step progress pictures are always so interesting.
👍: 0 ⏩: 1
I love seeing how other artists work
👍: 0 ⏩: 0

awesomeness! this is really pretty, and inspiring...makes me wanna draw something right now! (:
👍: 0 ⏩: 1
Thanks! ^_^ That's a huge compliment :3
👍: 0 ⏩: 0

Oh, thank you
👍: 0 ⏩: 1

I'll bet; That if i Never EVER cut my hair, in my Whol life, it'd possibly be Longer than that, within mabe 4-5 years, lol. BTW, GREAT WORK!
👍: 0 ⏩: 0

ACK! You make it look so easy! 

👍: 0 ⏩: 0

Well if you're ever near Houston, I'd love to lend you my Mac with my wacom cintiq12wx. I have the new OS and quicktime records the screen as you work. I'd LOVE to watch how you do this live. My students would especially love it.
Think you could ever do something like that and post it? Maybe my students could watch you live via video conference.  (Smile)")
👍: 0 ⏩: 1
Mmmm, Cintiq!! I want to try one of those like burning!
Actually, I've been looking into livestream.com to do just that (because livestream drawing looks like so much fun) but I'm still having problems with finding a desktop-recording program that gives good resolution. I've tried manycam, but it's really fuzzy.
Since I draw on paper rather than digitally anyway, I'd most like to get my hands on a webcam and stream my drawing that way. But I have an iMac with the camera built in up top, and there's no way I can set it/myself up to record a drawing-in-progress.
")
👍: 0 ⏩: 1
We have two Intuos2's in my classroom. I haven't quite figured how I'll get them in the curriculum when there's 30 kids in the class.
I will say, though, that the Intuos has a more natural feel to me... The Cintiq has a glass surface, so the pen tip slides across the surface much faster than pencil to paper. The Intuos has a little resistance.
Anyways... it's a trade off I'm willing to deal with so I can watch what I'm doing on the screen.
I have a mac also, btw. I was JUST about to buy a screen recorder when I updated to Snow Leopard. When I did, it came with the new Quicktime- which does a really great screen recording. So... I plan to do some video for my kids.
Hey- do you have some Artist's Trading Cards??
👍: 0 ⏩: 1
Oooh I was looking into those artist trading cards about a year ago, but never went ahead to get the cards. Mostly because I haven't been going to conventions - I'd do some if I was planning to go sometime soon.
I'll have to look into the quicktime screen recording. The problem I initially ran into with livestream.com (that prompted me to look into manycam) was that it didn't offer me the option to switch to a screen cam... and I couldn't find my mac's built-in screen recorder. I'll have to check out quicktime this weekend and see what I can get into.
Also, I remember hearing from one of the the pro artists' DA journals that you can get a "textured" cintiq surface so it feels more like drawing on paper. I can't remember who said it... I'm thinking it was *Inkthinker , months ago, but I'm not sure...
👍: 0 ⏩: 1
Thanks! I just added *Inkthinker and can't wait to collaborate with them.
Good luck with the screen recording. I hope it works out so I can learn a little from the masta!
👍: 0 ⏩: 0

This is very good! The process is understandable and the description is wonderfully detailed! I especially like how you listed out the medium used for each step! It's great to see how artists lay out their work!
Did you just design this character as you drew her or is she an established character? In any case, you did an amazing job!
👍: 0 ⏩: 1
Thank you!
👍: 0 ⏩: 0

Are Yew serious? *gets shot*
Anyway, this is awesome. You make drawing look so effortless!!!
I like Yew and her colors. :3 She's really cute.
👍: 0 ⏩: 1
Hehe, yeah, I've already made myself lol by chatting about Yew. A lot of "Yew is" that makes me think of lolcats. Good thing it's not as in-your-face in type as it would be if I was speaking it out loud.
👍: 0 ⏩: 0
| Next =>