HOME | DD
 sican —
Noise Reduction Tutorial
by-nc-nd
sican —
Noise Reduction Tutorial
by-nc-nd
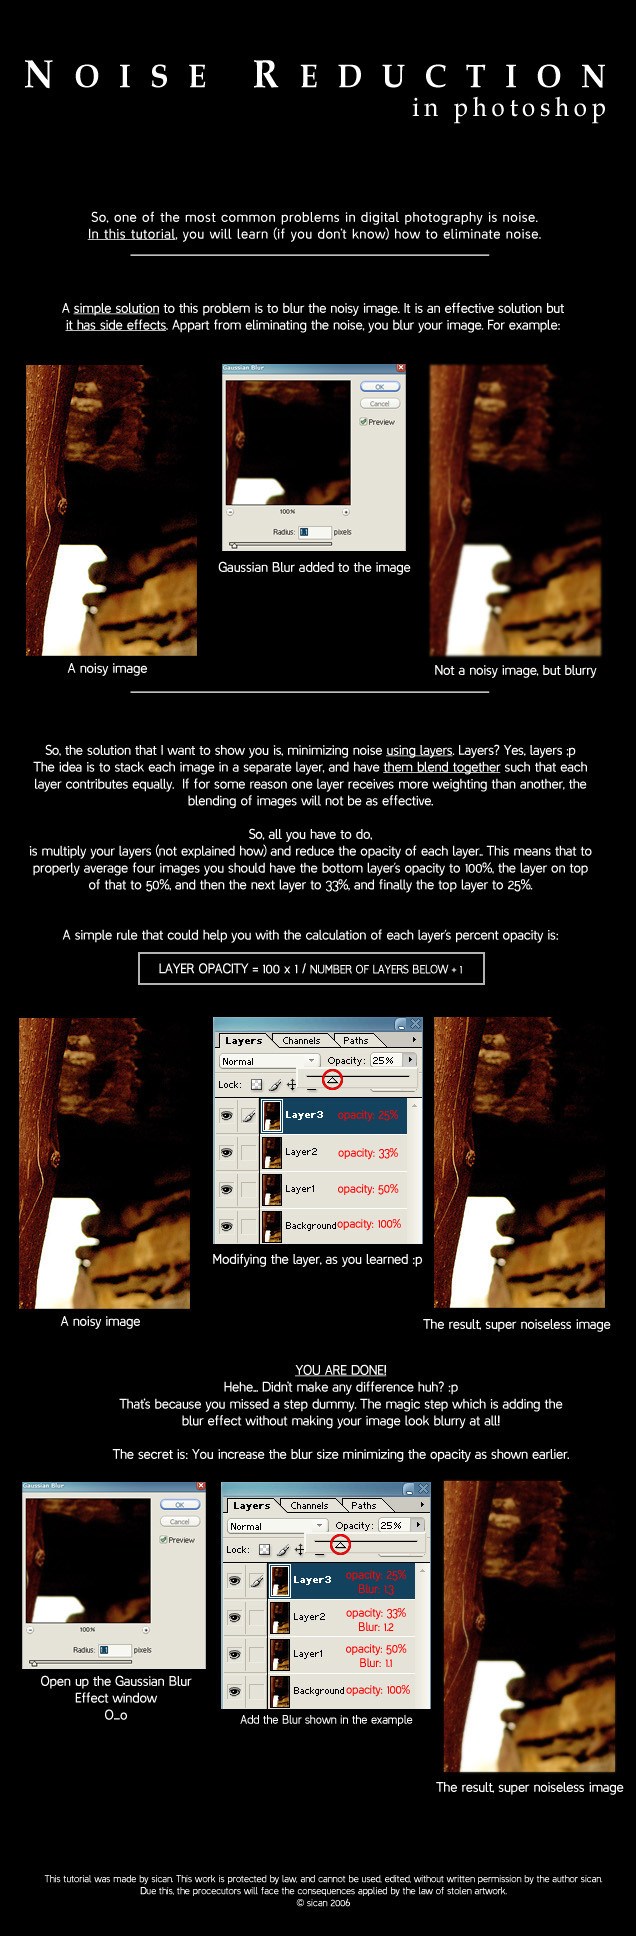
Published: 2006-04-22 20:08:47 +0000 UTC; Views: 32641; Favourites: 357; Downloads: 5659
Redirect to original
Description
First tutorial
")
Hope it is helpful!
NOTE:
The amount of blur, should be determined by your eyes (the blur shown in the tutorial it's just for information)
You should take in consideration:
**The size of the image
**The amount of noise of the image
to determine the amount of blur and the techniques that you will use.
-------
Time taken: 2 hours
Tools: Photoshop
Picture used: [link]
Links: [link]
-------
Check out the final image here: [link]
MANY THANKS TO ^bleedsopretty for adding it and to ^oibyrd for suggesting it!


******************************************************
EDIT:
RESUBMISSION 23/05/07 TO THE CORRECT CATEGORY
******************************************************
• DISCLAIMER
The works is protected by law, and cannot be used, edited, without written permission by the author ~sican . Due this, the procecutors will face the consequences applied by the law of stolen artwork.
© ~sican
Related content


Comments: 142

Yes! I shoot a lot of music, this'll be cheaper than all that expensive noise reduction sortware.
👍: 0 ⏩: 1
 (Smile)")

Either I am doing something VERY wrong, or this tutorial leaves me with a very blurry image. Ugh.
👍: 0 ⏩: 1
I have cs2 and just recently got a cs4, but have not installed it. Maybe it was the wrong version?
👍: 0 ⏩: 1

it doesn't matter. Just go to Filter>Noise>Reduce Noise
👍: 0 ⏩: 0


it still looks a bit blurry. if you want to sharpen it, duplicate the layer (after blending all the different layers in this tut) then add a high pass filter to it then set it to overlay
👍: 0 ⏩: 1
yeah... the techniques and technological advancements have changed a lot since 2006! LOL!
👍: 0 ⏩: 1


just letting you know i featured this here [link]
")
👍: 0 ⏩: 0

This is wonderful, I've been really needing something like this. your method is genius and simple.
Thanks a bunch, I think you've saved my life
")
👍: 0 ⏩: 1


you could have used a different noisy picture... cuz i dont see any noise on the noisy picture youre saying
👍: 0 ⏩: 0

It's an easy to follow and very helpful tutorial.
Thanks a lot, sican . . .
I guess that we can also use Filter/Sharpen/Unsharp Mask if we're looking for sharper photos after the noise reduction.
👍: 0 ⏩: 0

I don't catch it. What I do after duplicating the bottom layer three times and lowering their opacity? Because after that I see the blurred image and nothin else. This is what I do:
1. Add little blur to the background layer
2. Duplicate it and on new layer lower the opacity to 50%
3. Duplicate the second layer and lower the opacity of the new one to 33%
4. Duplicate the third layer and lower the opacity of the new one to 25%.
Now I have blurred image. What I do wrong?
👍: 0 ⏩: 1
"You should take in consideration:
**The size of the image
**The amount of noise of the image
to determine the amount of blur and the techniques that you will use."
Maybe it's blurred - out of focus from the beginning...
Adding extra blur, while you're editing, will blur the image even more
Also try erasing parts of the blurred layers where the subject-focus is,
and leave the blurred layers untouched where the noise problem is
Hope it helps!
👍: 0 ⏩: 0


Sorry to tell but i can't see the meaning of this. the result is nothing but 'blur'. you could achieve the same result by simply blurring the original layer without making new layers. Plus i cant call this as 'noise reduction'. for example there is a specific filter for this which keeps the image sharp enough. if i used your method i would also add a layer mask on the top layer so i could hide the unnecessary blur.
and finally, i think your image doesn't seem to need any noise reduction at all
👍: 0 ⏩: 1
Eneshei provlima...
This tutorial was written a year and a half ago when no noise reduction filters where available,
anw thanks for the comment
👍: 0 ⏩: 0

It really trouble when every time fix the pics taken frm digital camera...
Anyway, through d idea...it's work better. Well done~~
👍: 0 ⏩: 0

very weird. plus you got a DD.
very weird.
i gotta tell you, i really don't see it as a great way to fix noise.
so many steps and crummy results.
better to get a mask out of the find edges filter and work on that
with the blur filter and then to simply lower the opacity.
file size alone should make you avoid your system.
anyways... a well layed out tutorial i know how hard it is to write one.
drop by the club
jaako
👍: 0 ⏩: 1

the DD was given because I suggested it after trying it out and finding it helpful 
👍: 0 ⏩: 1
have you tried it on a high resolution image?
i guess i should shut up and just make
a 2nd noise reduction tutorial for the club
instead of just complaining.
anyways... to each his own
p.s. do drop by the club, many hours or hard
work has been put into it... you might find it helpfull.

👍: 0 ⏩: 1
I will drop by tonight and hopefully find some helpful hints...which I am always very happy and grateful to find  (Wink)")
👍: 0 ⏩: 0

Hello there! Faved this a few days ago, thinking it might come in handy....and it did! I just used it on my most recent deviation, [link] Just a scan job, but the sketchpaper was so rough, and it noisied up the lineart, you know? So, thanks much!

👍: 0 ⏩: 1

Then you should wear some glasses
Kidding
There is difference if you look at it carefuly

👍: 0 ⏩: 1

I seriously can't see any difference
👍: 0 ⏩: 0

That was rude. You called me dummy and you didn't even put the comma before the word, dummy.
👍: 0 ⏩: 1
Haha, lol!
Thanks for mentioning it!
👍: 0 ⏩: 0

Well, I certainly can see the difference!!
Great and simple little tip
👍: 0 ⏩: 1

will definitely put this to good use. thanks for making it!
👍: 0 ⏩: 1
No problem!
Glad it is useful!
👍: 0 ⏩: 0

Really excellent tutorial: I'm very sure that I'm going to need it later on.
👍: 0 ⏩: 1

please show the initial photograph with noise for reference to see the potential of this technique.. thanks you
👍: 0 ⏩: 1
huh?
I don't have it, sry!
When I usually edit the pictures and the result is better that the unedited, I replace them...
👍: 0 ⏩: 0

I don't see the difference...but...erm
...it seems helpfull for those who are not familiar with Photoshop and I see they are a lot.
Well erm...congrats on the DD.
👍: 0 ⏩: 1
Thanks!
And there is some difference, anyway..
👍: 0 ⏩: 0


just the tutorial i need for the project i'm doing! O___O
👍: 0 ⏩: 1
| Next =>