HOME | DD
 sican —
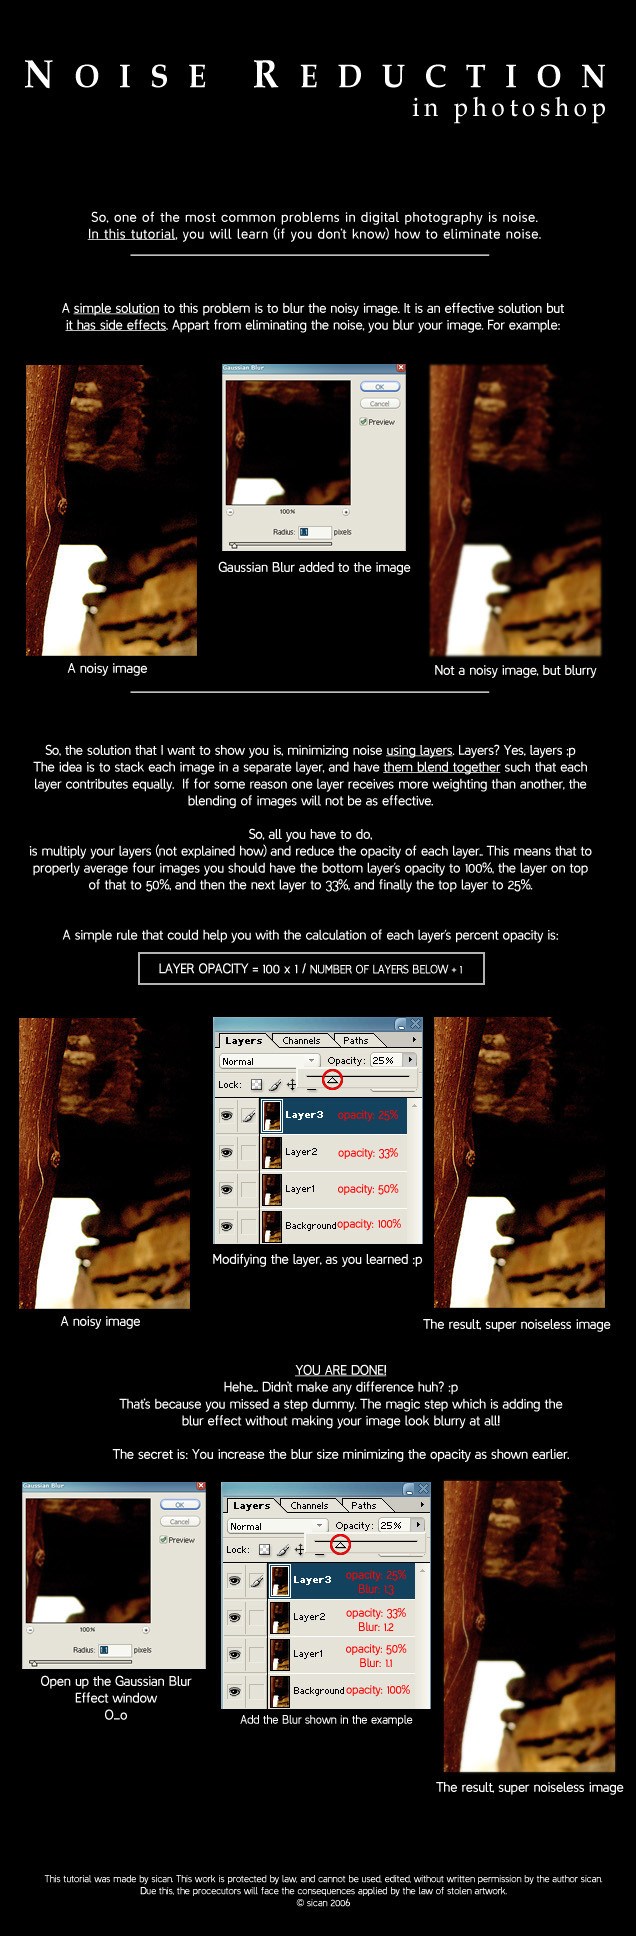
Noise Reduction Tutorial
by-nc-nd
sican —
Noise Reduction Tutorial
by-nc-nd
Published: 2006-04-22 20:08:47 +0000 UTC; Views: 32619; Favourites: 357; Downloads: 5659
Redirect to original
Description
First tutorial
")
Hope it is helpful!
NOTE:
The amount of blur, should be determined by your eyes (the blur shown in the tutorial it's just for information)
You should take in consideration:
**The size of the image
**The amount of noise of the image
to determine the amount of blur and the techniques that you will use.
-------
Time taken: 2 hours
Tools: Photoshop
Picture used: [link]
Links: [link]
-------
Check out the final image here: [link]
MANY THANKS TO ^bleedsopretty for adding it and to ^oibyrd for suggesting it!


******************************************************
EDIT:
RESUBMISSION 23/05/07 TO THE CORRECT CATEGORY
******************************************************
• DISCLAIMER
The works is protected by law, and cannot be used, edited, without written permission by the author ~sican . Due this, the procecutors will face the consequences applied by the law of stolen artwork.
© ~sican
Related content


Comments: 142

I used the formula as it is described in the deviation. You can have the GIMP xcf source file if you like, or a Photoshop PSD.
👍: 0 ⏩: 1
The noise is barely noticeable in the original, but the blur is noticable in the 'finished' product. As soon as you get more noise, this breaks down completely since you can't selectively remove noise this way. Using this technique, you're only reducing noise by very little while at the same time losing equally much signal, so the more noise you need to remove, the more you muddle the signal. Dedicated anti-noise solutions or even despeckling the Luminance and Chroma layers separately are superior to this.
I have a before/after comparison of a rather noisy image (ISO 800, concert photography) in my journal if you're interested.
👍: 0 ⏩: 1

I have to disagree (not totally)...
If you use more techniques with this one, noise can be reduced with less side effects...
I don't say that the side effects can be totally removed, which is what you are telling me, but there can't be any action without a reaction...
👍: 0 ⏩: 1
A nonselective Gaussian blur will affect signal and noise equally. Usually noise is either chromatic (in the color channels) or luminance noise (in the lightness component). Just blurring all components equally is exactly that - a blur, effectively degrading image quality. When trying to reduce noise, you want to keep signal (e.g. sharpness), which means you want to keep edges (= contrast). Thus you ought to exclude high frequency parts from the noise reduction, which is what a selective Gaussian blur does - you overlay the image with a copy and mask the original edges. An improvement over this technique is doing so seperately for each Y, Cb and Cr (Luma, Chroma diffs) or YUV using a noise profile that fits your source image. You should take into account where noise is strongest (Luma or Chroma, and which color) and adapt your technique to that. So if you had much Luma noise, and a little noise in Cb, you'd selectively blur Luma more than Cb. Lastly, be aware that the human eye weighs the green and red channels far more than the blue channel, so don't bother too much about keeping the signal in the blue channel.
👍: 0 ⏩: 1
Hm nice...
If you show this to most people won't get it..
So I tried to show a quick noise reduction that all ppl can apply without needing expert gnosis...
👍: 0 ⏩: 1
My point is, it can't be called a "noise reduction" if it reduces both noise and signal equally. Doesn't Photoshop have a simple "Selective Gaussian Blur" filter?
👍: 0 ⏩: 0

Thats really good info.
I don't do much phtography at the mo though, but if I decide to take it up again I'll keep this in mind.
👍: 0 ⏩: 1

nice tutorial! thx a lot for sharing your tip

👍: 0 ⏩: 1


 (Smile)")

awsome tutorial!
very nice work!
and grats on dialy deviation
👍: 0 ⏩: 1

Seems easy, I'll keep that in mind. Too bad I can't test it: I don't have noisy images
And hey, congratulations on Daily Deviation!

👍: 0 ⏩: 1
Hey, this method works for oversharpenned images too!
👍: 0 ⏩: 1

 (Wink)")

Interesting, seems like it's going to be helpful.
👍: 0 ⏩: 1

I shall definitely be trying this out on my photos. 
👍: 0 ⏩: 1


OOoOoO...must remember this in the future...good tutorial..simple and clear <3
👍: 0 ⏩: 1

Great idea.

👍: 0 ⏩: 1

thanks for that tutorial. Now I will keep it in mind. Congrats on the DD.
👍: 0 ⏩: 1


This sounds convincingly good. I'll try it out tommorow. Pretty nice, I think this'll work.
👍: 0 ⏩: 1

I might find this useful, as i find when i take the larger size images with my camera, the image tends to be a bit noisy, and i couldnt figure out how to fix it
Thanks
")
👍: 0 ⏩: 1
Hehe, no problem, glad it was usefull!
👍: 0 ⏩: 0
<= Prev |