HOME | DD
 Blackout-Comix — Celestia WIP How-To Tutorial Part 1
Published: 2012-10-02 04:06:34 +0000 UTC; Views: 12663; Favourites: 376; Downloads: 173
Redirect to original
Description
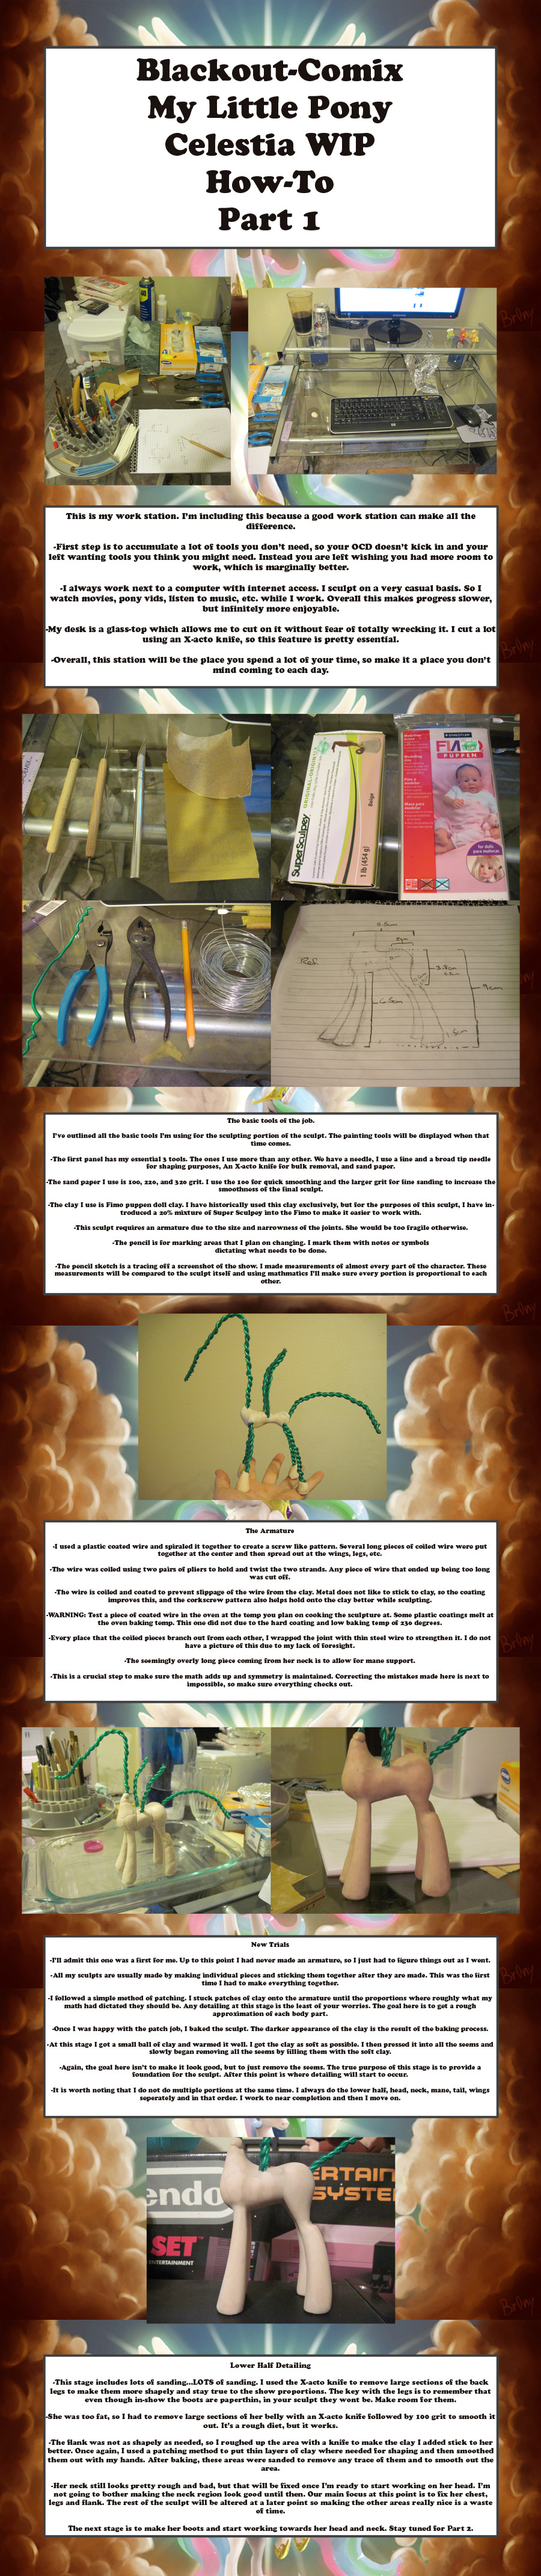
Today I have the first part of my upcoming Celestia sculpt. She is nowhere near done, but she's coming along nicely.I have been asked repeatedly to make a tutorial and since she's going to be my most involved and complicated sculpture to date, I figured it would be the perfect time to just get everything out. These multi-part WIP submissions should include everything I do when sculpting. I do not know how many parts this will end up being, but I'll keep making them until she's done.
If you have any questions feel free to ask.
Part 2: [link]
My Little Pony (C) Hasbro
Sculpture by
Related content


Comments: 67

so you add stiff wire to the center then spiral plastic coated wire around it?
👍: 0 ⏩: 0

Do you mind if i aske you a couple questions about this guide? Im just confused about a couple things
👍: 0 ⏩: 0

You do put the sculpture in the oven,right? 
👍: 0 ⏩: 1

I do.
Feel free to ask any question you want. I'd be happy to help.
 (Smile)")
👍: 0 ⏩: 1
Thanks! :3 One my question, when you're gonna paint the sculpture, do you paint it before or after it's been in the oven? xP
👍: 0 ⏩: 1
Definitely after. The oven will dry the paint to the point of cracking the paint job.
👍: 0 ⏩: 1
so after,okay,thanks! ^^
👍: 0 ⏩: 0

VERY GOOD, Thank you...this helps a lot, I'm creative and artistic, so I will probably REALLY enjoy the detailing and painting part C:
👍: 0 ⏩: 0

I'm not a fan of MLP, nor do I plan on making one soon.. but this is really helpful. C:
👍: 0 ⏩: 1
No problem. I made this for fans and non-fans alike.
👍: 0 ⏩: 0

thank you for this tutorial, im on a mission to create a crysalis clay thing, like this
👍: 0 ⏩: 0

does the wire have to be plastic coated? if it isn't will it affect baking?
👍: 0 ⏩: 1
The plastic coat only helps the clay adhere to the wire. Metal doesn't like to stick to clay, but plastic loves to cling to it.
If you don't have any trouble getting the clay to adhere to your armature, then feel free to use non-coated wire.
Either way it won't affect baking.
👍: 0 ⏩: 1

Can you bake the clay that many times?
On the instructions to Sculpey it says that you should NOT overbake it
👍: 0 ⏩: 1
Overbake and rebake are two different things. Regardless, I don't use sculpey for my sculpts. Fimo can be rebaked as many times as you like without consequence. The Celestia has about a 15% mixture of Super Sculpey to 85% Fimo. It still retains the properties of FIMO, but it's a bit easier to work with. I prefer 100% FIMO usually. Super Sculpey can be rebaked, but it's more sensitive to rebaking and you'll have to be pretty careful.
👍: 0 ⏩: 1
My local store only sells soft Fimo, and i was wondering if i could use that as well?
perhaps it will be more like your mixture?
And thank you so much for making this, and for answering my question
👍: 0 ⏩: 1
I think so, but I'm not sure. I've never used Fimo soft. It may be like this mixture, but there's only one way to really know. You'll have to experiment. Try making a few small pieces and bake them again and again to see what happens. It's what I did initially and the knowledge is worth the investment of clay.
👍: 0 ⏩: 1

Thank you very much for this ;_;
I will try with paper clay Hope it works
👍: 0 ⏩: 0

I love this tutorial, I think it's going to be really helpful for me.
Just one problem for me: I can't seem to sand any of my baked sculptures. I usually use FiMO Soft clay or Scuper Sculpey Living Doll clay.
I'm not sure if I have to get myself a "stronger" type of sandpaper...
Also, when you cut the spiral for her horn on Part 6 of this tutorial, was the clay baked?
How do you cut already baked clay?
Tracing the details with pencil, I wish I had thought of that
That's an awesome idea
")
👍: 0 ⏩: 1
The clay was baked when I cut the spiral in the horn. I used an X-acto knife and cut a wedge >
What do you mean you can't sand them?
I'm glad the guide was useful. If you ever need advice, I always try to be available to help.
Best wishes.
👍: 0 ⏩: 1
I don't think I could be able to do that, isn't the clay really solid?
Whenever I use the sandpaper on the sculpture, nothing gets smoother or anything, it doesn't do anything at all to the sculpture.
Thank you!
👍: 0 ⏩: 1
You just have to have a steady hand and a really sharp knife.
You just need the right sandpaper and you have to put muscle into it. The harder the clay is, the harder it is sand, but the better the results are.
If you are having difficulties sanding, try a smaller grit sandpaper that's very very coarse. There's no clay that won't be affected by it and once you've sanded some away, then move to larger grits and smooth it out.
👍: 0 ⏩: 1
I will try it one day, thank you! ^^
What kind of grit sandpaper do you use?
I think mine isn't the right one.
👍: 0 ⏩: 1
I usually start with 220grit, but I've used smaller grit if needed.
👍: 0 ⏩: 1
I tried it, and it worked miracles, thank you!
One itty-bitty last thing though, once you have baked the clay, can you add more clay to the sculpture?
If I bake a pony sculpture with no mane or tail, could I just add them after? Or do I have to bake the entire finished thing at once?
👍: 0 ⏩: 2
Nvm. I see you are using FiMO Soft clay or Scuper Sculpey Living Doll clay.
Honestly I'm not sure about those clays. I've never used them.
What's the baking temp and times for those clays?
👍: 0 ⏩: 1
Super Sculpey Living Doll Clay bakes at 275°F for 15 minutes, and that's the clay I'm currently using.
The FIMO Soft clay always falls apart in the oven, and that bakes at 230°F for 30 minutes. I don't use that clay anymore. Super Sculpey is much easier to work with, in my opinion.
👍: 0 ⏩: 1
If the ease of use is very important to you, then I'd use the Super Sculpey.
I use the Fimo puppen and it's harder to work with than Fimo Soft. It's a pain to work with, but the results are the best I've seen to date. The lower baking temperatures and the composition of the clay make rebaking a non-issue with the Fimo and the sculpts are more durable. Super Sculpey is weaker than baked Fimo by a significant margin.
If easy to manipulate clay is important to your work, then I'd recommend sticking with your Super Sculpey, but the regular Fimo produces stronger, harder, and more durable sculpts and is my preferred clay for that reason.
You should be able to add more clay to the super sculpey, but you'll have to be more careful than Fimo.
Best wishes.
👍: 0 ⏩: 0
It depends on the clay you are using.
The Fimo puppen clay I use can be baked as many times as you want, as long as you let it cool in-between bakings. So yes, I can add clay, bake, sand, add clay, and rebake. That's my secret to getting super detailed and super smooth sculpts.
What clay are you using?
👍: 0 ⏩: 0

I looked at all the tutorial parts. and these are just fantastic! I was actually thinking of making a Princess Luna/Nightmare moon. and this might help. nut I won't be making anymore clay ponys for a while. i'm not even done with my AJ yet. (which s my first pony sculpture)
👍: 0 ⏩: 0

I dont know why but I keep getting DeviantWatch messages from over a month or sometimes even longer ago.
👍: 0 ⏩: 0

So how does mixing the two different clay mixtures together make it easier to work with?
👍: 0 ⏩: 1
The Fimo is very firm and the Super Sculpey is very soft. Mixing the two makes the Fimo softer and easier to work with, but makes the Super Sculpey stronger. The mixture has the positive qualities of both clays.
👍: 0 ⏩: 1
Oh okay! Makes sense now.
👍: 0 ⏩: 0

My question is, won't the clay eventually become overbaked? That happened to me once, maybe I had just bad clay or something but it really got all dried up and eventually cracked..? I only baked it two, maybe 3 times for up to an hour each time.
👍: 0 ⏩: 1
I never had the problem with mine. It is probably the type of clay you are using though, since Fimo doesn't bake longer than 30min. It also has a lower baking temp than most clays.
What type of clay are you using?
👍: 0 ⏩: 1
At the time, I had been using uhm... I believe it was either Sculpey or the store-brand version
👍: 0 ⏩: 1
You'll experience problems during rebaking with Sculpey. Sculpey does not like to be baked more than once. Even Super Sculpey has it's problems. Fimo is the only brand I've used so far that is completely free from the problems of rebaking.
👍: 0 ⏩: 0


Oh wow, I still have the box for my NES, too ... ^^ Sorry, I just got nostalgic! Thanks for sharing your work process! It makes me want to try this out. : )
👍: 0 ⏩: 1
Don't worry about. I'm all about nostalgia. I have about every old system you can imagine. XD
You're very welcome. If you decide to try it out, I'd be more than happy to answer any questions you may have.
👍: 0 ⏩: 0


how do you get the back leg to have the (jointthing?) at the back? The corner at the back of the leg. do you do the thigh first, and add the rest of the leg seperatley, or do the whole leg and shave off the back?
👍: 0 ⏩: 1
I added the patching clay onto the lower leg first and worked up. I got to the hock area and narrowed it up again and worked up from there onto the higher thigh. There really isn't a solid method for adding the clay at that point. I just worked the math of where the hock should be and then put a clay marker on the wire to know where it should be positioned at and then just kept adding patches of clay until I liked how it looked.
👍: 0 ⏩: 0

I feel pretty dumb asking, but is it possible to use an X-acto knife to shave a few centimeters/ect. off baked clay? I ask this only because I'm thinking of getting one and what you create with them are divine.
She's looking fantastic, by the way. Awesome job so far for your first armature.
👍: 0 ⏩: 1
Don't feel dumb. When you're learning, there are no stupid questions.
It is definitely possible to use it to shave off a few centimeters off of baked clay. I use it all the time to do that very thing. The only problem is the area you do this will be pretty rough, so be sure to sand like crazy.
Thank you so much. It really keeps me going to hear people like my work.
If you have any more questions, I'd be happy to answer them.
👍: 0 ⏩: 1
No problem, I can't wait to see how she turns out. Thanks for the advice as well- I'll go pick up one today.
👍: 0 ⏩: 0

Looking fantastic. You're a natural with this armature thing. I'm pleased to see you have to suffer just as much with sanding as I do to get results like in the bottom photo, I was concerned shenanigans were afoot. Especially nice taper on the leg thickness, that is the single hardest part for me. Looking forward to part 2!
👍: 0 ⏩: 1
| Next =>