HOME | DD
 sashas — The Lineart Tutorial

Published: 2006-05-04 08:09:43 +0000 UTC; Views: 461810; Favourites: 10341; Downloads: 23112
Redirect to original
Description
GIMP Translation --> [link]Italian Translation--> [link]
PSD for this tutorial--> [link]
helpful stuff in my gallery---> [link]
the perspective tutorial-->[link]
the penciling tutorial---> [link]
This tutorial explains how to ink, as in where to make your lineart thicker and thinner, which really can be used for traditional and tablet users. Even if you have a tablet, or if you are a traditional inker this has some things that can help you. It has tips for people scanning in their lineart and some brush settings for tablet ppl. Then it goes over the path tool, and how to use it with different brush settings. NO TABLET NEEDED. I haven't tested earlier versions but I think I've used this method since Photoshop 7 and I've used every version of Photoshop since that version, so it should work for most computers.
FAQ:
Is there some way of automatically making the fade extend to the end of the path?
No, not that I know of there's no way to do this. You can always change the minimum width to a heigher percentage, and erase the end to make it tapper off. Or you can just go through the hard way an play around with the fade length in the brush window. Sorry

Why isn't the fade thing working D:
you have not gone into your brush window (F5 or window>brushes), gone to shape dynamic and switched the brush to 'fade' instead of pen pressure under size jitter. If you have not done this, it ain't gonna work. Also, mess with the fade value (the textbox next to the 'control' drop down menu. : )
I make my tutorials for free, but if you enjoy my tutorials and want to donate some funds for gas, art books and such, I would appreciate it. [link]
People who used this tutorial: [link] [link] [link] [link]
Related content


Comments: 657

ahhhh...so u use the pen tool to make ur lineart huh? XD
👍: 0 ⏩: 1

Heheh, well, I uses alot of methods--my tablet, the pentool, or traditional inking. LOL. Still, the pentool gets much better lines than when I actually draw it XD
👍: 0 ⏩: 1
true true...it juz gets annoying since u hav to adjust the paths so much. >.> but it is helpful in making neat lines that my jittery hand cannot create. xD
👍: 0 ⏩: 0

Uwaaah, I was wondering, (Awesome tutorial by the way!)when you try to make the brush all smooth like (How you demostrated the sharp/smooth edges in the custom brush presets or whatever), does it automatically become smooth after you put the settings to which you said?
Or do I have to use the pen and stimulate pressure and then it will become how I desired it to be?
owo;; Sorry about the Q & A.
It's just I did what the tutorial said but no smoothness. XD; -feels like an idiot-
Thanks for the tutorail!
👍: 0 ⏩: 1
Hm, well, if you do not put the simulate pressure thing on it will not show up, I think when you choice the simulate pressure the smoothness should show up.
If it doesn't work, just note me and I'll try to assist ^___^
👍: 0 ⏩: 1
^^ Thanks! ")
Plus I don't know how to use the pen tool without it on freehand. X3;
However I do know how to stroke and stuff.
But thank you again! <33
👍: 0 ⏩: 0

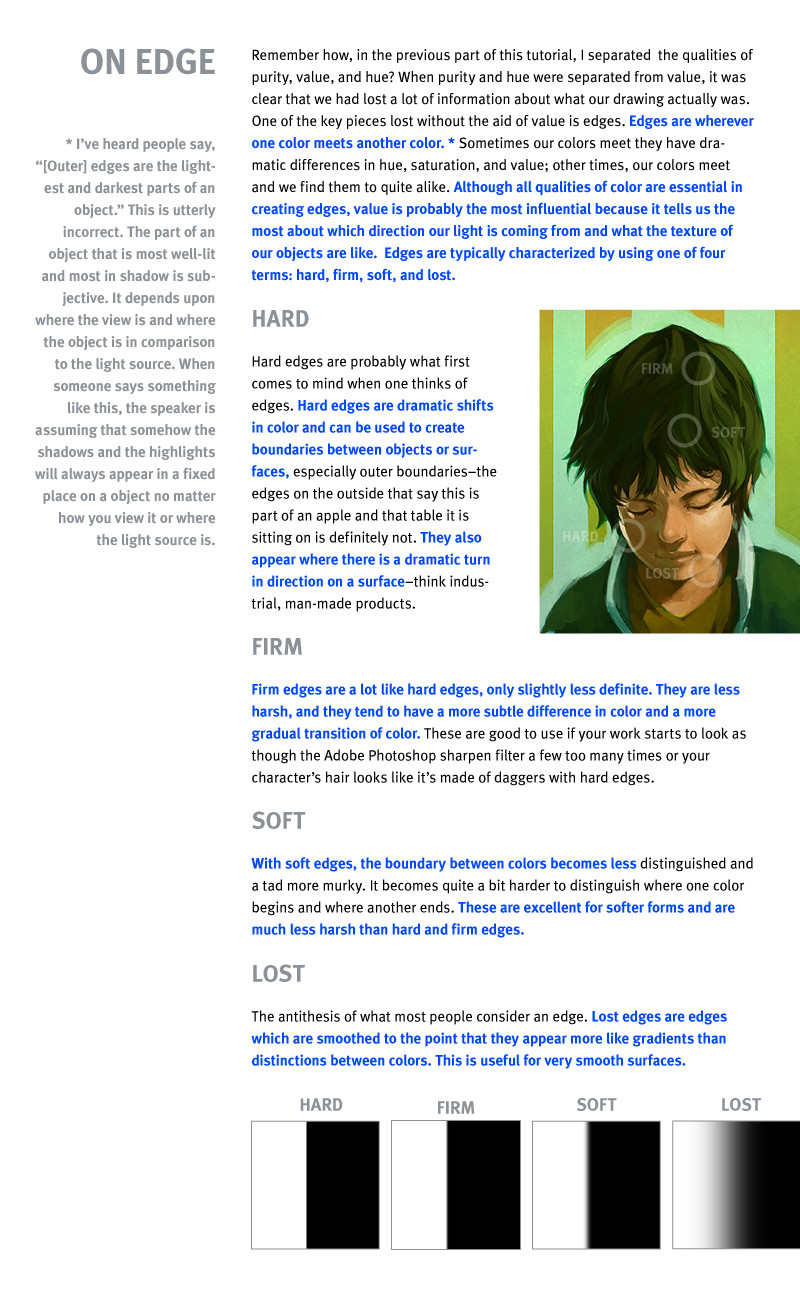
Wonderful tutorial! I love the details about atmospheric blurring and why some light should affect the degree of how dark a line should be.
👍: 0 ⏩: 1
Oh, I'm happy you enjoyed it, and I'm glad you enjoyed the part about atmospheric perspective. I always think it's one thing to just practice something when you draw/ink/whatever but another thing to know why you do it that way
Anyway, much thanks

👍: 0 ⏩: 0

haha! you have an awesome of way of explaining stuff. Great tutorial!
(I advise Inuyasha not to stand infront of a fangirl in pitch black-ness)
👍: 0 ⏩: 1
Well, I'm glad you like the way I explain... I have a weird way I viewing things XD
Very glad you enjoyed the tutorial
👍: 0 ⏩: 0


WOah~~ Thanks you so much for sharing this ^^ I'm gonna have to try it now...
👍: 0 ⏩: 1
Welcome.
Just wondering... how'd it work out for you
")
👍: 0 ⏩: 0

i was determined to ink my art today but i cant figure out how to get the pen thingy right. --;;;
👍: 0 ⏩: 1
Uhm, what is not working with it?
👍: 0 ⏩: 1
haha i dont remember what it was anymore. hehe... it's been a while ^o^
👍: 0 ⏩: 0


Yay!
<3
So going to faves, this helped me so much.
Thank you!!

~~Shirubiichan.
👍: 0 ⏩: 1
Very welcome. I'm glad it helped you :3
👍: 0 ⏩: 0

It looks easy when you do it <3 I hope I can do it too, somehow...
This was really awesome!
👍: 0 ⏩: 1
Sure you can. If I can anybody can~!
Thanks very much
👍: 0 ⏩: 0

Lovely tutorial. Its nice to have a logical explaination for the variation of thickness--I've just kind of been doing it willy-nilly. Sometimes it looks good, sometimes not (though always better than a flat line, in my opinion). Your explaination of light and shadows and distance is really helpful! Thanks!
👍: 0 ⏩: 0
Lovely tutorial. Its nice to have a logical explaination for the variation of thickness--I've just kind of been doing it willy-nilly. Sometimes it looks good, sometimes not (though always better than a flat line, in my opinion). Your explaination of light and shadows and distance is really helpful! Thanks!
👍: 0 ⏩: 1
Thanks very much. Heheh, I'm glad you enjoyed the explaination. I always like to know why I draw in a certain way, and why some things just seem to turn out better than others. But, anywoo, I'm quite pleased you found something helpful in it. Thanks very much for commenting
👍: 0 ⏩: 0

Wow..i can see you put many effort to making this tutorial.But i got a question..why is it that the line i make can't be as black as your tutorial?
👍: 0 ⏩: 1
Hmm, I'm not sure why your lines are not as black... but here are somethings that might help^^ :
1. make sure your inking in pure black not a dark gray
2. make sure the hardness of your brush is set to 0%
3. If your lineart is on a separate layer, use the Hue/Saturations tool (crtl+U) and move the brightness slider all the way down
4. In the brush bar... where you select the size of the brush, choose the largest brush in your set and then set the brush width slider to whatever size you are inking in... it gets rid of the fuzz that maybe making your lineart look gray.
Those are just some options of what you can do... I hope they work. If they don't send me a sample of what it looks like and I see if I can help you out
👍: 0 ⏩: 1
hmm..i think mayb is the problem of the hardness...i think i put 100%.Thanks for the help^^.
👍: 0 ⏩: 1
Oh, no problem. I'm glad I could help
👍: 0 ⏩: 0

Ritsuka! >w< Chu! Very good tut by the way
👍: 0 ⏩: 1

Wow, this is seriously going to help me alot ^_^ It's awesome!
👍: 0 ⏩: 1
Oh, I'm really glad 

👍: 0 ⏩: 1
that would be great ^_^ I'm sketching out a picture as I type (lol) so that will be used, no doubt ^_^.
I wanna enter you contest too O_o but I don't know what to do yet =/
But I have plenty of time ^___^
👍: 0 ⏩: 0

hey! look at this! i was able to do this with the help of this tutorial! YAY! [link]
👍: 0 ⏩: 0

OMFG!!! I can see it!!!!!!!!!!
XD
Ah, Sash, this is no fair.. on one hand, I'm happy because I know most of this stuff already. On the other hand, I'm sad because I know most of this stuff already.... *cries* IT'S NOT HELPING ME ANY!!!!!!!!!!!
*sighs*
Well, I guess we got to plan b; practice and try harder.
*Kyte hates practicing and trying harder*
👍: 0 ⏩: 1
LOL, well, I don't really do much that would be considered revolutionary, I suppose >> I just tend to make my variation in width much more exaggerated than most ^^ so that's why it looks dynamic or whatever you want to call it... There's other stuff, like using line to bring attention to character out and other stuff, but it's only minimal stuff... not really worth mentioning.
I hate practicing and trying harder too... but it seems to work.... when I get around to doing it xD
👍: 0 ⏩: 1
Yeah... I do most of that stuff... naturally... when I'm actually concentrating on my lines. The problem is, I always just do it and never actually think about what I'm doing, so it ends up really plain.... *hates it when she has to focus*
👍: 0 ⏩: 0
uh oh. now i have problem i cant figure out the stroke part. i got the fill part but i dont understand the hardness or spacing part, im not sure where to find in in photoshop. help?
👍: 0 ⏩: 1
Okay, that's an easy fix. Make sure you have the brush tool selected from your toolbar (press B). Just press F5 and the window should appear... On the menu, where you see all of the checkboxes, there should be an option calls Brush Tip Shape. Click it. There you will find the hardness (set it to 100%) and the Spacing(set it to 1%).
Oh, btw, my email is seventh-prodigy@hotmail.com. The new DA layout has moved it to below my DevID
👍: 0 ⏩: 1
unfortunately, for somereason my keyboard doesn't work with this version of photoshop so all those buttons to press to bring up those windows, i can't do. It would be a great help if you made the tutorial more visual so that (dumb) people like me could understand it better. lol. i will upload the new inked thing i did tho. I can't seem to figure out how to make one end of the stroke, not fade. y'know? anyhoo, thanks a lot btw.
👍: 0 ⏩: 1
Oh, okay. I wonder why it doesn't work for you.... It's just easier to use type the keystrokes than the menus so that's why I used them... Here it without the keys but using your mouse:
Make sure you have the brush tool selected from your press the brush tool from the toolbox window. Next, go to Window>Brushes and the window should appear... On the menu, where you see all of the checkboxes, there should be an option calls Brush Tip Shape. Click it. There you will find the hardness (set it to 100%) and the Spacing(set it to 1%). Okay, that should work...
You want the lines not to fade at the ends? When you right click and click stroke path, in the new window that appears, make sure the 'simulate pressure' is unchecked.
👍: 0 ⏩: 1
I tried that. I was trying to figure out how to make one end of the stroke fade, and the other not, like in your tutorial. or did i look at it wrong? lol. im confused! but the new way you describe bringing up the window helps tremendously. thanks.
👍: 0 ⏩: 0
holy f-ing cow!!! I just tried this and it works!! I am not photoshop savvy and it f-ing worked! wicked cool! I love this I cannot express how much I love this tutorial! You f-ing rock!!!!!!!
👍: 0 ⏩: 1
Oh, I'm really happy it worked for you
If you need any help with photoshop, just note me or comment on something, and I'll see if I can help you out, okay?
👍: 0 ⏩: 0
ok, now i have to try this. It usually takes me forever to ink something and it still comes out crappy, i hope this works for me too.
👍: 0 ⏩: 0
<= Prev | | Next =>